Yamaha MT50 Owner's Manual - Page 9
AUX RETURN control, MONITOR SELECT switch, Stereo, POWER indicator, MONITOR/PHONES control - cassette recorder cassettes
 |
View all Yamaha MT50 manuals
Add to My Manuals
Save this manual to your list of manuals |
Page 9 highlights
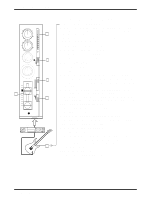
Getting to Know the MT50 5 0 AUX RETURN control: This control sets the level of the AUX RETURN input signal (i.e., the level of the processed signal from an external effects processor) back into the stereo mix. A MONITOR SELECT switch: This switch determines the signal source for the PHONES and the MONITOR OUT. Stereo - This setting selects the L and R signals controlled by the Pan control (the level of these signals is adjusted by the faders). Cue - The signal source is CUE (controlled by the CUE sliders). Use this for overdub recording. Mix - The signal source is the stereo mix and CUE. Use this for punch-in/out recording. B POWER indicator: This indicator lights up when the MT50 is powered-on and ready for use. C MONITOR/PHONES control: This control is used to adjust the PHONES and MONITOR OUT levels. 0 AB C AUX RETURN POWER MONITOR/PHONES ZERO STOP OFF ON MONITOR SELECT STEREO MIX CUE 0 10 MIN SYNC OFF ON PITCH - + MAX 000 MULTITRACK CASSETTE RECORDER D E F G D PITCH slider: This control is used to adjust the tape speed plus or minus 10%. The center position is normal speed (9.5 cm/sec). In general, set this slider to the center position. E dbx switch: "dbx" is a sophisticated noise reduction system that can help you make cleaner-sounding recordings. This switch is used to turn the dbx noise reduction ON and OFF. The switch has three positions: OFF - dbx noise reduction is OFF. ON - dbx noise reduction is ON for all four tracks. SYNC - dbx noise reduction is ON for tracks 1, 2, and 3, but not 4. Use this setting when track 4 is striped with the FSK signal for synchronized operation. Note: If you recorded a tape with dbx noise reduction set to either ON or SYNC, make sure that ON or SYNC is used for playback too. Do not change this setting half way through a recording session. MT50 User's Guide
-
 1
1 -
2
-
3
-
 4
4 -
 5
5 -
 6
6 -
 7
7 -
 8
8 -
 9
9 -
 10
10 -
 11
11 -
 12
12 -
 13
13 -
 14
14 -
15
-
16
-
17
-
18
-
19
-
20
-
21
-
22
-
23
-
24
-
25
-
26
-
27
-
28
-
29
-
30
-
31
-
32
-
33
-
34
-
35
-
36
-
37
-
38
-
39
-
40
-
41
-
42
-
43
-
44
-
45
-
46
-
47
-
48
-
49
-
50
-
51
-
52
-
53
-
54
-
55
-
56
-
57
-
58
-
59
-
60
-
61
-
62
-
63
-
64
-
65
-
66
-
67
-
68
-
69
-
70
-
71
-
72
-
73
-
74
-
75
-
76
-
77
-
78
-
79
-
80
-
81
-
82
-
83
-
84
-
85
-
86
-
87
-
88
-
89
-
90
-
91
-
92
-
93
-
94
-
95
-
96
-
97
-
98
-
99
-
100
-
101
-
102
-
103
-
104
-
105
-
106
-
107
-
108
-
109
-
110
-
111
-
112
-
113
-
114
-
115
-
116
-
117
-
118
-
119
-
120
-
121
-
122
-
123
-
124
-
125
-
126
-
127
-
128
-
129
-
130
-
131
-
132
-
133
-
134
-
135
-
136
-
137
-
138
-
139
-
140
-
141
-
142
-
143
-
144
-
145
-
146
-
147
-
148
-
149
-
150
-
151
-
152
-
153
 |
 |
