Yamaha MW12CX Owners Manual - Page 10
Recording with Cubase AI, Cubase AI Setup - usb
 |
View all Yamaha MW12CX manuals
Add to My Manuals
Save this manual to your list of manuals |
Page 10 highlights
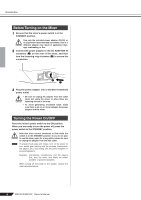
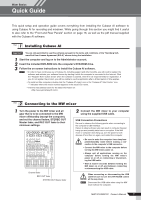
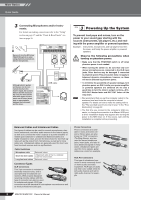
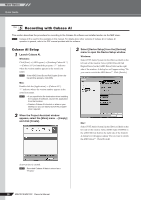
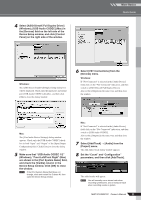
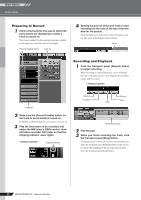
Mixer Basics Quick Guide 5 Step Recording with Cubase AI This section describes the procedure for recording to the Cubase AI software we installed earlier via the MW mixer. NOTE Cubase AI 6 is used for the examples in this manual. For details about other versions of Cubase AI or Cubase AI operation in general, refer to the PDF manual provided with the software. Cubase AI Setup 1 Launch Cubase AI. Windows: Click [Start] → [All Program] → [Steinberg Cubase AI *] → [Cubase AI *] to launch the program. ("*" indicates where the version number appears in the actual icon name.) NOTE If the ASIO Direct Sound Full Duplex Driver dialog window appears, click [OK]. Mac: Double-click the [Application] → [Cubase AI *]. "*" indicates where the version number appears in the actual icon name. NOTE • If you specified a file destination when installing the Cubase AI software, launch the application from that location. • Create a Cubase AI shortcut or alias on your desktop so you can easily launch the program when required. 2 When the Project Assistant window appears, select the [More] menu → [Empty] and click [Create]. 3 Select [Device Setup] from the [Devices] menu to open the Device Setup window. Windows: Select [VST Audio System] in the [Devices] field on the left side of the window. Select [ASIO DirectX Full Duplex Driver] in the [ASIO Driver] field on the right side of the window. A dialog box will appear asking "Do you want to switch the ASIO driver?". Click [Switch]. Mac: Select [VST Audio System] in the [Devices] field on the left side of the window. Select [USB Audio CODEC] in the [ASIO Driver] field on the right side of the window. A dialog box will appear asking "Do you want to switch the ASIO driver?". Click [Switch]. A new project is created. NOTE Recorded Cubase AI data is stored as a "Project." 10 MW12CX/MW12C Owner's Manual
-
 1
1 -
2
-
3
-
4
-
 5
5 -
 6
6 -
 7
7 -
 8
8 -
 9
9 -
 10
10 -
 11
11 -
 12
12 -
 13
13 -
 14
14 -
 15
15 -
16
-
17
-
18
-
19
-
20
-
21
-
22
-
23
-
24
-
25
-
26
-
27
-
28
-
29
-
30
-
31
-
32
-
33
-
34
 |
 |