Yamaha N12 Owners Manual - Page 26
Adjusting the volume level
 |
UPC - 086792859866
View all Yamaha N12 manuals
Add to My Manuals
Save this manual to your list of manuals |
Page 26 highlights
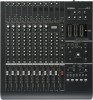
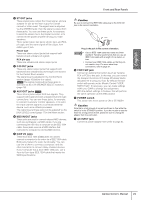
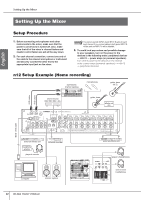
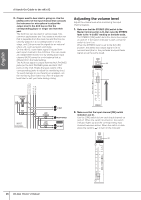
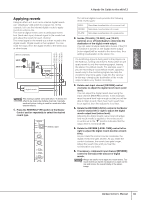
English STEREO BUS L STEREO BUS R AUX BUS L AUX BUS R A Hands-On Guide to the n8/n12 3. Players want to hear what is going on. Use the [AUX] control of the input channel that connects the instrument or microphone to adjust the output level to the AUX bus so that the corresponding player or singer can hear their part. The AUX bus can be used in various ways. Two common applications are 1) to create a monitor mix that is separate from the main mix and that can be used by players in a recording booth or on the stage, and 2) to process the signal via an external effect unit, such as reverb and delay. On the n8/n12, a pre-fader signal is routed from each input channel to the AUX bus. You can create an independent monitor mix by setting each input channel [AUX] control to a mix balance that is different from the fader setting. The AUX bus signal is output from the AUX PHONES jacks (or the AUX PHONES jacks and AUX OUT jacks on the n12). Rotate the level control of the corresponding jacks to adjust the monitoring level. To avoid damage to your hearing or speakers, set the monitoring level rather low, then re-adjust the level later to suit your taste during mixing. Adjusting the volume level Adjust the volume level while monitoring the input channel signals. 1. Make sure that the STEREO [ON] switch in the Master Control section is lit, then raise the STEREO fader to the "0 (0 dB)" marking on the fader scale. The STEREO [ON] switch turns the stereo bus output on and off. If the switch indicator is dark, press the switch to turn it on. When the STEREO fader is set to the 0 (0 dB) position, the stereo bus output signal is at its nominal level (that is, the pre-fader and post-fader signal are at the same level). on CHANNEL FADER AUX INPUT CHANNEL AUX PHONES AUX LEVEL ST OUT AUX PHONES Only AUX OUT 2. Make sure that the input channel [ON] switch indicators are lit. Use the [ON] switch to turn each input channel on and off. When the switch is turned on, the switch indicator lights up and the corresponding input channel becomes active. When the switch is dark, press the switch ( ) to turn on the indicator. on 26 Owner's Manual
-
 1
1 -
2
-
3
-
4
-
5
-
6
-
7
-
8
-
9
-
10
-
11
-
12
-
13
-
14
-
15
-
16
-
17
-
18
-
19
-
20
-
 21
21 -
 22
22 -
 23
23 -
 24
24 -
 25
25 -
 26
26 -
 27
27 -
 28
28 -
 29
29 -
 30
30 -
 31
31 -
32
-
33
-
34
-
35
-
36
-
37
-
38
-
39
-
40
-
41
-
42
-
43
-
44
-
45
-
46
-
47
-
48
-
49
-
50
-
51
-
52
-
53
-
54
-
55
-
56
-
57
-
58
-
59
-
60
-
61
-
62
 |
 |