Yamaha NX-P120 Owners Manual - Page 66
Setting the Speaker Size
 |
UPC - 026229770036
View all Yamaha NX-P120 manuals
Add to My Manuals
Save this manual to your list of manuals |
Page 66 highlights
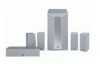
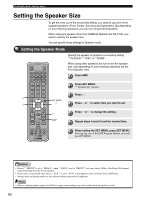
Creating the Best Listening Space Setting the Speaker Size To get the most out of the sound field effects, you need to use all 6 of the supplied speakers (Front, Center, Surround and Subwoofer). But depending on your listening objectives, you can turn off specified speakers. When using any speaker other than YAMAHA Speaker Set NX-P120, you need to specify the speaker size. You can specify these settings in Speaker mode. Setting the Speaker Mode DVR-S120 WB56650 POWER POWER TV AUDIO ANGLE SUBTITLE /DTS SELECT MATRIX 6.1 STEREO REPEAT A-B NIGHT SW CENTER SURR TV CH PRESET TV INPUT A B C D E SHIFT SLEEP PRESET h ON SCREEN MENU CH STATUS TV VOL ENTER SET MENU CH RETURN MUTE TEST VOLUME AMP DVD/CD VCR VIDEO TUNER MOVIE MUSIC SPORTS GAME SET MENU g AMP CINEMA Specify the speaker to produce no sound by setting "* CENTER", "* SUR." or "* BASS". When using other speakers, be sure to set the speaker size, and depending on your listening objectives set the Front Speaker level. Press AMP. Press SET MENU. "* Speaker Set" appears. Press w. Press h or g to select item you want to set. Press q or w to change the setting. Repeat steps 4 and 5 to set the needed item. When exiting the SET MENU, press SET MENU. Pressing any one of the DSP Program buttons also exits the SET MENU. g g Advice • Even if "* FRONT" is set to "SMALL", when "* BASS" is set to "FRONT", low tones below 90 Hz of the Front L/R channel signal will output from the Front Speakers. • If you select a sound field effect when "* SUR." is set to "NON", CinemaStation enters Virtual Cinema DSP mode. • Settings made in Speaker mode are not reflected when connected to headphones. Note • When a sampling digital signal over 48 kHz is input, some settings may not be reflected in the playback sound. 62
-
 1
1 -
2
-
3
-
4
-
5
-
6
-
7
-
8
-
9
-
10
-
11
-
12
-
13
-
14
-
15
-
16
-
17
-
18
-
19
-
20
-
21
-
22
-
23
-
24
-
25
-
26
-
27
-
28
-
29
-
30
-
31
-
32
-
33
-
34
-
35
-
36
-
37
-
38
-
39
-
40
-
41
-
42
-
43
-
44
-
45
-
46
-
47
-
48
-
49
-
50
-
51
-
52
-
53
-
54
-
55
-
56
-
57
-
58
-
59
-
60
-
 61
61 -
 62
62 -
 63
63 -
 64
64 -
 65
65 -
 66
66 -
 67
67 -
 68
68 -
 69
69 -
 70
70 -
 71
71 -
72
-
73
-
74
-
75
-
76
-
77
-
78
-
79
-
80
-
81
-
82
-
83
-
84
-
85
-
86
-
87
-
88
-
89
-
90
-
91
-
92
-
93
-
94
-
95
-
96
-
97
-
98
-
99
-
100
-
101
-
102
-
103
-
104
-
105
-
106
-
107
-
108
-
109
-
110
-
111
-
112
-
113
-
114
 |
 |
