Yamaha P-105 Owner's Manual - Page 6

Introduction, Panel Controls and Terminals - piano

Page 6 highlights

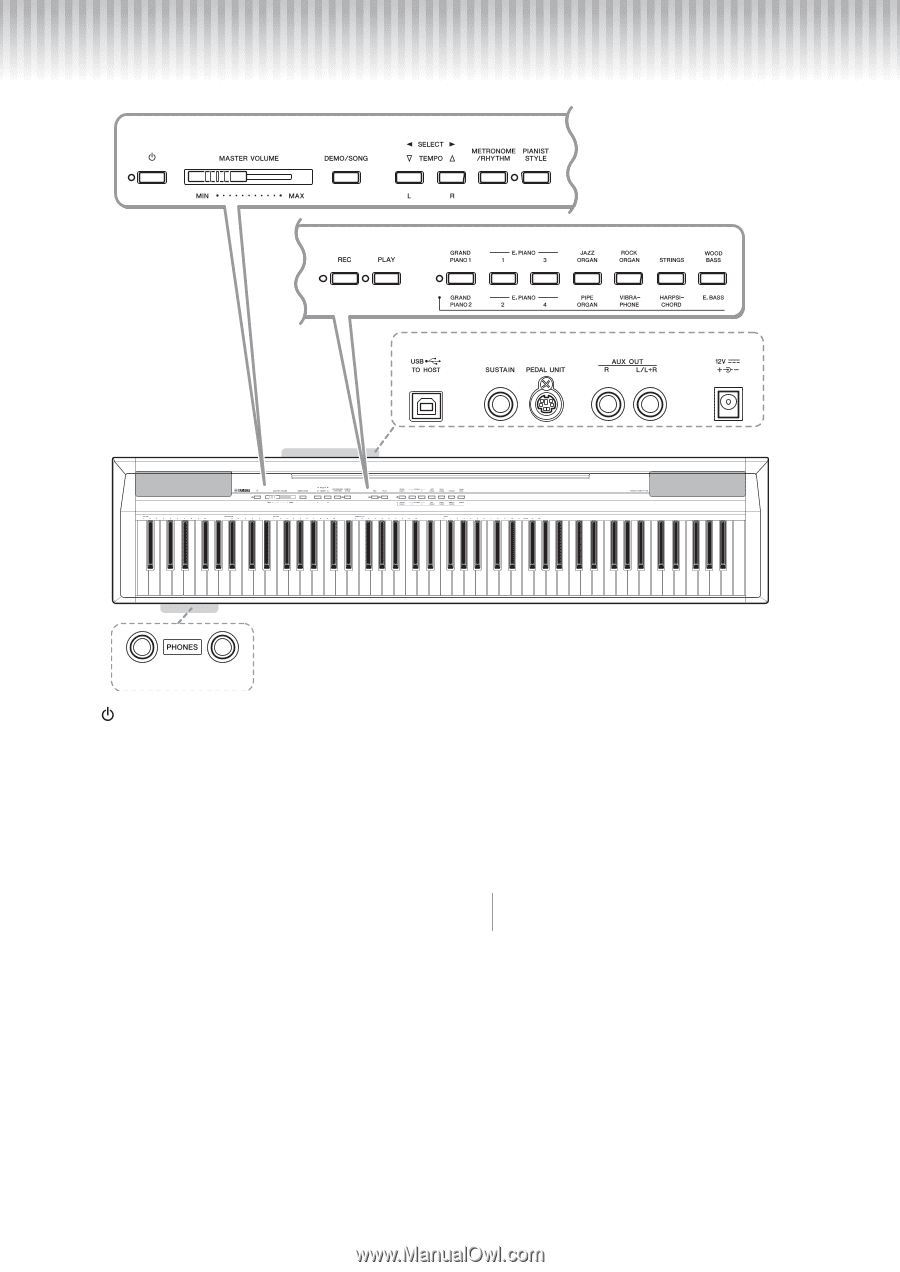
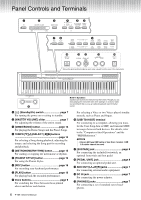
Panel Controls and Terminals Introduction q w e r ty ui o !0 !1 !2 !3 !4 Shows the jacks and terminals as seen when viewed from the rear of the instrument. A-1 C0 C1 C2 C3 C4 C5 C6 C7 Built-in Speakers Speakers are built into the instrument at the bottom. Though you can enjoy playing the instrument even when putting it on a desk or table, we recommend that you use an optional keyboard stand for better !5 sound. q [ ] (Standby/On) switch page 7 For turning the power on or setting to standby. w [MASTER VOLUME] slider page 7 For adjusting the volume of the entire sound. e [DEMO/SONG] button page 14 For playing the Demo Songs and the Preset Songs. r TEMPO [][]/SELECT [][]buttons page 14 For selecting a Song during playback, adjusting the tempo, and selecting the Song part for recording and playback. t [METRONOME/RHYTHM] button..........page 15 For starting or stopping the metronome or rhythm. y [PIANIST STYLE] button page 10 For using the Pianist Styles. u [REC] button page 16 For recording your keyboard performance. i [PLAY] button page 16 For playing back the recorded performance. o Voice buttons page 9 For switching the Voice between those printed above and below each button. For selecting a Voice or two Voices played simultaneously, such as Piano and Organ. !0 [USB TO HOST] terminal For connecting to a computer, allowing you transfer the User Song data as SMF, and transmit MIDI messages between both devices. For details, refer to the "Computer-related Operations" and the "MIDI Reference." NOTICE • Use an AB type USB cable of less than 3 meters. USB 3.0 cables cannot be used. !1 [SUSTAIN] jack page 8 For connecting the included footswitch, an optional footswitch and foot pedal. !2 [PEDAL UNIT] jack page 8 For connecting an optional pedal unit. !3 AUX OUT [L/L+R][R] jacks page 7 For connecting external audio equipment. !4 DC IN jack page 7 For connecting the power adaptor. !5 [PHONES] jacks page 7 For connecting a set of standard stereo headphones. 6 P-105 Owner's Manual

  • 1
  • 2
  • 3
  • 4
  • 5
  • 6
  • 7
  • 8
  • 9
  • 10
  • 11
  • 12
  • 13
  • 14
  • 15
  • 16
  • 17
  • 18
  • 19
  • 20
  • 21
  • 22
  • 23
  • 24
  • 25
  • 26
  • 27
  • 28

P-105
Owner’s Manual
6
Panel Controls and Terminals
q
[
] (Standby/On) switch
.......................
page 7
For turning the power on or setting to standby.
w
[MASTER VOLUME] slider
.....................
page 7
For adjusting the volume of the entire sound.
e
[DEMO/SONG] button
...........................
page 14
For playing the Demo Songs and the Preset Songs.
r
TEMPO [
][
]/SELECT [
][
]buttons
................................................................
page 14
For selecting a Song during playback, adjusting the
tempo, and selecting the Song part for recording
and playback.
t
[METRONOME/RHYTHM] button
..........
page 15
For starting or stopping the metronome or rhythm.
y
[PIANIST STYLE] button
.......................
page 10
For using the Pianist Styles.
u
[REC] button
..........................................
page 16
For recording your keyboard performance.
i
[PLAY] button
........................................
page 16
For playing back the recorded performance.
o
Voice buttons
..........................................
page 9
For switching the Voice between those printed
above and below each button.
For selecting a Voice or two Voices played simulta-
neously, such as Piano and Organ.
!
0
[USB TO HOST] terminal
For connecting to a computer, allowing you trans-
fer the User Song data as SMF, and transmit MIDI
messages between both devices. For details, refer
to the “Computer-related Operations” and the
“MIDI Reference.”
!
1
[SUSTAIN] jack
........................................
page 8
For connecting the included footswitch, an
optional footswitch and foot pedal.
!
2
[PEDAL UNIT] jack
..................................
page 8
For connecting an optional pedal unit.
!
3
AUX OUT [L/L+R][R] jacks
.....................
page 7
For connecting external audio equipment.
!
4
DC IN jack
................................................
page 7
For connecting the power adaptor.
!
5
[PHONES] jacks
......................................
page 7
For connecting a set of standard stereo head-
phones.
!3
!4
!2
!1
!0
!5
q
w
e
r
t
y
u
i
o
C0
C1
C2
C3
C4
C5
C6
C7
A-1
Built-in Speakers
Speakers are built into the instrument at the bottom. Though you can
enjoy playing the instrument even when putting it on a desk or table,
we recommend that you use an optional keyboard stand for better
sound.
Shows the jacks and terminals as seen when viewed from the rear of the instrument.
• Use an AB type USB cable of less than 3 meters. USB
3.0 cables cannot be used.
NOTICE
Introduction