Yamaha P-200 Owner's Manual - Page 31
Balance
 |
View all Yamaha P-200 manuals
Add to My Manuals
Save this manual to your list of manuals |
Page 31 highlights
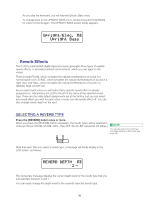
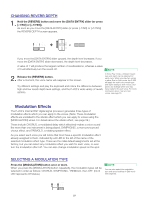
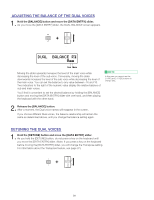
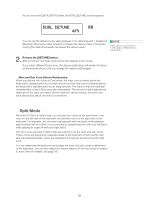
ADJUSTING THE BALANCE OF THE DUAL VOICES 1. Hold the [BALANCE] button and move the [DATA ENTRY] slider. As you move the [DATA ENTRY] slider, the DUAL BALANCE screen appears. CS SPLIT BALANCE + DATA ENTRY DUAL BALANCE $ 0J Sub Main Moving the slider upwards increases the level of the main voice while decreasing the level of the sub voice. Conversely, moving the slider downwards increases the level of the sub voice while decreasing the level of the main voice. You can set the balance to any value between -16 and 15. Two indicators to the right of the numeric value display the relative balance of sub and main voices. You'll find it convenient to set the desired balance by holding the [BALANCE] button and moving the [DATA ENTRY] slider with one hand, and then playing the keyboard with the other hand. NOTE In this case you cannot use the [-1/NO] and [+1/YES] buttons to change data. 2. Release the [BALANCE] button. After a moment, the Dual voice names will reappear in the screen. If you choose different Dual voices, the balance relationship will remain the same as determined above, until you change the balance setting again. DETUNING THE DUAL VOICES 1. Hold the [DETUNE] button and move the [DATA ENTRY] slider. As you hold the [DETUNE] button, do not press a key on the keyboard until you move the [DATA ENTRY] slider. (Note: If you press a key on the keyboard before moving the [DATA ENTRY] slider, you will change the Transpose setting. For information about the Transpose feature, see page 37.) TRANSPOSE DETUNE + CS DATA ENTRY 31
-
 1
1 -
2
-
3
-
4
-
5
-
6
-
7
-
8
-
9
-
10
-
11
-
12
-
13
-
14
-
15
-
16
-
17
-
18
-
19
-
20
-
21
-
22
-
23
-
24
-
25
-
 26
26 -
 27
27 -
 28
28 -
 29
29 -
 30
30 -
 31
31 -
 32
32 -
 33
33 -
 34
34 -
 35
35 -
 36
36 -
37
-
38
-
39
-
40
-
41
-
42
-
43
-
44
-
45
-
46
-
47
-
48
-
49
-
50
-
51
-
52
-
53
-
54
-
55
-
56
-
57
-
58
-
59
-
60
-
61
-
62
-
63
-
64
-
65
-
66
-
67
-
68
-
69
-
70
-
71
-
72
-
73
-
74
-
75
-
76
-
77
-
78
-
79
-
80
-
81
-
82
-
83
-
84
-
85
-
86
-
87
-
88
-
89
-
90
-
91
 |
 |
