Yamaha PSR-1500 Owner's Manual - Page 38
Displaying Music Notation Score, Changing the Notation Display
 |
View all Yamaha PSR-1500 manuals
Add to My Manuals
Save this manual to your list of manuals |
Page 38 highlights
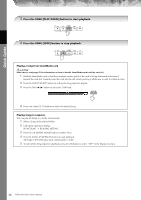
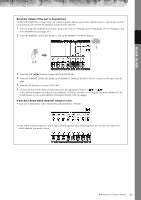
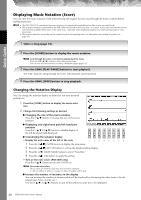
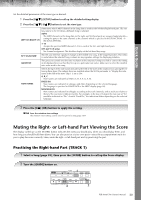
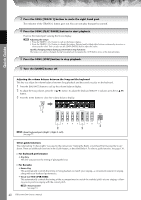
Quick Guide Displaying Music Notation (Score) You can view the music notation of the selected Song. We suggest that you read through the music notation before starting to practice. n • The PSR-3000/1500 can display the music notation of commercially-available music data or your recorded Songs. • The displayed notation is generated by the PSR-3000/1500 based on the Song data. As a result, it may not be exactly the same as commercially available sheet music of the same song-especially when displaying notation of complicated passages or many short notes. • The notation functions cannot be used to create Song data by inputting notes. For information on creating Song data, see page 141. 1 Select a Song (page 35). 2 Press the [SCORE] button to display the music notation. n Look through the entire score before playing back the Song Press the TAB [√] [®] button to select subsequent pages. You can also use the footswitch to select subsequent pages (page 192). 3 Press the SONG [PLAY/PAUSE] button to start playback. The "ball" bounces along through the score, indicating the current position. 4 Press the SONG [STOP] button to stop playback. Changing the Notation Display You can change the notation display as desired to suit your personal preferences. 1 Press the [SCORE] button to display the music nota- tion. 2 Change the following settings as desired. ● Changing the size of the music notation Press the [7π†] button to change the size of the music notation. ● Displaying only right-hand part/left-hand part notation Press the [1π†]/[2π†] button to disable display of the left-hand part/right-hand part. ● Customizing the notation display • Display the note name at the left of the note 1 Press the [5π†] (NOTE) button to display the note name. 2 Press the [8π†] (SET UP) button to call up the detailed setting display. 3 Press the [6†] (NOTE NAME) button to select "Fixed Do." 4 Press the [8π] (OK) button to apply the setting. • Turn on the note colors (PSR-3000 only) Press the [6π†] button to turn the COLOR on. n About the note colors These colors are fixed for each note and cannot be changed. C: red, D: yellow, E: green, F: orange, G: blue, A: purple, and B: gray ● Increase the number of measures in the display You can increase the number of measures that will be displayed by decreasing the other items to be displayed (part, lyrics, chords, etc.). Use the [1π†]-[4π†] buttons to turn off the items you want not to be displayed. 38 PSR-3000/1500 Owner's Manual
-
 1
1 -
2
-
3
-
4
-
5
-
6
-
7
-
8
-
9
-
10
-
11
-
12
-
13
-
14
-
15
-
16
-
17
-
18
-
19
-
20
-
21
-
22
-
23
-
24
-
25
-
26
-
27
-
28
-
29
-
30
-
31
-
32
-
 33
33 -
 34
34 -
 35
35 -
 36
36 -
 37
37 -
 38
38 -
 39
39 -
 40
40 -
 41
41 -
 42
42 -
 43
43 -
44
-
45
-
46
-
47
-
48
-
49
-
50
-
51
-
52
-
53
-
54
-
55
-
56
-
57
-
58
-
59
-
60
-
61
-
62
-
63
-
64
-
65
-
66
-
67
-
68
-
69
-
70
-
71
-
72
-
73
-
74
-
75
-
76
-
77
-
78
-
79
-
80
-
81
-
82
-
83
-
84
-
85
-
86
-
87
-
88
-
89
-
90
-
91
-
92
-
93
-
94
-
95
-
96
-
97
-
98
-
99
-
100
-
101
-
102
-
103
-
104
-
105
-
106
-
107
-
108
-
109
-
110
-
111
-
112
-
113
-
114
-
115
-
116
-
117
-
118
-
119
-
120
-
121
-
122
-
123
-
124
-
125
-
126
-
127
-
128
-
129
-
130
-
131
-
132
-
133
-
134
-
135
-
136
-
137
-
138
-
139
-
140
-
141
-
142
-
143
-
144
-
145
-
146
-
147
-
148
-
149
-
150
-
151
-
152
-
153
-
154
-
155
-
156
-
157
-
158
-
159
-
160
-
161
-
162
-
163
-
164
-
165
-
166
-
167
-
168
-
169
-
170
-
171
-
172
-
173
-
174
-
175
-
176
-
177
-
178
-
179
-
180
-
181
-
182
-
183
-
184
-
185
-
186
-
187
-
188
-
189
-
190
-
191
-
192
-
193
-
194
-
195
-
196
-
197
-
198
-
199
-
200
-
201
-
202
-
203
-
204
-
205
-
206
-
207
-
208
-
209
-
210
-
211
-
212
-
213
-
214
-
215
-
216
-
217
-
218
-
219
-
220
 |
 |
