Yamaha PSR-1500 Owner's Manual - Page 63
File Selection Display Configuration and Basic Operation, Split Point, Registration Memory Bank name
 |
View all Yamaha PSR-1500 manuals
Add to My Manuals
Save this manual to your list of manuals |
Page 63 highlights
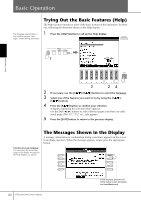
Basic Operation Basic Displays (Main Display and File Selection Display) • LEFT (indicated at the right edge of the display): Voice name currently selected for the LEFT part (page 77). Pressing one of the [F], [G] and [H] buttons calls up the Voice Selection display for each part (page 29). @ Split Point Split Points are specific positions (notes) on the keyboard that divide the keyboard into separate sections. There are two kinds of Split Points: "A", which separates the chord section from the rest of the keyboard, and "L", which divides the left-hand and right-hand sections. # Registration Memory Bank name Displays the currently selected Registration Memory Bank name. Pressing the [J] button calls up the Registration Memory Bank Selection display (page 130). $ Volume Balance Displays the volume balance among the parts. Adjust the volume balance among the parts by using the [1π†]-[8π†] buttons. Setting the Split Point From the Main display, press the [I] button to call up the window for setting the Split Point. Press the [F] (S+L) button then rotate the [DATA ENTRY] dial to set the Split Point (S) and Split Point (L) to the same note number. Press the [H] (S) or [G] (L) button then rotate the [DATA ENTRY] dial to set the Split Point (S) or the Split Point (L) to the desired note number independently. File Selection Display Configuration and Basic Operation The File Selection display appears when you press one of the buttons shown below. From here you can select Voices, Styles, and other data. VOICE category selection buttons SONG SELECT button REGIST. BANK selection button PSR-3000/1500 Owner's Manual 63
-
 1
1 -
2
-
3
-
4
-
5
-
6
-
7
-
8
-
9
-
10
-
11
-
12
-
13
-
14
-
15
-
16
-
17
-
18
-
19
-
20
-
21
-
22
-
23
-
24
-
25
-
26
-
27
-
28
-
29
-
30
-
31
-
32
-
33
-
34
-
35
-
36
-
37
-
38
-
39
-
40
-
41
-
42
-
43
-
44
-
45
-
46
-
47
-
48
-
49
-
50
-
51
-
52
-
53
-
54
-
55
-
56
-
57
-
 58
58 -
 59
59 -
 60
60 -
 61
61 -
 62
62 -
 63
63 -
 64
64 -
 65
65 -
 66
66 -
 67
67 -
 68
68 -
69
-
70
-
71
-
72
-
73
-
74
-
75
-
76
-
77
-
78
-
79
-
80
-
81
-
82
-
83
-
84
-
85
-
86
-
87
-
88
-
89
-
90
-
91
-
92
-
93
-
94
-
95
-
96
-
97
-
98
-
99
-
100
-
101
-
102
-
103
-
104
-
105
-
106
-
107
-
108
-
109
-
110
-
111
-
112
-
113
-
114
-
115
-
116
-
117
-
118
-
119
-
120
-
121
-
122
-
123
-
124
-
125
-
126
-
127
-
128
-
129
-
130
-
131
-
132
-
133
-
134
-
135
-
136
-
137
-
138
-
139
-
140
-
141
-
142
-
143
-
144
-
145
-
146
-
147
-
148
-
149
-
150
-
151
-
152
-
153
-
154
-
155
-
156
-
157
-
158
-
159
-
160
-
161
-
162
-
163
-
164
-
165
-
166
-
167
-
168
-
169
-
170
-
171
-
172
-
173
-
174
-
175
-
176
-
177
-
178
-
179
-
180
-
181
-
182
-
183
-
184
-
185
-
186
-
187
-
188
-
189
-
190
-
191
-
192
-
193
-
194
-
195
-
196
-
197
-
198
-
199
-
200
-
201
-
202
-
203
-
204
-
205
-
206
-
207
-
208
-
209
-
210
-
211
-
212
-
213
-
214
-
215
-
216
-
217
-
218
-
219
-
220
 |
 |
