Yamaha PSR-530 Owner's Manual - Page 46
Adjusting the Harmony Volume
 |
View all Yamaha PSR-530 manuals
Add to My Manuals
Save this manual to your list of manuals |
Page 46 highlights
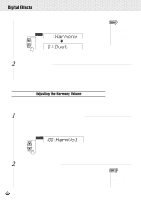
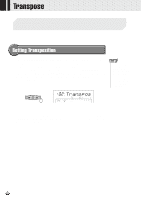
,,QQ,,QQDigi,,QQtal Ef,,QQfects,,QQ,,QQ,,QQ,,QQ,,QQ,,QQ,,QQ,,QQ,,QQ,,QQ,,QQ,,QQ Then use the SUB MENU [v] and [w] buttons to select "Harmony". After a few seconds the name of the currently selected HARMONY type will appear on top line of the display. Harmony 01 Duet • You can also jump directly to the DIGITAL EFFECT HARMONY TYPE function by pressing and holding the [HARMONY] button for a few seconds. 2 Select a Harmony Type Use the [-] and [+] buttons, number buttons, or data dial to select the desired HARMONY type (the name of the selected HARMONY type will appear on the top line of the display). Adjusting the Harmony Volume The volume of the harmony sound in relation to the keyboard sound can be adjusted for HARMONY types 1 through 10 as follows (HARMONY types 11 through 22 are not affected): 1 Select the Digital Effect "HarmVol" Function Use the MENU [v] and [w] buttons to move the triangular indicator in the display next to "DIGITAL EFFECT", then use the SUB MENU [v] and [w] buttons to select "HarmVol". The current harmony volume setting will appear to the left of "HarmVol" on the display. 100 HarmVol 2 Adjust the Harmony Volume Use the [-] and [+] buttons, number buttons, or data dial to adjust the harmony volume as required. The range is from "0" to "127" - "0" is minimum (no sound) and "127" is maximum volume. • When the Voice Set function is ON (page 85), the Harmony Volume may change according to the selected R1 panel voice. 44
-
 1
1 -
2
-
3
-
4
-
5
-
6
-
7
-
8
-
9
-
10
-
11
-
12
-
13
-
14
-
15
-
16
-
17
-
18
-
19
-
20
-
21
-
22
-
23
-
24
-
25
-
26
-
27
-
28
-
29
-
30
-
31
-
32
-
33
-
34
-
35
-
36
-
37
-
38
-
39
-
40
-
 41
41 -
 42
42 -
 43
43 -
 44
44 -
 45
45 -
 46
46 -
 47
47 -
 48
48 -
 49
49 -
 50
50 -
 51
51 -
52
-
53
-
54
-
55
-
56
-
57
-
58
-
59
-
60
-
61
-
62
-
63
-
64
-
65
-
66
-
67
-
68
-
69
-
70
-
71
-
72
-
73
-
74
-
75
-
76
-
77
-
78
-
79
-
80
-
81
-
82
-
83
-
84
-
85
-
86
-
87
-
88
-
89
-
90
-
91
-
92
-
93
-
94
-
95
-
96
-
97
-
98
-
99
-
100
-
101
-
102
-
103
-
104
-
105
-
106
-
107
-
108
-
109
-
110
-
111
-
112
-
113
-
114
-
115
-
116
-
117
-
118
-
119
-
120
-
121
-
122
-
123
-
124
-
125
-
126
-
127
-
128
-
129
-
130
 |
 |
