Yamaha PSR-9000 Owner's Manual - Page 1
Yamaha PSR-9000 Manual
 |
View all Yamaha PSR-9000 manuals
Add to My Manuals
Save this manual to your list of manuals |
Page 1 highlights
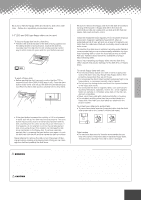
Make sure that your local AC mains voltage matches the voltage specified on the name plate on the bottom panel. In some areas a voltage selector may be provided on the rear panel of the PSR-9000 near the power cord. Make sure that the voltage selector is set for the voltage in your area. The voltage selector is set at 240V when the unit is initially shipped. To change the setting use a slotted ("minus") screwdriver to rotate the selector dial so that the correct voltage appears next to the pointer on the panel. Stellen Sie sicher, daß Ihre Netzstromversorgung mit der auf dem Etikett auf der Unterseite übereinstimmt. In manchen Fällen ist ein Spannungswähler an der Rückseite des PSR-9000 in der Nähe des Netzkabels installiert. Beachten Sie, daß der Spannungswähler auf die Spannung für Ihren Wohnort eingestellt ist. Der Spannungswähler wird vom Hersteller auf 240V eingestellt. Verwenden Sie zum Ändern der Einstellung einen Schlitzschraubendreher, um die Wählscheibe so zu drehen, daß die korrekte Spannung unter der Markierung auf der Abdeckung angezeigt wird. Vérifiez que la tension de votre alimentation secteur correspond à celle qui est spécifiée sur la plaque du fabricant, située sur le panneau du bas. Dans certaines régions, l'instrument peut disposer d'un sélecteur de tension installé sur son panneau arrière, près du cordon d'alimentation. Assurez-vous que le sélecteur de tension est réglé sur la valeur en vigueur dans votre région. Au départ de l'usine, le sélecteur de tension de l'unité est initialement spécifié sur 240V. Pour modifier ce réglage, utilisez un tournevis pour écrous à fente et faites tourner le cadran du sélecteur jusqu'à ce que la valeur correcte s'affiche en marge de l'indicateur sur le panneau.
-
 1
1 -
 2
2 -
 3
3 -
 4
4 -
 5
5 -
 6
6 -
 7
7 -
8
-
9
-
10
-
11
-
12
-
13
-
14
-
15
-
16
-
17
-
18
-
19
-
20
-
21
-
22
-
23
-
24
-
25
-
26
-
27
-
28
-
29
-
30
-
31
-
32
-
33
-
34
-
35
-
36
-
37
-
38
-
39
-
40
-
41
-
42
-
43
-
44
-
45
-
46
-
47
-
48
-
49
-
50
-
51
-
52
-
53
-
54
-
55
-
56
-
57
-
58
-
59
-
60
-
61
-
62
-
63
-
64
-
65
-
66
-
67
-
68
-
69
-
70
-
71
-
72
-
73
-
74
-
75
-
76
-
77
-
78
-
79
-
80
-
81
-
82
-
83
-
84
-
85
-
86
-
87
-
88
-
89
-
90
-
91
-
92
-
93
-
94
-
95
-
96
-
97
-
98
-
99
-
100
-
101
-
102
-
103
-
104
-
105
-
106
-
107
-
108
-
109
-
110
-
111
-
112
-
113
-
114
-
115
-
116
-
117
-
118
-
119
-
120
-
121
-
122
-
123
-
124
-
125
-
126
-
127
-
128
-
129
-
130
-
131
-
132
-
133
-
134
-
135
-
136
-
137
-
138
-
139
-
140
-
141
-
142
-
143
-
144
-
145
-
146
-
147
-
148
-
149
-
150
-
151
-
152
-
153
-
154
-
155
-
156
-
157
-
158
-
159
-
160
-
161
-
162
-
163
-
164
-
165
-
166
-
167
-
168
-
169
-
170
-
171
-
172
-
173
-
174
-
175
-
176
-
177
-
178
-
179
-
180
-
181
-
182
-
183
-
184
-
185
-
186
-
187
-
188
-
189
-
190
-
191
-
192
-
193
-
194
-
195
-
196
-
197
-
198
-
199
-
200
-
201
-
202
-
203
-
204
-
205
-
206
-
207
-
208
-
209
-
210
-
211
-
212
-
213
-
214
 |
 |
