Yamaha PSR-9000 Owner's Manual - Page 41
Press the [EXIT] button several times to exit from the Sam
 |
View all Yamaha PSR-9000 manuals
Add to My Manuals
Save this manual to your list of manuals |
Page 41 highlights
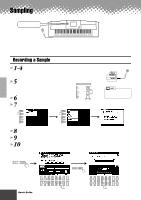
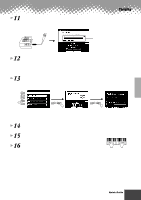
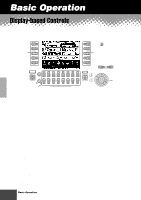
11 Press the LCD [START] button and speak into the microphone to start the sampling. Sampling starts when the input level reaches the Auto Trigger level (page 72). Sampling PHONES MIC/LINE IN Indicates the amount of remaining sampling memory/time. 12 Press the LCD [STOP] button to stop the sampling. Sampling will stop automatically when the available wave memory is full, so be sure to press LCD [STOP] button as soon as the sound you want to sample is recorded, otherwise you'll end up sampling unwanted silence (which can be edited out later). 13 Store voice parameters for the recorded sample as a Custom voice. 1) Follow the instructions in the chart below. A B C D E Select "STORE." PAGE CONTROL BACK NEXT Select a Custom voice number (destination). PAGE CONTROL BACK NEXT 2) Press the [NEXT] button to store the voice parameters for the recorded sample as Custom voice. 14 Press the [EXIT] button several times to exit from the Sampling mode. 15 Select the Custom voice number above and play the voice from the keyboard. 16 Save the recorded sample (wave data) to disk. 1) Press the [DISK/SCSI] button to call up the Save display. 2) Select "SAVE TO DISK." 3) Call up the Custom Voice display and select the number stored in step #13. 4) Save the selected Custom Voice with the sample (wave data) to disk. Input a voice name. q q q q q q q q q q q q q q q q q q q q q q q q q q q q q q q q q q q q q q q q q q Quick Guide 41 39
-
 1
1 -
2
-
3
-
4
-
5
-
6
-
7
-
8
-
9
-
10
-
11
-
12
-
13
-
14
-
15
-
16
-
17
-
18
-
19
-
20
-
21
-
22
-
23
-
24
-
25
-
26
-
27
-
28
-
29
-
30
-
31
-
32
-
33
-
34
-
35
-
 36
36 -
 37
37 -
 38
38 -
 39
39 -
 40
40 -
 41
41 -
 42
42 -
 43
43 -
 44
44 -
 45
45 -
 46
46 -
47
-
48
-
49
-
50
-
51
-
52
-
53
-
54
-
55
-
56
-
57
-
58
-
59
-
60
-
61
-
62
-
63
-
64
-
65
-
66
-
67
-
68
-
69
-
70
-
71
-
72
-
73
-
74
-
75
-
76
-
77
-
78
-
79
-
80
-
81
-
82
-
83
-
84
-
85
-
86
-
87
-
88
-
89
-
90
-
91
-
92
-
93
-
94
-
95
-
96
-
97
-
98
-
99
-
100
-
101
-
102
-
103
-
104
-
105
-
106
-
107
-
108
-
109
-
110
-
111
-
112
-
113
-
114
-
115
-
116
-
117
-
118
-
119
-
120
-
121
-
122
-
123
-
124
-
125
-
126
-
127
-
128
-
129
-
130
-
131
-
132
-
133
-
134
-
135
-
136
-
137
-
138
-
139
-
140
-
141
-
142
-
143
-
144
-
145
-
146
-
147
-
148
-
149
-
150
-
151
-
152
-
153
-
154
-
155
-
156
-
157
-
158
-
159
-
160
-
161
-
162
-
163
-
164
-
165
-
166
-
167
-
168
-
169
-
170
-
171
-
172
-
173
-
174
-
175
-
176
-
177
-
178
-
179
-
180
-
181
-
182
-
183
-
184
-
185
-
186
-
187
-
188
-
189
-
190
-
191
-
192
-
193
-
194
-
195
-
196
-
197
-
198
-
199
-
200
-
201
-
202
-
203
-
204
-
205
-
206
-
207
-
208
-
209
-
210
-
211
-
212
-
213
-
214
 |
 |
