Yamaha PSR-9000 Owner's Manual - Page 37
Press the [START/STOP] button to hear your newly, Save the recorded data to the disk.
 |
View all Yamaha PSR-9000 manuals
Add to My Manuals
Save this manual to your list of manuals |
Page 37 highlights
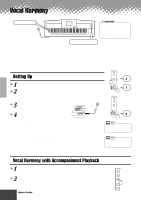
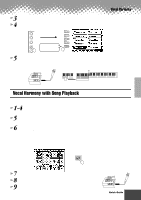
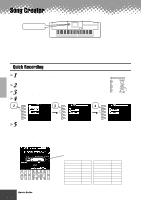
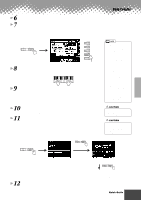
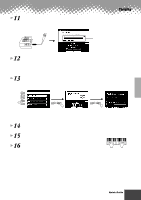
6 Press the [NEXT] button. 7 Set up for recording. • Select the required voice(s), select a style, if required. Set up all parameters as desired for recording. • Turn the metronome on or off as required. Song Creator F PAGE CONTROL G BACK NEXT H I J 8 Start recording. Recording starts as soon as you play a key on the keyboard. Turn the metronome on or off as required. 9 Stop recording. When you finish playing, press the [START/STOP] button. If you have set ACMP track to REC in step #5 above, you can stop recording by pressing the [ENDING] button. If you press the [ENDING] button, recording will stop automatically after the ending section has finished. 10 Press the [START/STOP] button to hear your newly recorded performance. 11 Save the recorded data to the disk. Insert a blank recordable disk into the disk drive, and follow the instructions in the illustrations below. • If ACMP is set to "REC" in step #5, you can start recording your keyboard performance first and then start recording the Auto Accompaniment or rhythm. To do this, 1) Press the [RUBATO] LCD button. 2) Play a key on the right side of the split point to start recording your keyboard performance. 3) Play a chord on the left side of the split point to start recording the Auto Accompaniment with your keyboard performance. • Using Registration Memory (page 28), One Touch Setting (page 24), and Music Database (page 26) can make your recording sessions much more efficient, since various settings (such as voices, etc.) can be recalled by a single button press. CAUTION • While the file is being saved, never eject the floppy disk or turn the power off. CAUTION • Please note that the recorded data will be lost if exiting from the Record mode without saving the data to disk. PAGE CONTROL BACK NEXT PAGE CONTROL BACK NEXT Input a file name. PAGE CONTROL BACK NEXT The LCD display will prompt you to save the recorded data. At the prompt, select "YES" to save the recorded data. 12 Press the [EXIT] button to exit from the Record mode. q q q q q q q q q q q q q q q q q q q q q q q q q q q q q q q q q q q q q q q q q q Quick Guide 37 35
-
 1
1 -
2
-
3
-
4
-
5
-
6
-
7
-
8
-
9
-
10
-
11
-
12
-
13
-
14
-
15
-
16
-
17
-
18
-
19
-
20
-
21
-
22
-
23
-
24
-
25
-
26
-
27
-
28
-
29
-
30
-
31
-
 32
32 -
 33
33 -
 34
34 -
 35
35 -
 36
36 -
 37
37 -
 38
38 -
 39
39 -
 40
40 -
 41
41 -
 42
42 -
43
-
44
-
45
-
46
-
47
-
48
-
49
-
50
-
51
-
52
-
53
-
54
-
55
-
56
-
57
-
58
-
59
-
60
-
61
-
62
-
63
-
64
-
65
-
66
-
67
-
68
-
69
-
70
-
71
-
72
-
73
-
74
-
75
-
76
-
77
-
78
-
79
-
80
-
81
-
82
-
83
-
84
-
85
-
86
-
87
-
88
-
89
-
90
-
91
-
92
-
93
-
94
-
95
-
96
-
97
-
98
-
99
-
100
-
101
-
102
-
103
-
104
-
105
-
106
-
107
-
108
-
109
-
110
-
111
-
112
-
113
-
114
-
115
-
116
-
117
-
118
-
119
-
120
-
121
-
122
-
123
-
124
-
125
-
126
-
127
-
128
-
129
-
130
-
131
-
132
-
133
-
134
-
135
-
136
-
137
-
138
-
139
-
140
-
141
-
142
-
143
-
144
-
145
-
146
-
147
-
148
-
149
-
150
-
151
-
152
-
153
-
154
-
155
-
156
-
157
-
158
-
159
-
160
-
161
-
162
-
163
-
164
-
165
-
166
-
167
-
168
-
169
-
170
-
171
-
172
-
173
-
174
-
175
-
176
-
177
-
178
-
179
-
180
-
181
-
182
-
183
-
184
-
185
-
186
-
187
-
188
-
189
-
190
-
191
-
192
-
193
-
194
-
195
-
196
-
197
-
198
-
199
-
200
-
201
-
202
-
203
-
204
-
205
-
206
-
207
-
208
-
209
-
210
-
211
-
212
-
213
-
214
 |
 |
