Yamaha PSR-9000 Owner's Manual - Page 33
Vocal Harmony with Song Playback
 |
View all Yamaha PSR-9000 manuals
Add to My Manuals
Save this manual to your list of manuals |
Page 33 highlights
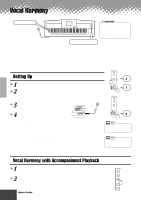
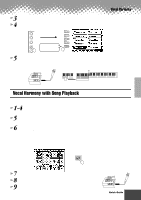
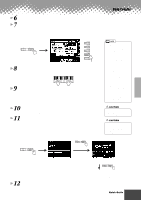
3 Press the VOCAL HARMONY [SELECT] button. 4 Select a Vocal Harmony type. VOCAL HARMONY TALK A DSP(8) B C V.H. (9) D SELECT For this example, "JazzSisters" is E MIC SETUP selected. 5 Play the keyboard while singing into the microphone. The Vocal Harmony effect can be controlled by the chords you play in the Auto Accompaniment section (the keys to the left of the split point). Split Point PHONES MIC/LINE IN Auto Accompaniment section Vocal Harmony with Song Playback The PSR-9000 can properly play back disk songs that contain Vocal Harmony data. 1-4 Use the same operation as in "Playback of Song Disks" on page 30. 5 Turn the Vocal Harmony effect on and select a Vocal Harmony type (see above). 6 Press the [MIC SETUP] button and set the Vocal Harmony track. Press the [E] or [J] button to select the bottom row of controls, then set the VOCODER track to the appropriate setting. For details on the appropriate track number (or MIDI channel) used for the Vocal Harmony effect, refer to the documentation included with the disk software. Vocal Harmony START/STOP 7 Start the song. 8 Sing into the microphone during song playback. PHONES MIC/LINE IN 9 Stop the song. q q q q q q q q q q q q q q q q q q q q q q q q q q q q q q q q q q q q q q q q q q Quick Guide 33 31
-
 1
1 -
2
-
3
-
4
-
5
-
6
-
7
-
8
-
9
-
10
-
11
-
12
-
13
-
14
-
15
-
16
-
17
-
18
-
19
-
20
-
21
-
22
-
23
-
24
-
25
-
26
-
27
-
 28
28 -
 29
29 -
 30
30 -
 31
31 -
 32
32 -
 33
33 -
 34
34 -
 35
35 -
 36
36 -
 37
37 -
 38
38 -
39
-
40
-
41
-
42
-
43
-
44
-
45
-
46
-
47
-
48
-
49
-
50
-
51
-
52
-
53
-
54
-
55
-
56
-
57
-
58
-
59
-
60
-
61
-
62
-
63
-
64
-
65
-
66
-
67
-
68
-
69
-
70
-
71
-
72
-
73
-
74
-
75
-
76
-
77
-
78
-
79
-
80
-
81
-
82
-
83
-
84
-
85
-
86
-
87
-
88
-
89
-
90
-
91
-
92
-
93
-
94
-
95
-
96
-
97
-
98
-
99
-
100
-
101
-
102
-
103
-
104
-
105
-
106
-
107
-
108
-
109
-
110
-
111
-
112
-
113
-
114
-
115
-
116
-
117
-
118
-
119
-
120
-
121
-
122
-
123
-
124
-
125
-
126
-
127
-
128
-
129
-
130
-
131
-
132
-
133
-
134
-
135
-
136
-
137
-
138
-
139
-
140
-
141
-
142
-
143
-
144
-
145
-
146
-
147
-
148
-
149
-
150
-
151
-
152
-
153
-
154
-
155
-
156
-
157
-
158
-
159
-
160
-
161
-
162
-
163
-
164
-
165
-
166
-
167
-
168
-
169
-
170
-
171
-
172
-
173
-
174
-
175
-
176
-
177
-
178
-
179
-
180
-
181
-
182
-
183
-
184
-
185
-
186
-
187
-
188
-
189
-
190
-
191
-
192
-
193
-
194
-
195
-
196
-
197
-
198
-
199
-
200
-
201
-
202
-
203
-
204
-
205
-
206
-
207
-
208
-
209
-
210
-
211
-
212
-
213
-
214
 |
 |
