Yamaha PSR-E333 Owner's Manual - Page 36
Record Your Own Performance, Recording
 |
View all Yamaha PSR-E333 manuals
Add to My Manuals
Save this manual to your list of manuals |
Page 36 highlights
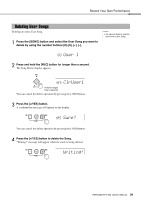
Record Your Own Performance You can record up to five of your own performances as User Songs (User 1-5: Song numbers 103-107). Think of each User Song as a kind of basket or drawer for storing your recordings. Remember that you can also record a Style (containing chord changes) along with your own performance. Recording 1 Press the [REC] button. rEC User 1 001 The lowest-numbered unrecorded User Song (Song numbers 103-107) available for recording is displayed. If you want to select the Song you will be recording, select the desired Song number by using the [+] and [-] buttons. Flashes NOTICE • If all User Songs (Song numbers 103-107) contain recorded data, Song 103 will automatically be selected. In this case, you will record over and erase any previous data in Song 103, so be careful that you won't be erasing any material you want to keep! After you've selected the desired User Song for recording, you can select a Style to be recorded as well. To do this, press the [STYLE] button and select the Style number while the ACMP indication is on. You can turn off the Record mode by pressing the [REC] button again ( and stop flashing). NOTE • Accompaniment cannot be turned on or off once the [REC] button is pressed. 2 Start recording. When you play the keyboard, recording will begin. Split Point 36 48 60 72 NOTE • A total of approximately 10,000 notes or 5,500 chord changes can be recorded to the five User Songs. By playing keys to the left of the Split Point when auto accompaniment is set to on, the Style starts sounding and is recorded with your performance. When auto accompaniment is set to off, only your keyboard performance is recorded. 36 PSR-E333/YPT-330 Owner's Manual
-
 1
1 -
2
-
3
-
4
-
5
-
6
-
7
-
8
-
9
-
10
-
11
-
12
-
13
-
14
-
15
-
16
-
17
-
18
-
19
-
20
-
21
-
22
-
23
-
24
-
25
-
26
-
27
-
28
-
29
-
30
-
 31
31 -
 32
32 -
 33
33 -
 34
34 -
 35
35 -
 36
36 -
 37
37 -
 38
38 -
 39
39 -
 40
40 -
 41
41 -
42
-
43
-
44
-
45
-
46
-
47
-
48
-
49
-
50
-
51
-
52
-
53
-
54
-
55
-
56
-
57
-
58
-
59
-
60
-
61
-
62
-
63
-
64
-
65
-
66
-
67
-
68
-
69
-
70
-
71
-
72
-
73
-
74
-
75
-
76
 |
 |
