Yamaha PSR-E333 Owner's Manual - Page 37
Recording to a Specific track, About track recording - - portable keyboard
 |
View all Yamaha PSR-E333 manuals
Add to My Manuals
Save this manual to your list of manuals |
Page 37 highlights
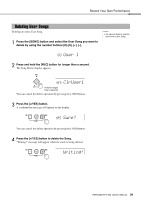
Record Your Own Performance 3 Stop recording. Pressing the [START/STOP] button stops recording and writes the data to the User Song. (A "Writing!" message is shown.) To playback the newly recorded performance, press the [START/STOP] button. In order to record with the Style, turn auto accompaniment to on (see Step 2 on page 19), and then record according to the instructions. (The "ACMP ON" lights.) In order to record only your performance, turn auto accompaniment to off and record according to the normal steps. (The "ACMP ON" is unlit.) NOTICE • Never attempt to turn the power off when a "Writing!" message is shown in the display. Doing so can damage the flash memory device and result in a loss of data. NOTE • Use the Musicsoft Down- loader to backup the User Songs to a computer (page 45). Recording to a Specific track The User Songs are organized into two tracks: Track 1 and Track 2. You can specify the track you want to record to. About track recording If you start recording by specifying a track, the track will be overwritten (existing data in the track is deleted and replaced with the new recording). User Song Data that can be recorded to Track 2 Data that can be recorded to Track 1 Style playback* (including chord changes) or your own keyboard performance Your own keyboard performance only NOTE • Record following the steps in the previous page, and your performance will be recorded to Track 1 and the Style (if you are playing one) will be recorded to Track 2. * When playing the Style Recording to the specified track Only your keyboard performance can be recorded to Track 1. Either a Style or your performance can be recorded to Track 2, resulting in a User Song like that depicted below. User Song Track 2 Style Track 1 Your own keyboard performance User Song Track 2 Your own keyboard performance Track 1 Your own keyboard performance NOTE • You cannot record the Reverb Level, metronome click, or the Transpose and Tuning settings. • The following settings and buttons cannot be changed, or if changed, the new settings cannot be recorded if entered during the recording process. ACMP ON/OFF, Split Point, Reverb Type, Chorus Type, Harmony Type, [FUNCTION] button, [PORTABLE GRAND] button. PSR-E333/YPT-330 Owner's Manual 37
-
 1
1 -
2
-
3
-
4
-
5
-
6
-
7
-
8
-
9
-
10
-
11
-
12
-
13
-
14
-
15
-
16
-
17
-
18
-
19
-
20
-
21
-
22
-
23
-
24
-
25
-
26
-
27
-
28
-
29
-
30
-
31
-
 32
32 -
 33
33 -
 34
34 -
 35
35 -
 36
36 -
 37
37 -
 38
38 -
 39
39 -
 40
40 -
 41
41 -
 42
42 -
43
-
44
-
45
-
46
-
47
-
48
-
49
-
50
-
51
-
52
-
53
-
54
-
55
-
56
-
57
-
58
-
59
-
60
-
61
-
62
-
63
-
64
-
65
-
66
-
67
-
68
-
69
-
70
-
71
-
72
-
73
-
74
-
75
-
76
 |
 |
