Yamaha PSR-S775 PSR-S975/PSR-S775 Reference Manual - Page 40
Editing Data for Each Channel CHANNEL, QUANTIZE, VELOCITY CHANGE, BAR COPY, BAR CLEAR, REMOVE EVENT
 |
View all Yamaha PSR-S775 manuals
Add to My Manuals
Save this manual to your list of manuals |
Page 40 highlights
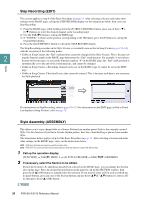
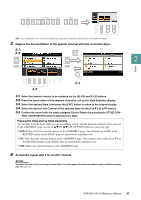
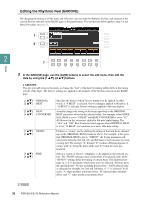
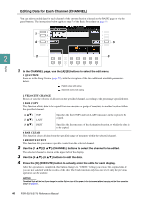
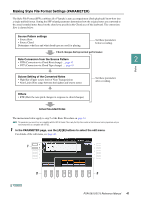
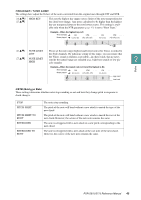
Editing Data for Each Channel (CHANNEL) You can edit recorded data for each channel of the current Section selected on the BASIC page or via the panel buttons. The instructions below apply to step 5 of the Basic Procedure on page 31. 1 4 5 2 2 3 Styles 1 In the CHANNEL page, use the [A]/[B] buttons to select the edit menu. 1 QUANTIZE Same as in the Song Creator (page 70), with the exception of the two additional available parameters below. Eighth notes with swing Sixteenth notes with swing 2 VELOCITY CHANGE Boosts or cuts the velocity of all notes in the specified channel, according to the percentage specified here. 3 BAR COPY This function allows data to be copied from one measure or group of measures to another location within the specified channel. [4 ] [5 ] [6 ] TOP LAST DEST Specifies the first (TOP) and last (LAST) measures in the region to be copied. Specifies the first measure of the destination location, to which the data is to be copied. 4 BAR CLEAR This function clears all data from the specified range of measures within the selected channel. 5 REMOVE EVENT This function lets you remove specific events from the selected channel. 2 Use the [1 ]/[2 ] (CHANNEL) buttons to select the channel to be edited. The selected channel is shown at the upper left of the display. 3 Use the [4 ]-[8 ] buttons to edit the data. 4 Press the [D] (EXECUTE) button to actually enter the edits for each display. After the operation is completed, this button changes to "UNDO," letting you restore the original data if you are not satisfied with the results of the edit. The Undo function only has one level; only the previous operation can be undone. NOTICE The edited Style will be lost if you change to another Style or turn off the power to the instrument without carrying out the Save operation (step 7 on page 31). 40 PSR-S975/S775 Reference Manual
-
 1
1 -
2
-
3
-
4
-
5
-
6
-
7
-
8
-
9
-
10
-
11
-
12
-
13
-
14
-
15
-
16
-
17
-
18
-
19
-
20
-
21
-
22
-
23
-
24
-
25
-
26
-
27
-
28
-
29
-
30
-
31
-
32
-
33
-
34
-
 35
35 -
 36
36 -
 37
37 -
 38
38 -
 39
39 -
 40
40 -
 41
41 -
 42
42 -
 43
43 -
 44
44 -
 45
45 -
46
-
47
-
48
-
49
-
50
-
51
-
52
-
53
-
54
-
55
-
56
-
57
-
58
-
59
-
60
-
61
-
62
-
63
-
64
-
65
-
66
-
67
-
68
-
69
-
70
-
71
-
72
-
73
-
74
-
75
-
76
-
77
-
78
-
79
-
80
-
81
-
82
-
83
-
84
-
85
-
86
-
87
-
88
-
89
-
90
-
91
-
92
-
93
-
94
-
95
-
96
-
97
-
98
-
99
-
100
-
101
-
102
-
103
-
104
-
105
-
106
-
107
-
108
-
109
-
110
-
111
-
112
-
113
-
114
-
115
-
116
-
117
-
118
-
119
-
120
-
121
-
122
-
123
-
124
-
125
-
126
-
127
-
128
-
129
-
130
-
131
-
132
-
133
-
134
-
135
-
136
 |
 |
