Yamaha QY300 Owner's Manual - Page 15
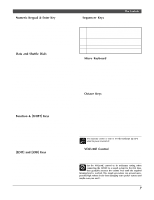
Numeric Keypad & Enter Key
 |
View all Yamaha QY300 manuals
Add to My Manuals
Save this manual to your list of manuals |
Page 15 highlights
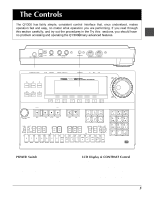
The Controls 5 Numeric Keypad & Enter Key These keys allow direct entry of numeric values where applicable. Enter the required value via the numeric keys - the entered number will flash on the display - then press the [ENTER] key to actually enter the specified value. The [ENTER] key is also used to enter notes and other events when editing sequence data, and to execute a specified job or disk function. The numeric keys are also used to specify note lengths and dynamics when step recording. 6 Data and Shuttle Dials These concentric dials have different functions: The inner "data dial" can be used for data entry in the same situations as the [-1/NO] and [+1/YES] keys or numeric keypad. Rotate the dial clockwise to increment the select value or counter-clockwise to decrement. The data dial is handy for quickly covering a large range of values or searching for a specific item or value. The outer "shuttle dial" is used to move forward or backward in the SONG, PATTERN, or PHRASE mode at varying speed, both during playback and when playback is stopped. The more you rotate the shuttle dial in the clockwise direction the faster you will shuttle forward through the song, pattern, or phrase. The same applies to reverse shuttling in the counter-clockwise direction. If you use the shuttle dial during playback you will be able to monitor the sound while shuttling forward or backward. 7 Function & [SHIFT] Keys The function keys - [F1] through [F6] - select the corresponding items from the menu that appears on the display immediately above the keys. The available functions are different in each mode. The [SHIFT] keys are used to access several secondary or "background" functions that you might only need in special situations. For example, the [SHIFT] key can be used when you want to mute all tracks simultaneously instead of muting the tracks one at a time. 8 [EDIT] and [JOB] Keys The [EDIT] key accesses the QY300 edit mode from the SONG or PHRASE modes, allowing detailed eventby-event editing of the recorded data. The [JOB] key accesses the various "jobs" available in the SONG, PATTERN, and PHRASE modes. The jobs include functions such as quantization, data copying, track mixing, data modification, name entry, and much more. 9 Sequencer Keys The sequencer keys control recording and playback in the SONG, PATTERN, and PHRASE modes. REC PLAY STOP TOP Activates the record-ready mode in the QY300 SONG and PHRASE modes. The red REC key indicator will light, then recording will begin as soon as the [PLAY] key is pressed. The [REC] key can be pressed again to cancel the record-ready mode before recording is actually started by pressing the [PLAY] key. Starts playback from the current point in the song or phrase if the recordready mode is not active, or recording from the same point if the recordready mode is active. Stops playback or recording. Instantly returns to the first beginning of the current song or phrase (i.e. the first beat of the first measure). 10 Micro Keyboard This tiny 2-octave keyboard makes it possible to program the QY300 without having to connect an external MIDI keyboard. It's even polyphonic, so you can directly enter chords as well as single notes. The only thing it lacks is velocity sensitivity. The QY300 does, however, accept velocity information from an external MIDI keyboard. When programming an accompaniment the microkeyboard is also used to specify the chord roots and types to be entered. 11 Octave Keys Since the 2-octave range of the micro-keyboard is not enough for serious music programming, the [OCT DOWN] and [OCT UP] keys allow the pitch of the keyboard to be shifted up or down in octave steps, over a range of 8 octaves. Each time the [OCT DOWN] key is pressed the pitch of the keyboard is shifted down by one octave, until the lower limit is reached. The [OCT UP] key shifts the pitch of the keyboard up in the same way. When recording the accompaniment chord tracks in the step mode the octave keys perform several secondary functions, such as specifying "on-bass" or syncopated chords. The keyboard octave is reset to the ÒnormalÓ range (E2 É F4) when the power is turned off. 12 VOLUME Control The VOLUME control adjusts the volume of the sound delivered via the OUTPUT and PHONES jacks. Rotate the control toward "MAX." to increase the volume. Set the VOLUME control to its minimum setting when connecting the QY300 to a sound system for the first time, then gradually increase the volume level until the required listening level is reached. This simple precaution can prevent unexpectedly high volume levels from damaging your speaker system (and maybe even your ears!). 7
-
 1
1 -
2
-
3
-
4
-
5
-
6
-
7
-
8
-
9
-
 10
10 -
 11
11 -
 12
12 -
 13
13 -
 14
14 -
 15
15 -
 16
16 -
 17
17 -
 18
18 -
 19
19 -
 20
20 -
21
-
22
-
23
-
24
-
25
-
26
-
27
-
28
-
29
-
30
-
31
-
32
-
33
-
34
-
35
-
36
-
37
-
38
-
39
-
40
-
41
-
42
-
43
-
44
-
45
-
46
-
47
-
48
-
49
-
50
-
51
-
52
-
53
-
54
-
55
-
56
-
57
-
58
-
59
-
60
-
61
-
62
-
63
-
64
-
65
-
66
-
67
-
68
-
69
-
70
-
71
-
72
-
73
-
74
-
75
-
76
-
77
-
78
-
79
-
80
-
81
-
82
-
83
-
84
-
85
-
86
-
87
-
88
-
89
-
90
-
91
-
92
-
93
-
94
-
95
-
96
-
97
-
98
-
99
-
100
-
101
-
102
-
103
-
104
-
105
-
106
-
107
-
108
-
109
-
110
-
111
-
112
-
113
-
114
-
115
-
116
-
117
-
118
-
119
-
120
-
121
-
122
-
123
-
124
-
125
-
126
-
127
-
128
-
129
-
130
-
131
-
132
-
133
-
134
-
135
-
136
-
137
-
138
-
139
-
140
-
141
 |
 |