Yamaha QY300 Owner's Manual - Page 35
Select the Punch-in Record Mode, Specify the Punch-in & Punch-out Points, Start the Punch-in
 |
View all Yamaha QY300 manuals
Add to My Manuals
Save this manual to your list of manuals |
Page 35 highlights
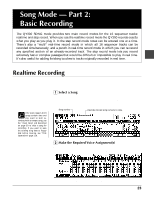
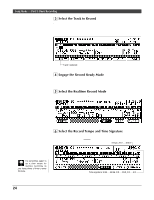
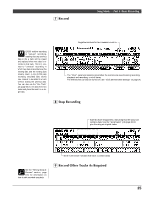
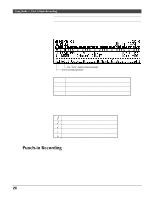
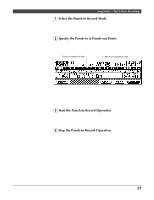
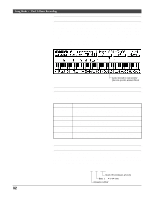
Song Mode - Part 2: Basic Recording 1 Select the Punch-in Record Mode For punch-in recording you must first select the punch-in mode after engaging the record ready mode (step 4 of the realtime record process, described above). Press the [F6] function key ("PUNCH") to select the punch-in record mode. 2 Specify the Punch-in & Punch-out Points Specify the "punch-in" and "punch-out" points, the punch-in point being the measure and beat at which recording will begin, and the punch-out point being the measure and beat at which recording will end. Punch-in measure & beat Punch-out measure & beat Move the cursor to the punch-in and punch-out measure and beat parameters and set as required. Then, before actually starting recording, set the measure parameter a few measures before the punch-in point so you'll be ready to record when the punch-in point is reached. 3 Start the Punch-in Record Operation Start the punch-in operation by pressing the [©] key (there is no count-in when punch-in recording is started). Recording will begin automatically at the specified punch-in point. 4 Stop the Punch-in Record Operation Recording will stop, but playback will continue, when the punch-out point is reached. Press the [m] key to stop playback. In the example display above, playback will begin at the first measure, recording will begin on the first beat of the third measure and then stop on the fourth beat of the fifth measure. 27
-
 1
1 -
2
-
3
-
4
-
5
-
6
-
7
-
8
-
9
-
10
-
11
-
12
-
13
-
14
-
15
-
16
-
17
-
18
-
19
-
20
-
21
-
22
-
23
-
24
-
25
-
26
-
27
-
28
-
29
-
 30
30 -
 31
31 -
 32
32 -
 33
33 -
 34
34 -
 35
35 -
 36
36 -
 37
37 -
 38
38 -
 39
39 -
 40
40 -
41
-
42
-
43
-
44
-
45
-
46
-
47
-
48
-
49
-
50
-
51
-
52
-
53
-
54
-
55
-
56
-
57
-
58
-
59
-
60
-
61
-
62
-
63
-
64
-
65
-
66
-
67
-
68
-
69
-
70
-
71
-
72
-
73
-
74
-
75
-
76
-
77
-
78
-
79
-
80
-
81
-
82
-
83
-
84
-
85
-
86
-
87
-
88
-
89
-
90
-
91
-
92
-
93
-
94
-
95
-
96
-
97
-
98
-
99
-
100
-
101
-
102
-
103
-
104
-
105
-
106
-
107
-
108
-
109
-
110
-
111
-
112
-
113
-
114
-
115
-
116
-
117
-
118
-
119
-
120
-
121
-
122
-
123
-
124
-
125
-
126
-
127
-
128
-
129
-
130
-
131
-
132
-
133
-
134
-
135
-
136
-
137
-
138
-
139
-
140
-
141
 |
 |
