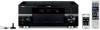
Yamaha RX-V3900BL Owner's Manual - Page 6
What you can do with the GUI menu, Adjusting the audio and video synchronization - a v receiver
 |
UPC - 705105565903
View all Yamaha RX-V3900BL manuals
Add to My Manuals
Save this manual to your list of manuals |
Page 6 highlights
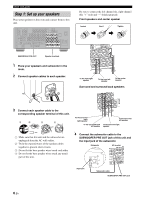
What you can do with the GUI menu By configuring the parameters in the GUI menu of this unit, you can adjust a variety of system settings suited for your listening environment. The following is a brief description of some of the useful menus you can configure in the GUI menu. For more detailed information, see "Graphical user interface (GUI) menu" (page 76). Fine adjusting the speaker settings In case speaker settings configured by automatic setup does not match your listening environment, you can configure them manually. Setup → Speaker (page 87) Specifying the muting type In case you do not want to fully mute audio when you receive a call while watching your favorite TV program, you can use this menu to specify the muting level. Setup → Volume → Muting Type (page 90) Specifying the initial volume level By adjusting this parameter, you can automatically control the initial volume level regardless of the recording level of the audio source. Setup → Volume → Initial Volume (page 90) Adjusting the dynamic range The dynamic range is the difference between the minimum and maximum amplitude. The higher the dynamic range, the more accurate the sound reproduction for bitstream signals. You can adjust the dynamic range for speakers and headphones individually. Also, you can use the adaptive dynamic range control feature to adjust the dynamic range automatically in conjunction with the volume level. Setup → Sound → Dynamic Range (page 90) Setup → Volume → Adaptive DRC (page 89) Adjusting the audio and video synchronization Sometimes, depending on your video source component, video is delayed relative to audio due to processing problems. In this case, you need to manually adjust the audio delay to keep it synchronized with the video. If you connect the video source component to this unit using an HDMI connection and your component supports the LIPSYNC feature, you can adjust the audio/video synchronization automatically. Setup → Sound → Lipsync (page 92) Changing input/output assignment In case the initial input/output assignments do not correspond to your needs, you can rearrange them according to your component to be connected to this unit. You can also edit the input name to be displayed in the front panel or in the GUI screen as necessary. Setup → Option → I/O Assignment (page 98) Setup → Option → Input Rename (page 98) Fixing the volume difference between input sources The sound output level may vary depending on the audio source components connected to this unit. In this case, you can reduce or increase the output level of each input source using this feature. Input Select → (input source) → (submenu) → Volume Trim (page 85) Setting the background video for discrete multichannel input If you want to enjoy video images in combination with discrete multi-channel audio input, configure this setting to specify the video input source. For example, to view DVD video images while listening to the music sources from a multi-format player or an external decoder, set this setting to "DVD". Input Select → MULTI CH → (submenu) → BGV (page 86) Adjusting the brightness of the front panel display You can make the front panel display darker or brighter by configuring this setting. Setup → Option → Display Set → Front Panel Display → Dimmer (page 98) Turning on or off the short message display Each time you operate this unit using controls on the front panel or remote control keys, this unit displays short messages on the video monitor. If you want to turn off the short message display, select "Off" in this setting (Initial factory setting is "On"). Setup → Option → Display Set → Short Message (page 98) Setting the amount of time to display GUI screen information You can set the amount of time to display playback information in the GUI screen after you perform a certain operation. Setup → Option → Display Set → Playback Screen (page 98) Protecting the setup values After you have configured the sound field program parameters and other system settings, you can use this feature to prevent accidental changes to those setup values. Setup → Option → Memory Guard (page 97) 2 En
-
 1
1 -
 2
2 -
 3
3 -
 4
4 -
 5
5 -
 6
6 -
 7
7 -
 8
8 -
 9
9 -
 10
10 -
 11
11 -
 12
12 -
13
-
14
-
15
-
16
-
17
-
18
-
19
-
20
-
21
-
22
-
23
-
24
-
25
-
26
-
27
-
28
-
29
-
30
-
31
-
32
-
33
-
34
-
35
-
36
-
37
-
38
-
39
-
40
-
41
-
42
-
43
-
44
-
45
-
46
-
47
-
48
-
49
-
50
-
51
-
52
-
53
-
54
-
55
-
56
-
57
-
58
-
59
-
60
-
61
-
62
-
63
-
64
-
65
-
66
-
67
-
68
-
69
-
70
-
71
-
72
-
73
-
74
-
75
-
76
-
77
-
78
-
79
-
80
-
81
-
82
-
83
-
84
-
85
-
86
-
87
-
88
-
89
-
90
-
91
-
92
-
93
-
94
-
95
-
96
-
97
-
98
-
99
-
100
-
101
-
102
-
103
-
104
-
105
-
106
-
107
-
108
-
109
-
110
-
111
-
112
-
113
-
114
-
115
-
116
-
117
-
118
-
119
-
120
-
121
-
122
-
123
-
124
-
125
-
126
-
127
-
128
-
129
-
130
-
131
-
132
-
133
-
134
-
135
-
136
-
137
-
138
-
139
-
140
-
141
-
142
-
143
-
144
-
145
-
146
-
147
-
148
-
149
-
150
-
151
-
152
-
153
-
154
-
155
-
156
-
157
-
158
-
159
-
160
-
161
-
162
-
163
-
164
-
165
-
166
-
167
-
168
-
169
 |
 |
