Yamaha S03 Owner's Manual - Page 10
Rear Panel - power supply
 |
View all Yamaha S03 manuals
Add to My Manuals
Save this manual to your list of manuals |
Page 10 highlights
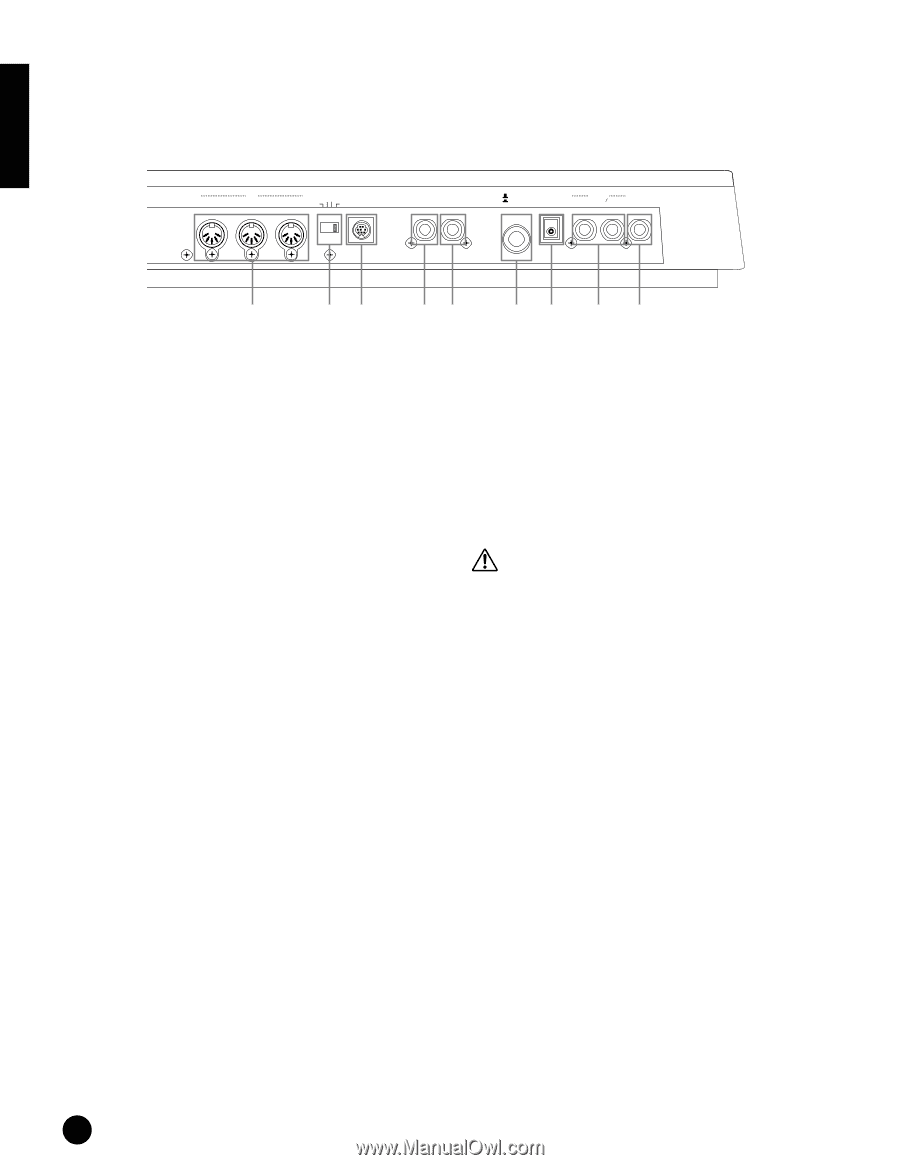
Basics Section Rear Panel THRU MIDI OUT HOST SELECT IN PC-2 Mac TO HOST MIDI OFF FOOT FOOT SWITCH CONTROLLER STANDBY ON DC IN OUTPUT R L MONO PHONES 1 2 3 45 6 7 8 9 1 MIDI IN/OUT/THRU terminals (Page 12) MIDI IN receives MIDI messages from an external MIDI device. Use this connector to control the S03 from an external MIDI device. MIDI OUT sends out MIDI messages generated by the S03 (including notes played on the keyboard and panel control movements) to an external MIDI sound module or device. MIDI THRU simply relays the MIDI messages received at MIDI IN. Connect other devices here. 2 HOST SELECT switch (Page 12) For selecting the type of computer connected to the S03 via the TO HOST connector. When using the MIDI IN/OUT/THRU terminals, set this switch to MIDI. 3 TO HOST terminal (Page 13) For connection to a computer, using an optional serial computer cable. 4 FOOT SWITCH jack (Pages 14, 46) For connecting an optional footswitch (FC4 or FC5). Depending on the assigned function, you can use the footswitch to turn specific functions on and off. 5 FOOT CONTROLLER jack (Pages 14, 45) For connecting an optional foot controller (FC7, etc.). This gives you real-time control over various aspects of the sound, such as tone, pitch, and volume. 6 STANDBY/ON switch (Page 15) Use this to turn the S03 on or off. Even when the switch is in the "STANDBY" position, electricity is still flowing to the instrument at a minimum level. When not using the S03 for an extended period of time, be sure to unplug the AC power adaptor from the wall AC outlet. 7 DC IN terminal (Page 11) For connecting an appropriate AC power adaptor (PA-3B or an equivalent recommended by Yamaha) to supply power to the S03. 8 OUTPUT L/MONO and R jack (Page 11) Line level audio signals are output from the S03 via these phone jacks (1/4" mono phone plug). For monophonic output, use just the L/MONO jack. 9 PHONES jack (Page 11) For connection to a pair of stereo headphones. 10
-
 1
1 -
2
-
3
-
4
-
 5
5 -
 6
6 -
 7
7 -
 8
8 -
 9
9 -
 10
10 -
 11
11 -
 12
12 -
 13
13 -
 14
14 -
 15
15 -
16
-
17
-
18
-
19
-
20
-
21
-
22
-
23
-
24
-
25
-
26
-
27
-
28
-
29
-
30
-
31
-
32
-
33
-
34
-
35
-
36
-
37
-
38
-
39
-
40
-
41
-
42
-
43
-
44
-
45
-
46
-
47
-
48
-
49
-
50
-
51
-
52
-
53
-
54
-
55
-
56
-
57
-
58
-
59
-
60
-
61
-
62
-
63
-
64
-
65
-
66
-
67
-
68
-
69
-
70
-
71
-
72
-
73
-
74
-
75
-
76
-
77
-
78
-
79
-
80
-
81
-
82
-
83
-
84
-
85
-
86
-
87
-
88
-
89
-
90
-
91
-
92
-
93
-
94
-
95
-
96
-
97
-
98
-
99
-
100
-
101
-
102
-
103
-
104
-
105
-
106
-
107
-
108
-
109
-
110
-
111
-
112
 |
 |