Yamaha THR30II THR30II Wireless THR10II Wireless THR10II Reference Manual - Page 8
Power
 |
View all Yamaha THR30II manuals
Add to My Manuals
Save this manual to your list of manuals |
Page 8 highlights
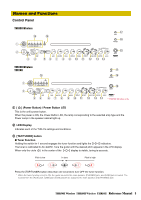
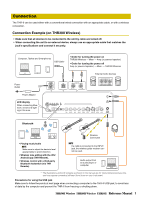
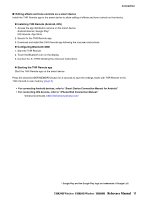
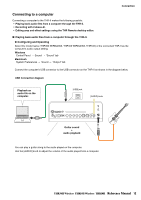
Connection NOTICE • Use an AB type USB cable of less than 3 meters. USB 3.0 cables cannot be used. • Be sure to wake the computer from suspended/sleep/standby mode before connecting a computer to the USB jack. • Always quit all applications that are running on the computer before connecting or disconnecting the USB cable and set the volume output on the computer to its minimum level. • When connecting or disconnecting the USB cable, be sure to set the OUTPUT controls ([GUITAR] knob and [AUDIO] knob) on the THR-II to their minimum levels. • Wait at least 6 seconds between connecting or disconnecting the USB cable. Power The THR-II Wireless can operate on either DC power (via the power adaptor) or with the built‐in rechargeable battery. The THR10II can operate on DC power (via the power adaptor). * When you use the THR-II Wireless with the built-in rechargeable battery, the maximum output volume is reduced. (page 16) When using the power adaptor Connect the supplied power cord to the power adapter. Connect the supplied power adaptor to the [15V] DC IN jack located on the rear panel of the THR-II. Connect the AC plug to a power outlet. * Follow the bundled Safety Instruction Sheet before making connections. DC IN Jack DC plug the supplied power cord Power Adaptor (supplied) Power Outlet Turning the power on and off Press the [ ] power button on the top of THR-II for one second to turn the power on. The LED of the power button lights when turning the power button on. The LED of the THR-II Wireless lights in green while charging. Otherwise, it lights in red. * Follow the bundled Safety Instruction Sheet before making connections. Checking the battery level (THR-II Wireless only) Press the [ ] button on top of the THR-II Wireless for less than one second to check the battery level. The remaining battery capacity is displayed in four levels of 3, 2, 1 and L (Low). Battery full No battery remaining THR30II Wireless THR10II Wireless THR10II Reference Manual 8
-
 1
1 -
2
-
 3
3 -
 4
4 -
 5
5 -
 6
6 -
 7
7 -
 8
8 -
 9
9 -
 10
10 -
 11
11 -
 12
12 -
 13
13 -
14
-
15
-
16
-
17
-
18
-
19
-
20
 |
 |
