Yamaha YHT-S401 Owners Manual - Page 22
USEFUL OPERATION, Setup menu, Setup menu list, Basic procedure - firmware
 |
View all Yamaha YHT-S401 manuals
Add to My Manuals
Save this manual to your list of manuals |
Page 22 highlights
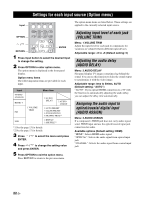
USEFUL OPERATION Setup menu Setup menu list Menu 1:SP LEVEL 2:TONE CONTROL 3:HDMI SETUP 4:DISPLAY MODE 5:SP SETUP 6:FIRMWARE 7:D.RANGE 8:MATRIX DECODE Sub menu 1-1:FRONT L 1-2:FRONT R 1-3:CENTER 1-4:SURROUND L 1-5:SURROUND R 1-6:SUBWOOFER 2-1:BASS 2-2:TREBLE 3-1:CONTROL 3-2:AUDIO 5-1:SP CHANNEL 5-2:SP TYPE 5-3:SP DISTANCE 5-4:CROSSOVER 6-1:VERSION 6-2:USB UPDATE 8-1:DECODE MODE 8-2:C.IMAGE Features Adjusting the volume balance with test tone Adjusting high/low frequency sound (tone control) Configuring the HDMI settings Changing the brightness of the front panel display Selecting the number of channel Changing the setting of the speaker type Setting the distance between the speakers Cutting the crossover register Displaying the firmware version of this unit Updating the firmware of this unit Adjusting the dynamic range Selecting the decoder Adjusting the center image Basic procedure Page ☞ P. 19 ☞ P. 19 ☞ P. 19 ☞ P. 19 ☞ P. 20 ☞ P. 17 ☞ P. 21 ☞ P. 21 ENTER RETURN SETUP / You can change various settings of this unit using the setup menu. 1 Press SETUP to enter the setup menu. "1:SP LEVEL" is displayed in the front panel display. 2 Press / to select menu and press ENTER. Repeat this procedure until desired menu/sub menu is displayed. 3 Press / menu. to adjust the value of each Press and hold / to change the setting value faster. 4 Press SETUP again to exit the setup menu. y • Press RETURN or to return to the previous menu. • Press to enter the next menu. Note If you do not operate within 30 seconds after entering the setup menu, the unit automatically exits the setup menu. 18 En
-
 1
1 -
2
-
3
-
4
-
5
-
6
-
7
-
8
-
9
-
10
-
11
-
12
-
13
-
14
-
15
-
16
-
 17
17 -
 18
18 -
 19
19 -
 20
20 -
 21
21 -
 22
22 -
 23
23 -
 24
24 -
 25
25 -
 26
26 -
 27
27 -
28
-
29
-
30
-
31
-
32
-
33
-
34
-
35
-
36
-
37
-
38
-
39
-
40
 |
 |
