Yamaha YHT-S401 Owners Manual - Page 23
Adjusting the volume balance of each channel, Adjusting high/low frequency sound (tone control) - 7 1 speakers to
 |
View all Yamaha YHT-S401 manuals
Add to My Manuals
Save this manual to your list of manuals |
Page 23 highlights
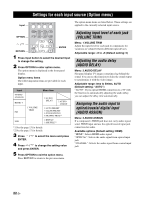
Adjusting the volume balance of each channel Menu: 1:SP LEVEL Adjust the volume balance between the channels with test tones output from each channel. Sub menu: "1-1:FRONT L" "1-2:FRONT R": Adjusts the output level of the front speaker (left/right) channels. "1-3:CENTER": Adjusts the output level of the center speaker channel. "1-4:SURROUND L" "1-5:SURROUND R": Adjusts the output level of the virtual surround/surround speaker (left/ right) channels. "1-6:SUBWOOFER": Adjusts the output level of the subwoofer channel. Adjustable range: -6 to +6 (Default setting: 0) y • You can also adjust the volume balance while playing the input device. (☞ P. 12) • As you complete each channel setting, press LEVEL to move to the next channel for adjustment. Adjusting high/low frequency sound (tone control) Menu: 2:TONE CONTROL You can adjust the balance of the high frequency range (Treble) and low frequency range (Bass) of sounds output from the front speakers to obtain desired tone. When headphones are connected, adjusts the balance of the highfrequency range and low-frequency range of sounds output from headphones. Sub menu "2-1:BASS": Adjusts the balance of the low frequency range (Bass) of sounds output from the speaker. "2-2:TREBLE": Adjusts the balance of the high frequency range (Treble) of sounds output from the speaker. Adjustable range: -6 to +6 (Default setting: 0) Setup menu Available options: OFF, ON (Default setting: OFF) "OFF": Deactivates the HDMI control function. The standby power consumption of this unit decreases. "ON": Activates the HDMI control function. y To activate the ARC function, set "3-1:CONTROL" to "ON". ■ Setting the audio output Sub menu: 3-2:AUDIO You can select a component to play back HDMI audio signals. This setting is effective when "3-1:CONTROL" is set to "OFF". Available options: AMP, TV (Default setting: AMP) "AMP": Outputs HDMI sound signals from the speakers connected to this unit. "TV": Outputs HDMI sound signals from the speakers of a TV connected to this unit. Changing the brightness of the front panel display You can change the brightness of the front panel display. You can also turn off the front panel display to view a movie in a darker environment. The brightness of the front panel changes as follows. Menu: 4:DISPLAY MODE Adjustable range (Default setting: "DIMMER 0") Bright Dark Configuring the HDMI settings Menu: 3:HDMI SETUP You can configure the settings related to HDMI signals and HDMI control function. ■ Switching HDMI control function on/off Sub menu: 3-1:CONTROL You can set whether to use the HDMI control function. For details, see "Operating the unit by TV's remote control" (☞ P. 23). * Selecting DISPLAY OFF turns off the front panel display after exiting the setup menu. Notes • The front panel display lights up momentarily when any operation is performed with DISPLAY OFF mode selected. • Only the STATUS indicator remains lit in DISPLAY OFF mode. USEFUL OPERATION English 19 En
-
 1
1 -
2
-
3
-
4
-
5
-
6
-
7
-
8
-
9
-
10
-
11
-
12
-
13
-
14
-
15
-
16
-
17
-
 18
18 -
 19
19 -
 20
20 -
 21
21 -
 22
22 -
 23
23 -
 24
24 -
 25
25 -
 26
26 -
 27
27 -
 28
28 -
29
-
30
-
31
-
32
-
33
-
34
-
35
-
36
-
37
-
38
-
39
-
40
 |
 |
