Zanussi ZBM26542XA Product Manaul - Page 26
Installation
 |
View all Zanussi ZBM26542XA manuals
Add to My Manuals
Save this manual to your list of manuals |
Page 26 highlights
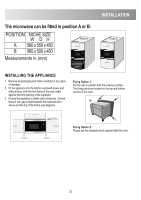
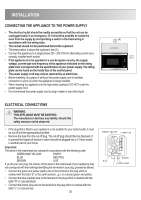
INSTALLATION CONNECTING THE APPLIANCE TO THE POWER SUPPLY • The electrical outlet should be readily accessible so that the unit can be unplugged easily in an emergency. Or it should be possible to isolate the oven from the supply by incorporating a switch in the fixed wiring in (A) accordance with the wiring rules. • The socket should not be positioned behind the cupboard. • The best position is above the cupboard, see (A). • Connect the appliance to a single phase 230 - 240 V/50 Hz alternating current via a correctly installed earth socket. • If the appliance is to be operated in a non-European country, the supply voltage, current type and frequency of the appliance indicated on the rating plate must correspond with the specification of your power supply. The rating plate can be found on the inside face of the control panel. • The power supply cord may only be replaced by an electrician. • Before installing, tie a piece of string to the power supply cord to facilitate connection to point (A) when the appliance is being installed. • When inserting the appliance into the high-sided cupboard, DO NOT crush the power supply cord. • Do not immerse the power supply cord or plug in water or any other liquid. ELECTRICAL CONNECTIONS WARNING: THIS APPLIANCE MUST BE EARTHED The manufacturer declines any liability should this safety measure not be observed. • If the plug that is fitted to your appliance is not suitable for your socket outlet, it must be cut off and the appropriate plug fitted. • Remove the fuse from the cut off plug. The cut off plug should then be disposed of to prevent the hazard of shocks in case it should be plugged into a 13 Amp socket in another part of your home. Important: The wires in the mains lead are coloured in accordance with the following code: GREEN AND YELLOW EARTH BLUE NEUTRAL BROWN LIVE If you fit your own plug, the colours of the wires in the mains lead of your appliance may not correspond with the markings identifying the terminals in your plug, proceed as follows: • Connect the green and yellow (earth) wire to the terminal in the plug which is marked with the letter "E" or the earth symbol ( ) or coloured green and yellow. • Connect the blue (neutral) wire to the terminal in the plug which is marked with the letter "N" or coloured black. • Connect the brown (live) wire to the terminal in the plug which is marked with the letter "L" or coloured red. 26 GREEN & YELLOW 13 AMP FUSE 13 AMP BLUE BROWN CORD CLAMP
-
 1
1 -
2
-
3
-
4
-
5
-
6
-
7
-
8
-
9
-
10
-
11
-
12
-
13
-
14
-
15
-
16
-
17
-
18
-
19
-
20
-
 21
21 -
 22
22 -
 23
23 -
 24
24 -
 25
25 -
 26
26 -
 27
27 -
 28
28 -
 29
29 -
 30
30 -
 31
31 -
32
 |
 |
