Zanussi ZBM26542XA Product Manaul - Page 7
Appliance Overview - microwave oven
 |
View all Zanussi ZBM26542XA manuals
Add to My Manuals
Save this manual to your list of manuals |
Page 7 highlights
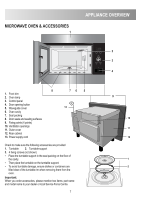
MICROWAVE OVEN & ACCESSORIES 1 APPLIANCE OVERVIEW 2 3 4 8 1. Front trim 2. Oven lamp 3. Control panel 4. Door opening button 5. Waveguide cover 6. Oven cavity 7. Seal packing 8. Door seals and sealing surfaces 9. Fixing points (4 points) 10. Ventilation openings 11. Outer cover 12. Rear cabinet 13. Power supply cord 76 5 13 Check to make sure the following accessories are provided: 1. Turntable 2. Turntable support 3. 4 fixing screws (not shown) • Place the turntable support in the seal packing on the floor of the cavity. • Then place the turntable on the turntable support. • To avoid turntable damage, ensure dishes or containers are lifted clear of the turntable rim when removing them from the oven. Important: When you order accessories, please mention two items: part name and model name to your dealer or local Service Force Centre. 7 9 10 11 12 1 2
-
 1
1 -
 2
2 -
 3
3 -
 4
4 -
 5
5 -
 6
6 -
 7
7 -
 8
8 -
 9
9 -
 10
10 -
 11
11 -
 12
12 -
13
-
14
-
15
-
16
-
17
-
18
-
19
-
20
-
21
-
22
-
23
-
24
-
25
-
26
-
27
-
28
-
29
-
30
-
31
-
32
 |
 |
