ZyXEL G-1000 User Guide - Page 96
Navigating the SMT Interface, Table 38
 |
View all ZyXEL G-1000 manuals
Add to My Manuals
Save this manual to your list of manuals |
Page 96 highlights
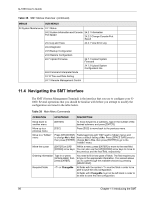
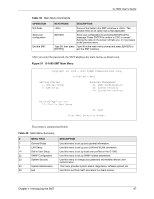
G-1000 User's Guide Table 38 SMT Menus Overview (continued) MENUS SUB MENUS 24 System Maintenance 24.1 Status 24.2 System Information and Console 24.2.1 Information Port Speed 24.2.2 Change Console Port Speed 24.3 Log and Trace 24.3.1 View Error Log 24.4 Diagnostic 24.5 Backup Configuration 24.6 Restore Configuration 24.7 Upload Firmware 24.7.1 Upload System Firmware 24.7.2 Upload System Configuration File 24.8 Command Interpreter Mode 24.10 Time and Date Setting 24.11 Remote Management Control 11.4 Navigating the SMT Interface The SMT (System Management Terminal) is the interface that you use to configure your G1000. Several operations that you should be familiar with before you attempt to modify the configuration are listed in the table below. Table 39 Main Menu Commands OPERATION KEYSTROKE DESCRIPTION Move down to another menu [ENTER] To move forward to a submenu, type in the number of the desired submenu and press [ENTER]. Move up to a previous menu Move to a "hidden" menu [ESC] Press [ESC] to move back to the previous menu. Press [SPACE BAR] Fields beginning with "Edit" lead to hidden menus and to change No to Yes have a default setting of No. Press [SPACE BAR] once to then press [ENTER]. change No to Yes, then press [ENTER] to go to the "hidden" menu. Move the cursor [ENTER] or [UP]/ Within a menu, press [ENTER] to move to the next field. [DOWN] arrow keys. You can also use the [UP]/[DOWN] arrow keys to move to the previous and the next field, respectively. Entering information Type in or press [SPACE BAR], then press [ENTER]. You need to fill in two types of fields. The first requires you to type in the appropriate information. The second allows you to cycle through the available choices by pressing [SPACE BAR]. Required fields or ChangeMe All fields with the symbol must be filled in order to be able to save the new configuration. All fields with ChangeMe must not be left blank in order to be able to save the new configuration. 96 Chapter 11 Introducing the SMT
-
 1
1 -
2
-
3
-
4
-
5
-
6
-
7
-
8
-
9
-
10
-
11
-
12
-
13
-
14
-
15
-
16
-
17
-
18
-
19
-
20
-
21
-
22
-
23
-
24
-
25
-
26
-
27
-
28
-
29
-
30
-
31
-
32
-
33
-
34
-
35
-
36
-
37
-
38
-
39
-
40
-
41
-
42
-
43
-
44
-
45
-
46
-
47
-
48
-
49
-
50
-
51
-
52
-
53
-
54
-
55
-
56
-
57
-
58
-
59
-
60
-
61
-
62
-
63
-
64
-
65
-
66
-
67
-
68
-
69
-
70
-
71
-
72
-
73
-
74
-
75
-
76
-
77
-
78
-
79
-
80
-
81
-
82
-
83
-
84
-
85
-
86
-
87
-
88
-
89
-
90
-
 91
91 -
 92
92 -
 93
93 -
 94
94 -
 95
95 -
 96
96 -
 97
97 -
 98
98 -
 99
99 -
 100
100 -
 101
101 -
102
-
103
-
104
-
105
-
106
-
107
-
108
-
109
-
110
-
111
-
112
-
113
-
114
-
115
-
116
-
117
-
118
-
119
-
120
-
121
-
122
-
123
-
124
-
125
-
126
-
127
-
128
-
129
-
130
-
131
-
132
-
133
-
134
-
135
-
136
-
137
-
138
-
139
-
140
-
141
-
142
-
143
-
144
-
145
-
146
-
147
-
148
-
149
-
150
-
151
-
152
-
153
-
154
-
155
-
156
-
157
-
158
-
159
-
160
-
161
-
162
-
163
-
164
-
165
-
166
-
167
-
168
-
169
-
170
-
171
-
172
-
173
-
174
-
175
-
176
-
177
-
178
-
179
-
180
-
181
-
182
-
183
-
184
-
185
-
186
-
187
-
188
-
189
-
190
-
191
-
192
 |
 |