ZyXEL NSA320 User Guide - Page 25
Manual Configuration, Table 3, LABEL, DESCRIPTION - default password
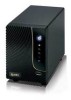 |
View all ZyXEL NSA320 manuals
Add to My Manuals
Save this manual to your list of manuals |
Page 25 highlights
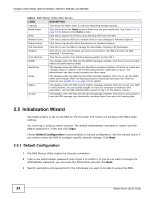
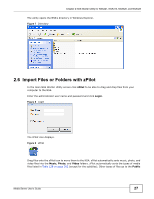
Chapter 2 NAS Starter Utility for NSA221, NSA310, NSA320, and NSA325 4 Check your settings. If they are OK, click Next. Otherwise click Back. If you want to change anything other than the user accounts, keep clicking Back until you can change the wizard type to manual. 5 Wait while the NAS Starter Utility configures the NSA. After the NAS Starter Utility finishes configuring the NSA, you can select Run zPilot to launch the zPilot to drag and drop files onto the NSA (see Section 2.6 on page 27) after clicking Finish or just click Finish to return to the main NAS Starter Utility screen (see Section 2.4 on page 23). 2.5.2 Manual Configuration 1 Set up the NSA's basic network configuration first. Table 3 NAS Starter Utility > Config LABEL DESCRIPTION Get IP automatically from DHCP server Select this if the NSA is automatically assigned an IP address from the ISP or a DHCP server in your network. Assign IP Manually Select this if you want to assign the NSA a fixed IP address, subnet mask and default gateway. Use DNS server from DHCP server Assign DNS server manually Note: Do not configure an IP address that is already in use in your network. This results to a network IP address conflict and makes the NSA inaccessible. Domain Name System (DNS) is for mapping a domain name to its corresponding IP address and vice versa. Select this if the NSA is automatically given DNS information from the ISP or a DHCP server in your network. If you were given specific IP address(es) of the DNS server(s), select this and enter the primary and secondary DNS in the corresponding fields. 2 If your Internet connection requires you to enter a user name and password to connect to the Internet, enter them here and click Next. If you do not need to enter a user name and password to connect to the Internet, click Skip. 3 The NAS Starter Utility checks the Internet connection. 4 Type a new administrator password (and retype it to confirm) and click Next. If you do not want to change the administrator password, you can leave the fields blank and just click Next. 5 Specify a name to uniquely identify the NSA on your network. Choose the time zone of your location. This sets the time difference between your time zone and Greenwich Mean Time (GMT). 6 Select how to configure the hard disks. With only one hard disk installed, just click Next. If you have two hard disks installed choose one of the following: • RAID 1: Use this to mirror all data on one disk to the other disk to protect against data loss. • Individual Disks: Use this if you want maximum storage capacity and/or you have other means of protecting your data. This creates two JBOD volumes (with one disk in each), a failure of one disk (volume) should not affect the other volume (disk). Media Server User's Guide 25
-
 1
1 -
2
-
3
-
4
-
5
-
6
-
7
-
8
-
9
-
10
-
11
-
12
-
13
-
14
-
15
-
16
-
17
-
18
-
19
-
 20
20 -
 21
21 -
 22
22 -
 23
23 -
 24
24 -
 25
25 -
 26
26 -
 27
27 -
 28
28 -
 29
29 -
 30
30 -
31
-
32
-
33
-
34
-
35
-
36
-
37
-
38
-
39
-
40
-
41
-
42
-
43
-
44
-
45
-
46
-
47
-
48
-
49
-
50
-
51
-
52
-
53
-
54
-
55
-
56
-
57
-
58
-
59
-
60
-
61
-
62
-
63
-
64
-
65
-
66
-
67
-
68
-
69
-
70
-
71
-
72
-
73
-
74
-
75
-
76
-
77
-
78
-
79
-
80
-
81
-
82
-
83
-
84
-
85
-
86
-
87
-
88
-
89
-
90
-
91
-
92
-
93
-
94
-
95
-
96
-
97
-
98
-
99
-
100
-
101
-
102
-
103
-
104
-
105
-
106
-
107
-
108
-
109
-
110
-
111
-
112
-
113
-
114
-
115
-
116
-
117
-
118
-
119
-
120
-
121
-
122
-
123
-
124
-
125
-
126
-
127
-
128
-
129
-
130
-
131
-
132
-
133
-
134
-
135
-
136
-
137
-
138
-
139
-
140
-
141
-
142
-
143
-
144
-
145
-
146
-
147
-
148
-
149
-
150
-
151
-
152
-
153
-
154
-
155
-
156
-
157
-
158
-
159
-
160
-
161
-
162
-
163
-
164
-
165
-
166
-
167
-
168
-
169
-
170
-
171
-
172
-
173
-
174
-
175
-
176
-
177
-
178
-
179
-
180
-
181
-
182
-
183
-
184
-
185
-
186
-
187
-
188
-
189
-
190
-
191
-
192
-
193
-
194
-
195
-
196
-
197
-
198
-
199
-
200
-
201
-
202
-
203
-
204
-
205
-
206
-
207
-
208
-
209
-
210
-
211
-
212
-
213
-
214
-
215
-
216
-
217
-
218
-
219
-
220
-
221
-
222
-
223
-
224
-
225
-
226
-
227
-
228
-
229
-
230
-
231
-
232
-
233
-
234
-
235
-
236
-
237
-
238
-
239
-
240
-
241
-
242
-
243
-
244
-
245
-
246
-
247
-
248
-
249
-
250
-
251
-
252
-
253
-
254
-
255
-
256
-
257
-
258
-
259
-
260
-
261
-
262
-
263
-
264
-
265
-
266
-
267
-
268
-
269
-
270
-
271
-
272
-
273
-
274
-
275
-
276
-
277
-
278
-
279
-
280
-
281
-
282
-
283
-
284
-
285
-
286
-
287
-
288
-
289
-
290
-
291
-
292
-
293
-
294
-
295
-
296
-
297
-
298
-
299
-
300
-
301
-
302
-
303
-
304
-
305
-
306
-
307
-
308
-
309
-
310
-
311
-
312
-
313
-
314
-
315
-
316
-
317
-
318
-
319
-
320
-
321
-
322
-
323
-
324
-
325
-
326
-
327
-
328
-
329
-
330
-
331
-
332
-
333
-
334
-
335
-
336
-
337
-
338
-
339
-
340
-
341
-
342
-
343
-
344
-
345
-
346
-
347
-
348
-
349
-
350
-
351
-
352
-
353
-
354
-
355
-
356
-
357
-
358
-
359
-
360
-
361
-
362
-
363
-
364
-
365
-
366
-
367
-
368
-
369
-
370
-
371
-
372
-
373
-
374
-
375
-
376
-
377
-
378
-
379
-
380
-
381
-
382
-
383
-
384
-
385
-
386
-
387
-
388
-
389
-
390
-
391
-
392
-
393
-
394
-
395
-
396
-
397
-
398
-
399
-
400
-
401
-
402
-
403
-
404
-
405
-
406
-
407
-
408
-
409
-
410
-
411
-
412
-
413
-
414
-
415
-
416
-
417
-
418
-
419
-
420
-
421
-
422
-
423
-
424
-
425
-
426
-
427
-
428
-
429
-
430
-
431
-
432
-
433
-
434
-
435
-
436
-
437
-
438
-
439
-
440
-
441
-
442
-
443
-
444
-
445
-
446
-
447
-
448
-
449
-
450
-
451
-
452
-
453
-
454
-
455
-
456
-
457
-
458
-
459
-
460
-
461
-
462
-
463
-
464
-
465
-
466
-
467
-
468
-
469
-
470
-
471
-
472
-
473
-
474
-
475
-
476
-
477
-
478
-
479
-
480
-
481
-
482
-
483
-
484
-
485
-
486
-
487
-
488
-
489
-
490
-
491
-
492
-
493
-
494
-
495
-
496
-
497
-
498
-
499
-
500
-
501
-
502
-
503
-
504
-
505
-
506
-
507
-
508
-
509
-
510
-
511
-
512
-
513
-
514
-
515
-
516
-
517
-
518
-
519
-
520
-
521
-
522
-
523
-
524
-
525
-
526
-
527
-
528
-
529
-
530
-
531
-
532
-
533
-
534
-
535
-
536
-
537
-
538
-
539
-
540
-
541
-
542
-
543
-
544
-
545
-
546
-
547
-
548
-
549
-
550
-
551
-
552
-
553
-
554
-
555
-
556
-
557
-
558
-
559
-
560
-
561
-
562
-
563
-
564
-
565
-
566
-
567
-
568
-
569
-
570
-
571
-
572
-
573
-
574
-
575
-
576
 |
 |
