ZyXEL P-964 User Guide - Page 24
Web Management - User Login
 |
View all ZyXEL P-964 manuals
Add to My Manuals
Save this manual to your list of manuals |
Page 24 highlights
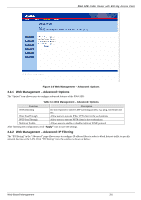
P964 APR Cable Router with 802.11g Access Point After you have finished the TCP/IP configuration setup, You may access the web pages by typing the web address " http://192.168.1.1:8080/". The P964 APR cable router provides users to configure LAN settings including DHCP server IP, netmask, DHCP clients' start IP address and the number of CPEs. To configure the LAN setting, users use a PC to browse the LAN IP of the cable router. The web functions only open to the LAN, no access from HFC cable is allowed. When browsing started, the cable router prompts the following windows for user to login. Figure 3-1 Web Management - "User Login" Page After input username/password, click "OK" and the following page will be displayed. There are four tags "Status", "Basic", "Advanced" and "wireless" as shown in in the web management interface of P964APR. The "Status" tag will show the connection status and software information. "Basic" and "Advanced" tags are used for the configuration to LAN interface. 1. "Status" The "Status" tag will show the connection status, software information and event logs of your P964APR. 2. "Basic" Click "Basic", users can set DHCP server IP, and net mask, etc. 3. "Advanced" This function is designed especially for users who want more control of LAN interface. For example, users can block packet from some CPEs to access the Internet. Users can also open some well known ports or some special port for accessing from the Internet. 4. "Wireless" Users can configure the wireless access point by clicking the "wireless" tag. There are four groups of configuration setups in the "Wireless" tag. 3-2 Web Based Management
-
 1
1 -
2
-
3
-
4
-
5
-
6
-
7
-
8
-
9
-
10
-
11
-
12
-
13
-
14
-
15
-
16
-
17
-
18
-
 19
19 -
 20
20 -
 21
21 -
 22
22 -
 23
23 -
 24
24 -
 25
25 -
 26
26 -
 27
27 -
 28
28 -
 29
29 -
30
-
31
-
32
-
33
-
34
-
35
-
36
-
37
-
38
-
39
-
40
-
41
-
42
-
43
-
44
-
45
-
46
-
47
-
48
-
49
-
50
-
51
 |
 |
