ZyXEL PLA-470 User Guide - Page 79
Product Specifications
 |
View all ZyXEL PLA-470 manuals
Add to My Manuals
Save this manual to your list of manuals |
Page 79 highlights
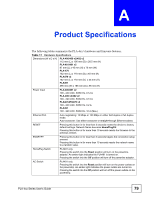
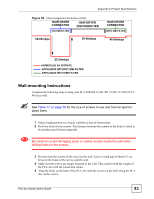
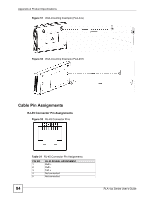
APPENDIX A Product Specifications The following tables summarize the PLA-4xx's hardware and firmware features. Table 17 Hardware Specifications Dimensions (W x D x H) PLA-400/400 v2/402 v2 112 mm (L) x 106 mm (D) x 28.5 mm (H) PLA-401/401 v2 97 mm (L) x 45 mm (H) x 70 mm (W) PLA-470 162 mm (L) x 118 mm (D) x 40 mm (H) PLA470 v2 162 mm (L) x 118 mm (D) x 35 mm (H) PLA491 395 mm (W) x 186 mm (D) x 96 mm (H) Power Input PLA-400/401 v2 100 - 240 VAC, 50/60 Hz, 0.12 A PLA-400 v2/402 v2 100 - 240 VAC, 50/60 Hz, 0.13 A PLA401/470/470 v2 100 - 240 VAC, 50/60 Hz, 0.2 A PLA491 100 - 240 VAC, 50/60 Hz, 10 A (Max.) Ethernet Port Auto-negotiating: 10 Mbps or 100 Mbps in either half-duplex or full-duplex mode. Auto-crossover: Use either crossover or straight-through Ethernet cables. RESET Pressing this button in for less than 3 seconds resets the device to factory default settings. Network Name becomes HomePlugAV. Pressing this button in for more than 10 seconds resets the firmware to the previous version. ENCRYPT Pressing this button in for less than 3 seconds begins the connection setup process. Pressing this button in for more than 10 seconds resets the network name to a random value. HomePlug Switch PLA491 only. Pressing the switch into the Reset position will turn on the powerline adapter. An amber light indicates the PLA491 is turned on. Pressing the switch into the Off position will turn off the powerline adapter. AC Switch PLA491 only. Pressing the switch into the Reset position will turn on the power outlets on the powerstrip. An amber light indicates the power outlets are turned on. Pressing the switch into the Off position will turn off the power outlets on the powerstrip. PLA-4xx Series User's Guide 79
-
 1
1 -
2
-
3
-
4
-
5
-
6
-
7
-
8
-
9
-
10
-
11
-
12
-
13
-
14
-
15
-
16
-
17
-
18
-
19
-
20
-
21
-
22
-
23
-
24
-
25
-
26
-
27
-
28
-
29
-
30
-
31
-
32
-
33
-
34
-
35
-
36
-
37
-
38
-
39
-
40
-
41
-
42
-
43
-
44
-
45
-
46
-
47
-
48
-
49
-
50
-
51
-
52
-
53
-
54
-
55
-
56
-
57
-
58
-
59
-
60
-
61
-
62
-
63
-
64
-
65
-
66
-
67
-
68
-
69
-
70
-
71
-
72
-
73
-
 74
74 -
 75
75 -
 76
76 -
 77
77 -
 78
78 -
 79
79 -
 80
80 -
 81
81 -
 82
82 -
 83
83 -
 84
84 -
85
-
86
-
87
-
88
-
89
-
90
-
91
-
92
 |
 |