eMachines 355 eMachines 355 Netbook Series Service Guide - Page 180
BIOS Recovery by Crisis Disk, BIOS Recovery Boot Block, BIOS Recovery Hotkey
 |
View all eMachines 355 manuals
Add to My Manuals
Save this manual to your list of manuals |
Page 180 highlights
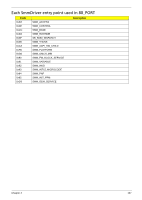
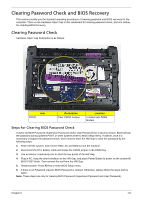
BIOS Recovery by Crisis Disk 0 BIOS Recovery Boot Block: 0 BIOS Recovery Boot Block is a special block of BIOS. It is used to boot up the system with minimum BIOS initialization. Users can enable this feature to restore the BIOS firmware to a successful one once the previous BIOS flashing process failed. BIOS Recovery Hotkey: 0 The system provides a function hotkey: Fn+Esc, for enable BIOS Recovery process when system is powered on during BIOS POST. To use this function, it is strongly recommended to have the AC adapter and Battery present. If this function is enabled, the system will force the BIOS to enter a special BIOS block, called Boot Block. Steps for BIOS Recovery from USB Storage: 0 Before doing this, prepare the Crisis USB key. The Crisis USB key could be made by executing the Crisis Disk program in another system with Windows XP OS. Follow the steps below: 1. Save ROM file (file name: PAV70D2.fd for DDR2, PAV70D3.FD for DDR3) to the root directory of USB storage. 2. Plug USB storage into USB port. 3. Press Fn + ESC button then plug in AC. The Power button flashes once. 4. Press Power button to initiate system CRISIS mode. When CRISIS is complete, the system auto restarts with a workable BIOS. 5. Update the latest version BIOS for this machine by regular BIOS flashing process. Steps for BIOS Recovery by Crisis Disk: 0 Before doing this, a Crisis Diskette should be prepared ready in hand. The Crisis Diskette could be made by executing the Crisis Disk program in another system with Windows XP OS. Follow the steps below: 1. Power Off failed system. 2. Attach a USB floppy drive to the failed system. 3. Copy xxxxx.wph to tool's folder and rename it as BIOS.wph. 4. Execute wincris.exe to start the Crisis Disk Build. 5. Select Removable and click Start. 6. Select Quick Format Disk and click Start. A progress screen displays. 7. Click OK to complete the process. 8. Insert the Crisis Disk in to the USB floppy drive attached to the BIOS flash failed system. 9. In the power-off state, press and hold Fn+Esc then press the Power button. The system powers on and the Crisis BIOS Recovery process begins. BIOS Boot Block begins restoring the BIOS code from the Crisis floppy disk to BIOS ROM on the failed systems. When the Crisis flash process is finished, the system restarts with a workable BIOS. Update to the latest version BIOS for the system using the regular BIOS flashing process. 172 Chapter 5
-
 1
1 -
2
-
3
-
4
-
5
-
6
-
7
-
8
-
9
-
10
-
11
-
12
-
13
-
14
-
15
-
16
-
17
-
18
-
19
-
20
-
21
-
22
-
23
-
24
-
25
-
26
-
27
-
28
-
29
-
30
-
31
-
32
-
33
-
34
-
35
-
36
-
37
-
38
-
39
-
40
-
41
-
42
-
43
-
44
-
45
-
46
-
47
-
48
-
49
-
50
-
51
-
52
-
53
-
54
-
55
-
56
-
57
-
58
-
59
-
60
-
61
-
62
-
63
-
64
-
65
-
66
-
67
-
68
-
69
-
70
-
71
-
72
-
73
-
74
-
75
-
76
-
77
-
78
-
79
-
80
-
81
-
82
-
83
-
84
-
85
-
86
-
87
-
88
-
89
-
90
-
91
-
92
-
93
-
94
-
95
-
96
-
97
-
98
-
99
-
100
-
101
-
102
-
103
-
104
-
105
-
106
-
107
-
108
-
109
-
110
-
111
-
112
-
113
-
114
-
115
-
116
-
117
-
118
-
119
-
120
-
121
-
122
-
123
-
124
-
125
-
126
-
127
-
128
-
129
-
130
-
131
-
132
-
133
-
134
-
135
-
136
-
137
-
138
-
139
-
140
-
141
-
142
-
143
-
144
-
145
-
146
-
147
-
148
-
149
-
150
-
151
-
152
-
153
-
154
-
155
-
156
-
157
-
158
-
159
-
160
-
161
-
162
-
163
-
164
-
165
-
166
-
167
-
168
-
169
-
170
-
171
-
172
-
173
-
174
-
 175
175 -
 176
176 -
 177
177 -
 178
178 -
 179
179 -
 180
180 -
 181
181 -
 182
182 -
 183
183 -
 184
184 -
 185
185 -
186
-
187
-
188
-
189
-
190
-
191
-
192
-
193
-
194
-
195
-
196
-
197
-
198
-
199
-
200
-
201
-
202
-
203
-
204
-
205
-
206
-
207
-
208
-
209
-
210
-
211
-
212
-
213
-
214
 |
 |