2015 Dodge Durango User Guide - Page 177
2015 Dodge Durango Manual

Page 177 highlights
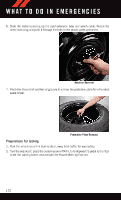
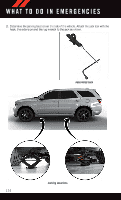
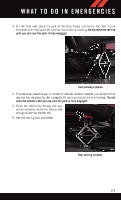
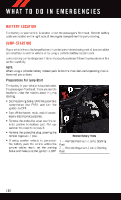
W H AT T O D O I N E M E R G E N C I E S 3. For the front axle, place the jack on the body flange just behind the front tire as indicated by the triangular lift point symbol on the sill molding. Do not raise the vehicle until you are sure the jack is fully engaged. Front Jacking Location 4. For a rear tire, place the jack in the slot on the rear tie-down bracket, just forward of the rear tire (as indicated by the triangular lift point symbol on the sill molding). Do not raise the vehicle until you are sure the jack is fully engaged. 5. Raise the vehicle by turning the jack screw clockwise. Raise the vehicle just enough to remove the flat tire. 6. Remove the lug nuts and wheel. Rear Jacking Location 175
-
 1
1 -
2
-
3
-
4
-
5
-
6
-
7
-
8
-
9
-
10
-
11
-
12
-
13
-
14
-
15
-
16
-
17
-
18
-
19
-
20
-
21
-
22
-
23
-
24
-
25
-
26
-
27
-
28
-
29
-
30
-
31
-
32
-
33
-
34
-
35
-
36
-
37
-
38
-
39
-
40
-
41
-
42
-
43
-
44
-
45
-
46
-
47
-
48
-
49
-
50
-
51
-
52
-
53
-
54
-
55
-
56
-
57
-
58
-
59
-
60
-
61
-
62
-
63
-
64
-
65
-
66
-
67
-
68
-
69
-
70
-
71
-
72
-
73
-
74
-
75
-
76
-
77
-
78
-
79
-
80
-
81
-
82
-
83
-
84
-
85
-
86
-
87
-
88
-
89
-
90
-
91
-
92
-
93
-
94
-
95
-
96
-
97
-
98
-
99
-
100
-
101
-
102
-
103
-
104
-
105
-
106
-
107
-
108
-
109
-
110
-
111
-
112
-
113
-
114
-
115
-
116
-
117
-
118
-
119
-
120
-
121
-
122
-
123
-
124
-
125
-
126
-
127
-
128
-
129
-
130
-
131
-
132
-
133
-
134
-
135
-
136
-
137
-
138
-
139
-
140
-
141
-
142
-
143
-
144
-
145
-
146
-
147
-
148
-
149
-
150
-
151
-
152
-
153
-
154
-
155
-
156
-
157
-
158
-
159
-
160
-
161
-
162
-
163
-
164
-
165
-
166
-
167
-
168
-
169
-
170
-
171
-
 172
172 -
 173
173 -
 174
174 -
 175
175 -
 176
176 -
 177
177 -
 178
178 -
 179
179 -
 180
180 -
 181
181 -
 182
182 -
183
-
184
-
185
-
186
-
187
-
188
-
189
-
190
-
191
-
192
-
193
-
194
-
195
-
196
-
197
-
198
-
199
-
200
-
201
-
202
-
203
-
204
-
205
-
206
-
207
-
208
-
209
-
210
-
211
-
212
-
213
-
214
-
215
-
216
-
217
-
218
-
219
-
220
-
221
-
222
-
223
-
224
-
225
-
226
-
227
-
228
 |
 |

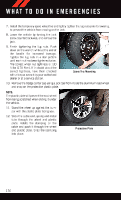
3. For the front axle, place the jack on the body flange just behind the front tire as
indicatedbythetriangularliftpointsymbolonthesillmolding.
Donotraisethevehicle
untilyouaresurethejackisfullyengaged.
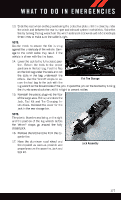
4. Forareartire,placethejackintheslotonthereartie-downbracket,justforwardofthe
reartire(asindicatedbythetriangularliftpointsymbolonthesillmolding).
Do not
raisethevehicleuntilyouaresurethejackisfullyengaged.
5. Raise the vehicle by turning the jack
screw clockwise. Raise the vehicle just
enoughtoremovetheflattire.
6. Removethelugnutsandwheel.
FrontJackingLocation
RearJackingLocation
WHAT TO DO IN EMERGENCIES
175