1997 Ford Explorer Owner Guide 1st Printing
1997 Ford Explorer Manual

1997 Ford Explorer manual content summary:
- 1997 Ford Explorer | Owner Guide 1st Printing - Page 1
Contents Before driving Introduction Instrumentation Controls and features Seating and safety restraints Starting and driving Starting Driving Roadside emergencies Servicing Maintenance and care Capacities and specifications Reporting safety defects Index 165 222 232 233 110 117 147 2 5 25 78 1 - 1997 Ford Explorer | Owner Guide 1st Printing - Page 2
and its equipment? In this owner's guide, answers to such questions are contained in driving too briskly during the first 1,600 km (1,000 miles) of driving. Vary speeds frequently. This is necessary to give the moving parts a chance to break in. If possible, you should avoid full use of the brakes - 1997 Ford Explorer | Owner Guide 1st Printing - Page 3
GUIDE The information found in this guide was in effect at the time of printing. Ford may change control or an accident. Be sure to read Control Trac - Automatic Four-Wheel Drive System (if equipped) in the Driving chapter as well as the special "Four Wheeling" supplement included with AWD and 4WD - 1997 Ford Explorer | Owner Guide 1st Printing - Page 4
Introduction Using your vehicle as a snowplow Do not use this vehicle for snowplowing. 4 - 1997 Ford Explorer | Owner Guide 1st Printing - Page 5
H C 2 1 3 UNLEADED FUEL ONLY 80 140 30 20 10 20 H 90 180 0 0 0 0 0 0 160 100 110 200 F E 0 H OFF RSM ON SET ACC OFF COAST SRS Headlamp control (pg. 25) Instrument panel dimmer switch (pg. 26) Tilt steering wheel lever (pg. 44) Driver air bag (pg. 89) Turn signal and wiper/washer - 1997 Ford Explorer | Owner Guide 1st Printing - Page 6
button) (pg. 121) Electronic sound system; refer to Audio Guide (pg. 36) Rear wiper/washer control (pg. 37) OD ON/OFF VOL - PUSH ON AM FM BASS TREB FM 1 CLK BAL FADE AUTO SET PUSH SEEK TUNE DISCS SCAN EJ DOLBY SYSTEM TAPE CD REW 1 FF 2 SIDE 1-2 3 4 COMP 5 SHUFFLE 6 LO OFF HI - 1997 Ford Explorer | Owner Guide 1st Printing - Page 7
CLUSTER LIGHTS AND CHIMES 4 H CHECK ENGINE 5 6 40 30 20 10 50 60 60 70 0 0 0 80 100 120 140 80 90 160 3 2 1 C 40 000000 100 1 10 H L H SPEED CONTROL 4WD 20 180 DOOR AJAR F E ABS 0 BRAKE ! P RPMx1000 MPH km/h 120 THEFT 4WD LOW P R N D 2 1 L O/D OFF Speed control (if - 1997 Ford Explorer | Owner Guide 1st Printing - Page 8
On position and the engine is Off. Anti-theft system (if equipped) Illuminates when the anti-theft system is arming and flashes when the anti-theft system is armed. CHECK ENGINE THEFT Turn signal Illuminates when the left or right turn signal or the hazard lights are turned on. Four wheel drive - 1997 Ford Explorer | Owner Guide 1st Printing - Page 9
Briefly illuminates when the ignition is turned on and the engine is off. The light also illuminates when the battery is not charging properly, requiring electrical system service. Fuel reset Illuminates when the ignition key is turned to the ON position and the fuel pump shut-off switch has been - 1997 Ford Explorer | Owner Guide 1st Printing - Page 10
Illuminates when the headlamp high beams are on. ! BRAKE Anti-lock brake system (ABS) Momentarily illuminates when the ignition is turned on and the engine is off. If the light stays on or continues to flash, the ABS needs to be serviced. Air bag readiness Briefly illuminates when the ignition is - 1997 Ford Explorer | Owner Guide 1st Printing - Page 11
warning chime Sounds when the key is left in the ignition in the Off/Lock or Acc position and the driver's door is opened. Safety belt warning chime For information on the safety belt warning chime, refer to the Seating and safety restraints chapter. Supplemental restraint system (SRS) warning chime - 1997 Ford Explorer | Owner Guide 1st Printing - Page 12
in the system. Sufficient pressure exists as long as the needle remains in the "NORM" range. If the gauge indicates constantly low pressure at normal engine speed, refer to Checking and adding engine oil in the Maintenance and care chapter. If the gauge indicates a low pressure and the - 1997 Ford Explorer | Owner Guide 1st Printing - Page 13
Instrumentation and have your vehicle checked at your dealership or by a qualified technician. 0 160 20 20 180 10 0 MPH km/h Trip odometer Can register the mileage of individual journeys. To reset, depress the control. 40 30 40 60 50 60 70 o o o o 100 80 120 80 140 90 100 110 120 0 0 0 0 - 1997 Ford Explorer | Owner Guide 1st Printing - Page 14
Indicates the engine speed in revolutions per minute. 4 3 2 1 0 RPM x 1000 5 6 Charging system gauge This gauge shows the battery voltage when the ignition key is in the ON position. If the pointer moves and stays outside of the normal range, have the vehicle's electrical system checked as soon - 1997 Ford Explorer | Owner Guide 1st Printing - Page 15
system will also notify you of potential vehicle problems with a display of system warnings. Selectable features FUEL ENGLISH METRIC RANGE STATUS ECON RESET SYSTEM CHECK OIL CHANGE RESET English/metric display Press to toggle the message center display between metric or English units. FUEL - 1997 Ford Explorer | Owner Guide 1st Printing - Page 16
in the Off position during fueling. The display FUEL LEVEL ERROR indicates a problem with the fuel indication system. See your dealer or qualified service technician for system METRIC RANGE STATUS ECON RESET SYSTEM CHECK OIL CHANGE RESET FUEL ENGLISH METRIC RANGE STATUS ECON RESET SYSTEM - 1997 Ford Explorer | Owner Guide 1st Printing - Page 17
ECON RESET SYSTEM CHECK OIL CHANGE RESET System check Press the system check control to display the status of the following systems: • engine oil life left • engine oil level • voltage level • engine coolant temperature • washer fluid level • head lamps • tail lamps • brake lamps FUEL ENGLISH - 1997 Ford Explorer | Owner Guide 1st Printing - Page 18
• automatic ride control (if equipped) • fuel level The engine oil life left has two phases. The first display will indicate the oil change status (OK, SOON, REQUIRED). The second display will indicate the percentage of oil life remaining. The display OIL TEMP SIGNAL ERROR indicates a problem with - 1997 Ford Explorer | Owner Guide 1st Printing - Page 19
display OIL TEMP SIGNAL ERROR indicates a problem with the system. Following this display, contact your dealer or qualified service technician for system maintenance. FUEL ENGLISH METRIC RANGE STATUS ECON RESET SYSTEM CHECK OIL CHANGE RESET Message center warnings Check air ride system This - 1997 Ford Explorer | Owner Guide 1st Printing - Page 20
Instrumentation switch Off and have your vehicle serviced as soon as possible. Air ride switch off The air ride suspension switch is off. Refer to Air suspension system in the Controls and features chapter for more information. Change oil soon The engine oil life remaining is 5% or less. After you - 1997 Ford Explorer | Owner Guide 1st Printing - Page 21
CHANGE RESET control until the displayed percentage is the Personalized Oil Reset Percentage you desire. Check charging system The electrical system is not maintaining a proper voltage. Have the electrical system checked as soon as safely possible. H - + L Check engine temp The engine coolant - 1997 Ford Explorer | Owner Guide 1st Printing - Page 22
D 2 1 OFF ON RSM SET ACC OFF COAST SRS 5. Turn the light switch to the headlamp position. If "CHECK EXTERIOR LAMPS" is displayed, then a low beam headlamp is burned out. If you use additional lights, such as trailer lights, or replace bulbs with equipment that is not equal to the original Ford - 1997 Ford Explorer | Owner Guide 1st Printing - Page 23
get a false warning or no warning at all. Door ajar The ignition switch is in the On or Start position and a door is open. Low fuel level The fuel level is low. F E Low oil level The oil level is low. Refer to Checking and adding engine oil in the Maintenance and carechapter for more information - 1997 Ford Explorer | Owner Guide 1st Printing - Page 24
and features HEADLAMP CONTROL Rotate the headlamp control to the desired position: OFF - Lamps off Parking lamps, side marker lamps, instrument panel lamps, license plate lamps and tail lamps on Headlamps on OFF DIM 4 H C 2 1 F E 0 3 5 6 40 30 40 - 1997 Ford Explorer | Owner Guide 1st Printing - Page 25
SET ACC OFF COAST SRS Daytime running light (DRL) system (if equipped) The DRL system turns on the highbeam headlamps, with a reduced light output, when: • the vehicle is running and the ignition is in the On position • the vehicle has a fully released parking brake • the headlamp system is in the - 1997 Ford Explorer | Owner Guide 1st Printing - Page 26
0 0 0 0 160 20 10 0 100 110 120 20 RPM x 1000 km/h P R N D 2 1 VOL - PUSH ON AM FM BASS TREB FM 1 ST CLK BAL FADE AUTO SET PUSH OFF ON RSM SEEK EJ DOLBY SYSTEM SET ACC OFF COAST TUNE DISCS SCAN TAPE CD REW 1 FF 2 SIDE 1-2 3 4 COMP 5 SHUFFLE 6 SRS LO OFF HI *A/C *MAX A/C 27 - 1997 Ford Explorer | Owner Guide 1st Printing - Page 27
Controls and features PARKING BRAKE For information on the parking brake, refer to Preparing to start the vehiclein the Driving chapter. BRAKE CLIMATE CONTROL SYSTEM Manual heating and air conditioning system OFF A/C MAX A/C 28 - 1997 Ford Explorer | Owner Guide 1st Printing - Page 28
speed. Temperature Turn the temperature control to the desired mix of warm and cool air (left for cooler and right for warmer). Controlling airflow Turn the mode control to the desired airflow position. • The A/C compressor operates in the mode positions marked *. OFF * * * * *A/C * MAX A/C 29 - 1997 Ford Explorer | Owner Guide 1st Printing - Page 29
the OFF position for all climate control functions to cease. The outside inlet door will close and the fan is shut off. Drive with the climate control system on (either in heating or A/C mode) to reduce humidity in your vehicle. Using A/C mode The A/C mode directs outside conditioned air to flow - 1997 Ford Explorer | Owner Guide 1st Printing - Page 30
AUTO SET PUSH RSM ON SET ACC OFF COAST SEEK TUNE DISCS SCAN EJ DOLBY SYSTEM TAPE CD REW 1 FF 2 SIDE 1-2 3 4 COMP 5 SHUFFLE 6 SRS LO OFF HI *A/C *MAX A/C Using the panel/floor mode The mode directs outside air to flow between the panel and floor vents. The air conditioning compressor - 1997 Ford Explorer | Owner Guide 1st Printing - Page 31
has the capability to demist the front side windows. The air conditioning compressor will function to dehumidify the windows provided the outside temperature is above 10°C (50°F). mode for air to Select the flow through these vents: Electronic automatic temperature control (EATC) system (if equipped - 1997 Ford Explorer | Owner Guide 1st Printing - Page 32
position. To maximize system efficiency: • Do not put items under the front seats that will interfere with the air flow to the rear seats. • Keep the air intake vents clear of any snow, ice or leaves. Automatic operation To turn on the EATC: • Press AUTO or any the six override controls. • Select - 1997 Ford Explorer | Owner Guide 1st Printing - Page 33
display window will indicate the temperature and operating mode that you have selected. MAX A/C VENT PNL•FLR REAR FAN OFF °F °C AUTO VENT PNL FLR MAX A/C The TEMP control will increase or decrease the set temperature in one degree increments between 36°C (65 °F) and 47°C (85°F). To scroll - 1997 Ford Explorer | Owner Guide 1st Printing - Page 34
fan speed is adjusted automatically for selected temperature conditions. °F AUTO Override automatic fan speed at any time by turning the FAN control up for HI and down for LO fan speeds. To return to automatic fan control, press AUTO. FLOOR FLR-DEF OFF HI AUTOMATIC LO DEF Manual override If an - 1997 Ford Explorer | Owner Guide 1st Printing - Page 35
MAX A/C and OFF control at the same time. • If the battery is disconnected, the display will revert to Fahrenheit. Servicing the EATC If the EATC is not operating properly, consult your dealer or qualified service technician. AUDIO SYSTEM Refer to the Audio Guide for instructions on how to operate - 1997 Ford Explorer | Owner Guide 1st Printing - Page 36
to operate the rear window defroster. The defroster turns off automatically after 10 minutes or when the ignition is turned to the OFF position. To manually turn off the defroster before ten minutes have passed, push the control again. REAR WINDOW WIPER AND WASHER (IF EQUIPPED) Washer Press for - 1997 Ford Explorer | Owner Guide 1st Printing - Page 37
with an automatic ride control system. This system is designed to level your vehicle when towing or carrying a heavy load. To prevent sudden vehicle movement, turn off the air suspension switch prior to jacking, towing or hoisting the vehicle. 4WD CONTROL (IF EQUIPPED) This control operates the - 1997 Ford Explorer | Owner Guide 1st Printing - Page 38
Fuel pump shut-off switch in the Roadside emergencies chapter. POSITIONS OF THE IGNITION 1. ACCESSORY allows the electrical accessories such as the radio and wipers/washer to operate while the engine is not running. 2. LOCK locks the steering wheel and gearshift lever and allows key removal. 3. OFF - 1997 Ford Explorer | Owner Guide 1st Printing - Page 39
or above 48 km/h (30 mph). ON OFF Do not use the speed control in heavy traffic or on roads that are winding, slippery, or unpaved. Do not shift the transmission into N (Neutral) with the speed control on. To turn speed control off Press OFF or turn off the vehicle ignition. ON OFF 40 - 1997 Ford Explorer | Owner Guide 1st Printing - Page 40
must be greater than 48 km/h (30 mph). RSM SET ACC COAST If you drive up or down a steep hill, your vehicle speed may vary momentarily slower or faster than the set speed. This is normal. Speed control cannot reduce the vehicle speed if it increases above the set speed on a downhill - 1997 Ford Explorer | Owner Guide 1st Printing - Page 41
and hold SET ACC. Release the control when the desired vehicle speed is the accelerator pedal at any time during speed control usage. Releasing the accelerator pedal will return your lower set speed • Press and hold COAST. Release the control when the desired speed is reached or • Press and release - 1997 Ford Explorer | Owner Guide 1st Printing - Page 42
• Depress the brake pedal or • Depress the clutch pedal (if equipped) Disengaging the speed control will not erase the previously programmed set speed. Pressing OFF will erase the previously programmed set speed. Indicator light Lights when the speed control is turned on and remains lit until - 1997 Ford Explorer | Owner Guide 1st Printing - Page 43
Controls and features TILT STEERING Pull the lever to adjust the steering column angle. Push the lever back up to lock the steering wheel into position. Never adjust the steering wheel when the vehicle is moving. 4 H C 2 1 F E 0 3 5 6 40 30 40 50 60 70 o o o o 100 80 60 120 80 140 UNLEADED - 1997 Ford Explorer | Owner Guide 1st Printing - Page 44
Controls and features FLASH-TO-PASS Pull toward you and release quickly for "flash-to-pass" operation. E 4 H C 2 1 F 0 3 5 6 USING OVERDRIVE Overdrive is the normal drive position and will stay on automatically until deactivated. The overdrive function allows automatic upshift to second, third and - 1997 Ford Explorer | Owner Guide 1st Printing - Page 45
features Deactivating overdrive To deactivate overdrive, press the control at the end of the gearshift lever. The O/D OFF will illuminate. Deactivate overdrive when: • driving with a heavy load • driving in hilly terrain • additional engine braking is desired 4 H C 2 1 F E 0 3 5 6 40 30 40 50 60 - 1997 Ford Explorer | Owner Guide 1st Printing - Page 46
you use the variable interval wipers. Delay will automatically adjust at speeds between 16 and 105 km/h (10 and 65 mph. This will help compensate for the extra moisture that accumulates on your windshield at higher speeds. Map lamps Press the left or right control to turn the lamp on. Press again to - 1997 Ford Explorer | Owner Guide 1st Printing - Page 47
position or start the vehicle. 3. Slide the delay control all the way to the left. ON AUTO MIRROR DIM AUTOLAMP ON 4. Press the ON/OFF control. The lamp indicator will glow. ON AUTO MIRROR DIM AUTOLAMP ON 5. The autolamp automatically turns the lamps on and off. The indicator light will - 1997 Ford Explorer | Owner Guide 1st Printing - Page 48
This feature will change from the normal state to the non-glare "active" state when bright lights (glare) reach the mirror. When the mirror detects bright light from front or behind, it will adjust automatically to minimize glare. To activate the mirror, have the key in the ON position and push the - 1997 Ford Explorer | Owner Guide 1st Printing - Page 49
Controls and features Adjusting the rearview mirror The inside rearview mirror may adjusted at the two pivot points near the mirror face and the windshield. COMPASS (IF EQUIPPED) Compass display The compass reading may be affected when you drive near large buildings, bridges, power lines and - 1997 Ford Explorer | Owner Guide 1st Printing - Page 50
zone number. 3. Press the MODE control until the desired zone number appears. The display will flash and then return to normal operation. and high voltage lines: • Press and hold the MODE control until CAL appears in the display (approximately eight seconds) and release. • Drive the vehicle slowly - 1997 Ford Explorer | Owner Guide 1st Printing - Page 51
feature displays a variety of system display features. Refer to Message center in the Instrumentation chapter. OPEN GARAGE LAMP MODE LAMP Storage compartment (if equipped) Press the OPEN control to open the storage compartment. The door will open slightly and can be moved to full open. LAM - 1997 Ford Explorer | Owner Guide 1st Printing - Page 52
clip from the door. • Place Velcro hook onto side of aftermarket transmitter opposite of actuator control. • Place transmitter into storage compartment, control down. • Place the provided height adaptors onto the back of the GARAGE control as needed. • Press the GARAGE control to activate the - 1997 Ford Explorer | Owner Guide 1st Printing - Page 53
roof control to close. The moon roof has a sliding shade that can be manually opened or closed when the glass panel is shut. To close the shade, pull it toward the front of the vehicle. Do not let children play with the moon roof. They may seriously hurt themselves. LAMP MODE LAMP POWER DOOR - 1997 Ford Explorer | Owner Guide 1st Printing - Page 54
Controls and features 2. Repeat unlock procedure within four seconds. All doors will unlock when the key is returned to the vertical position. Two-step unlock can be activated by all outside locks on vehicles with keyless entry and anti-theft (if equipped). CHILDPROOF DOOR LOCKS When these locks - 1997 Ford Explorer | Owner Guide 1st Printing - Page 55
will open completely without holding the switch down. Each passenger has window controls. • Press the top portion of the rocker switch to close. AUTO • Press the bottom portion of the rocker switch to open. AUTO • Press AUTO and release quickly. The window will open fully. Depress again to stop - 1997 Ford Explorer | Owner Guide 1st Printing - Page 56
to the liftgate door lift cylinders and attaching hardware. Make sure that the liftgate door and/or window are closed to prevent exhaust fumes from being drawn into the vehicle. This will also prevent passengers and cargo from falling out. If you must drive with the liftgate door or window open - 1997 Ford Explorer | Owner Guide 1st Printing - Page 57
Driver side mirror Right Passenger side mirror 2. Move the mirror control in the desired direction. 3. Lock the mirror by moving the selector to the center position. Heated outside mirrors (if equipped) Both mirrors are heated automatically to remove ice, mist and fog when the rear window defrost - 1997 Ford Explorer | Owner Guide 1st Printing - Page 58
coinholder • compact disc changer • cellular phone Use only soft cups in the cupholder. Hard objects can injure you in a collision. Auxiliary power point The power point is an additional power source for electrical accessories. Replacing the tissue box To replace the center console tissue box: 59 - 1997 Ford Explorer | Owner Guide 1st Printing - Page 59
information on the operation of your phone, refer to the manufacturer's instructions contained with the phone. Compact disc changer (if equipped) The compact disc changer is located inside the center console. For information on the compact disc changer, refer to the ''Audio Guide''. OPEN 60 - 1997 Ford Explorer | Owner Guide 1st Printing - Page 60
the following features: • air vents • audio system controls • rear seat climate controls • cupholders Refer to the "Audio Guide" for more information on the rear console audio system controls. Rear console climate controls Turn the air distribution control to the desired airflow position. - VOLUME - 1997 Ford Explorer | Owner Guide 1st Printing - Page 61
Controls and features Select for air to flow through these vents: - VOLUME + BAND SEEK MEMORY for air to flow through Select these vents: - VOLUME + BAND SEEK MEMORY FLOOR MATS Installing the floor mats 1. Move the driver's seat to the most rearward position. 2. Position the driver's - 1997 Ford Explorer | Owner Guide 1st Printing - Page 62
over the locator post and snap mat into place. TRUNK MOUNTED CONTROLS Spare tire and jack Your vehicle is equipped with either a temporary spare tire and jack or a full-size spare tire located under the rear of the vehicle. For instructions on how to remove and mount the spare tire, refer to - 1997 Ford Explorer | Owner Guide 1st Printing - Page 63
any objects on the cargo area cover. They may obstruct your vision or strike occupants of the vehicle in the case of a sudden stop or collision. Rewinding the shade With extended use, the cargo shade may lose its spring tension. If this occurs, the shade must be manually rewound. This is a two - 1997 Ford Explorer | Owner Guide 1st Printing - Page 64
the shade from losing its spring tension. 6. Unfold the vinyl and place it into the end cap slots. 7. Insert the shade into the side mounting brackets and check to make sure that it operates properly. ANTI-THEFT SYSTEM (IF EQUIPPED) When armed, the anti-theft system prevents unauthorized entry into - 1997 Ford Explorer | Owner Guide 1st Printing - Page 65
two-step unlock. The system automatically turns off after 25 seconds or when the ignition is turned to the START or ACC position. The inside lights will not turn off if: • they have been turned on with the dimmer control or • any door is open. Arming the anti-theft system Turn the ignition Off and - 1997 Ford Explorer | Owner Guide 1st Printing - Page 66
Controls and features Identifying an armed anti-theft system When the system is armed, the warning light will illuminate for 30 seconds. After 30 seconds, the light will flash. If the system is armed with the doors open, the warning light will stay illuminated until all the doors are closed and then - 1997 Ford Explorer | Owner Guide 1st Printing - Page 67
the key and turning the ignition to ACC or ON. Disarming an untriggered anti-theft system Press the UNLOCK control to disarm the untriggered system or unlock any door with the key. Or, use the keyless entry system 5 digit unlock code. If the driver armed the system but did not exit the vehicle, the - 1997 Ford Explorer | Owner Guide 1st Printing - Page 68
Controls and features REMOTE ENTRY SYSTEM (IF EQUIPPED) The remote entry system allows you to lock or unlock all vehicle doors without a key. The remote entry system features only operate with the ignition in the Off position. It also arms and disarms the anti-theft system (if equipped). (For more - 1997 Ford Explorer | Owner Guide 1st Printing - Page 69
the lamps will flash. If the horn chirps twice, a door is still ajar and the anti-theft system will not arm. Sounding a panic alarm Press the PANIC control to activate the horn and lights. To deactivate the alarm, press the PANIC control again or turn the ignition to the Acc or On position. LO CK - 1997 Ford Explorer | Owner Guide 1st Printing - Page 70
Fourth transmitter programmed recalls no seat position You may change seat positions at any time. You can deactivate or reactivate the remote memory seat feature: 1. Make sure the anti-theft system (if equipped) is not armed or triggered, ignition is off and all doors and liftgate window are closed - 1997 Ford Explorer | Owner Guide 1st Printing - Page 71
the instruction for deactivating. By reentering the code that deactivates the remote memory seat, the keyless entry system reinstates the feature. The memory seat function will continue to work from the door switch even when deactivated at the remote keyless entry module. Replacing the batteries The - 1997 Ford Explorer | Owner Guide 1st Printing - Page 72
Controls and features • battery failure • weather conditions • structures around the vehicle Replacement batteries for the remote entry and/or anti-theft system transmitters mat be purchased at pharmacies, watch stores or at authorized dealers. To replace the batteries: 1. Twist a thin coin between - 1997 Ford Explorer | Owner Guide 1st Printing - Page 73
light up the keypad controls for five seconds. Do not push the control keypad with any hard object that could damage the controls. Locking the doors with the keyless entry system To lock all the doors, press 7/8 and 9/0 at the same time. It is not necessary to first enter the keypad code. Unlocking - 1997 Ford Explorer | Owner Guide 1st Printing - Page 74
Controls and features The system has shut down if the keypad light is out. If the keyless entry system does not work, use the key or remote entry transmitter(s). 1. To unlock the driver door, enter one of the two codes. After pressing the fifth number, the driver door unlocks. 2. To unlock the - 1997 Ford Explorer | Owner Guide 1st Printing - Page 75
to the Anti-theft system section, if equipped, in this chapter for more details. Autolock (if equipped) The autolock feature is part of your remote keyless entry system which locks all of the doors when: • all vehicle doors are closed • the ignition key is turned to the ON position • the brake pedal - 1997 Ford Explorer | Owner Guide 1st Printing - Page 76
The autolock feature repeats when: • a door is opened and then all doors are closed • the brake pedal is released. The autolock feature can be disabled (or reenabled) by using the keyless entry system: 1. Enter your permanent five-digit entry code (not the user code you may have set). 2. Within five - 1997 Ford Explorer | Owner Guide 1st Printing - Page 77
Seating and safety restraints HEAD RESTRAINTS Rear seat head restraints Push to lower the head restraint. Rear seat four-way head restraints (if equipped) Push or pull the head restraint to the desired position. 78 - 1997 Ford Explorer | Owner Guide 1st Printing - Page 78
seatback cannot be folded down unless the built-in child seat is fully stowed. 1. Press the lower release control downward to unlatch the seatback. 2. Rotate the seatback downward into the load floor position. 3. Press down on the top outboard area of the seatback until a click is heard. The seat is - 1997 Ford Explorer | Owner Guide 1st Printing - Page 79
Seating and safety restraints Manually adjusting the captain's chair Lift to move the seat forward or backward. Pull up to recline the seat. Adjusting the power front seats (if equipped) Pull up to recline the seat. 80 - 1997 Ford Explorer | Owner Guide 1st Printing - Page 80
Seating and safety restraints Press to tilt the front of the seat up or down. Press in the desired direction for seat adjust or to move the seat forward or back. 81 - 1997 Ford Explorer | Owner Guide 1st Printing - Page 81
three, repeat the previous procedure but press controls 1 and 2 simultaneously. A position can only be recalled when the automatic transmission gearshift is in P (Park) or the manual transmission gearshift is in N (Neutral). A memory seat position may be programmed at any time. SET 1 2 82 - 1997 Ford Explorer | Owner Guide 1st Printing - Page 82
in case of a collision. In most states and Canada, the law requires the use of safety belts. Always drive and ride with your seatback upright and the lap belt snug and low across the hips. Lock the doors of your vehicle before driving to lessen the risk of the door coming open in a collision. Cargo - 1997 Ford Explorer | Owner Guide 1st Printing - Page 83
. Vehicle sensitive (emergency) locking mode The vehicle sensitive mode is the normal retractor mode which locks the belts in response to vehicle movement. For example, if the driver brakes suddenly, turns a corner sharply or your vehicle receives an impact of 8 km/h (5 mph) or more the combination - 1997 Ford Explorer | Owner Guide 1st Printing - Page 84
this mode, the shoulder belt is automatically prelocked; however, the belt will retract to remove any slack in the shoulder belt. The automatic locking mode is not available on the driver safety belt. When to use the automatic locking mode • When a tight lap and shoulder belt fit is desired. • Any - 1997 Ford Explorer | Owner Guide 1st Printing - Page 85
and allow it to completely retract. This will cancel the automatic locking mode and activate the vehicle sensitive (emergency) locking mode. Front seat safety belt height adjustment Adjust the height of the shoulder belt so that the belt rests across the middle of your shoulder. To lower the height - 1997 Ford Explorer | Owner Guide 1st Printing - Page 86
lap belts Adjusting the lap belt A lap belt is located in the center of the rear seat. To shorten the belt: • Buckle the belt. • Pull the loose end of the belt until snug. To lengthen the belt: • Tip and pull the tongue. Do not wear the lap belt around your waist. Safety belt indicator light and - 1997 Ford Explorer | Owner Guide 1st Printing - Page 87
the sew pattern may release and the colored label (REPLACE BELT) may become visible. If this occurs, the safety belt must be replaced. Whenever the orange portion of the label is visible, the safety belt must be replaced. Failure to follow these instructions will affect the performance of the safety - 1997 Ford Explorer | Owner Guide 1st Printing - Page 88
inches) may be added to the length of the belt with a safety belt extension (part # 611C22). Safety belt extensions are available at no cost from your dealer. Only label. Do not use the extension to change the fit of the shoulder belt across the torso. AIR BAG / SUPPLEMENTAL RESTRAINT SYSTEM (SRS) - 1997 Ford Explorer | Owner Guide 1st Printing - Page 89
to service, repair, or modify the Air Bag Supplemental Restraint System or its fuses. See your Ford or Lincoln-Mercury dealer. Children and air bags For additional important safety information, read all information on safety restraints in this guide. Children should always wear their safety belts - 1997 Ford Explorer | Owner Guide 1st Printing - Page 90
carriers should never be placed in the front seats. How does the air bag supplemental restraint system (SRS) work? The SRS is designed to activate fixed barrier head on at 12-24 km/h (8-14 mph). The fact that the air bags did not inflate in a collision does not mean that something is wrong with the - 1997 Ford Explorer | Owner Guide 1st Printing - Page 91
immediately. If the air bag is not replaced, the unrepaired area will increase the risk of injury in a collision. The SRS consists of: • driver and passenger air bag modules (which include the inflators and air bags), • one or more impact and safing sensors, • a readiness light and tone • and - 1997 Ford Explorer | Owner Guide 1st Printing - Page 92
(including the impact sensors), the system wiring, the air bag system readiness light, the air bag back up power and the air bag ignitors. Determining if the system is operational The SRS uses a readiness light in the instrument cluster or a tone to indicate the condition of the system. Refer - 1997 Ford Explorer | Owner Guide 1st Printing - Page 93
air bags and air bag equipped vehicles For disposal of air bags or air bag equipped vehicles, see your local dealership or qualified technician. Air vehicle. Safety belts and seats can become hot in a vehicle that has been closed up in sunny weather; they could burn a small child. Check seat covers - 1997 Ford Explorer | Owner Guide 1st Printing - Page 94
ride in a cargo area, inside or outside of a vehicle. In a collision, people riding in these areas are more likely to be seriously injured or killed. Do not allow people to ride in any area of your vehicle that is not equipped with seats and safety belts follow the instructions and warnings that - 1997 Ford Explorer | Owner Guide 1st Printing - Page 95
neck, the child should wear the lap and shoulder belt. Moving the child closer to the center of the vehicle may help provide a good shoulder belt fit. If the shoulder belt cannot be properly positioned: • move the child to one of the seats with a lap belt only (if equipped) OR • if the child is the - 1997 Ford Explorer | Owner Guide 1st Printing - Page 96
on children who have outgrown child safety seats, Ford recommends use of a belt-positioning booster seat that is labelled as conforming to all Federal motor vehicle safety standards. Belt-positioning booster seats raise the child and provide a shorter, firmer seating cushion that encourages safer - 1997 Ford Explorer | Owner Guide 1st Printing - Page 97
between the child seat and the release button, to prevent accidental unbuckling. • Place seatbacks in the upright position. • Put the safety belt in the automatic locking mode. Refer to Using the automatic locking mode in this chapter. Installing child safety seats in combination lap and shoulder - 1997 Ford Explorer | Owner Guide 1st Printing - Page 98
together, route the tongue through the child seat according to the child seat manufacturers' instructions. Be sure the belt webbing is not twisted. 4. Insert the belt tongue into the proper buckle for that seating position until you hear and feel the latch engage. Make sure the tongue is latched - 1997 Ford Explorer | Owner Guide 1st Printing - Page 99
remove any slack in the belt. 9. Before placing the child in the seat, forcibly tilt the seat forward and back to make sure the seat is securely held in place. 10. Try to pull the belt out of the retractor to make sure the retractor is in the automatic locking mode (you should not - 1997 Ford Explorer | Owner Guide 1st Printing - Page 100
a tether strap. Tether anchor hardware Attachment holes (at each rear seating position) have been provided in your vehicle to attach anchor hardware, if required. Tether anchor hardware kits (part number 613D74), including instructions, may be obtained at no charge from any Ford or Lincoln-Mercury - 1997 Ford Explorer | Owner Guide 1st Printing - Page 101
motor vehicle safety standards. Read the labels located on the child seat cushion and shoulder belt for more information on the built-in child seat. Use the built-in child seat only under the following conditions seat Failure to follow all of the instructions on the use of this child restraint system can - 1997 Ford Explorer | Owner Guide 1st Printing - Page 102
second row seatback must be fully locked before operating the child restraint system. Check the position of the seatback release lever. Never use the Built-In Child Seat as a booster cushion with the adult safety belts. A child using the adult belts could slide forward and out from under the safety - 1997 Ford Explorer | Owner Guide 1st Printing - Page 103
Seating and safety restraints 3. Lower the child seat cushion. 4. Unfold the cushion protector flap onto adult seat cushion. 104 - 1997 Ford Explorer | Owner Guide 1st Printing - Page 104
chest clip and buckles. 6. Place the child in the seat and position the left shoulder belt over the child's left shoulder first, then place the right shoulder belt over the child's right shoulder. 7. Insert the left and right safety belt tongues into the left and right slots of the crotch buckle - 1997 Ford Explorer | Owner Guide 1st Printing - Page 105
repairs. 8. Fasten the right and left chest clip halves together and adjust the clip to comfortably hold the shoulder belts shoulder belt may be put in automatic belts (like adult shoulder belts). In emergency locking mode, the shoulder belts of the child seat will lock in response to hard braking - 1997 Ford Explorer | Owner Guide 1st Printing - Page 106
locking mode (ALR) on the built-in child safety seat 1. Fully extend the right shoulder belt. 2. Allow the belts to tighten snugly against the child's shoulders. Deactivating the automatic locking mode (ALR) on the built-in child safety seat 1. Disconnect the chest clip and remove the left and - 1997 Ford Explorer | Owner Guide 1st Printing - Page 107
cushion to the stowed (upright) position. 5. Slide the Velcro straps through the D-rings on the child seat cushion and attach. 6. Slide the head restraint down until the top of the head restraint is flush with the top of the adult seat back. 7. Press firmly on the top center of the built-in child - 1997 Ford Explorer | Owner Guide 1st Printing - Page 108
Seating and safety restraints All built-in child restraints, including seats, buckles, retractors, seat latches, interlocks, and attaching hardware should be inspected by a qualified dealer technician after any collision. 109 - 1997 Ford Explorer | Owner Guide 1st Printing - Page 109
down automatically, have the vehicle checked. Do not allow the vehicle to idle for more than ten minutes. Extended idling at high engine speeds can produce very high temperatures in the engine and exhaust system, creating the risk of fire or other damage. Do not park, idle, or drive your vehicle - 1997 Ford Explorer | Owner Guide 1st Printing - Page 110
drive if you smell exhaust fumes. Important ventilating information If the engine is idling while the vehicle is stopped in an open area for long periods of time, open the windows at least 2.5 cm (one inch). DOOR LOCK U L AUTO WINDOW LOCK OFF A/C MAX A/C Adjust the heating or air conditioning - 1997 Ford Explorer | Owner Guide 1st Printing - Page 111
air inlet vents clear of snow, leaves and other debris. Guarding body ventilation systems checked whenever: • the vehicle is raised for service • the sound of the exhaust system changes • the vehicle has been damaged in a collision Preparing to start the vehicle Engine starting is controlled - 1997 Ford Explorer | Owner Guide 1st Printing - Page 112
in this chapter. Before starting the vehicle: 1. Make sure all vehicle occupants have buckled their safety belts. For more information on safety belts and their proper usage, refer to the Seating and safety restraints chapter. 2. Make sure the headlamps and vehicle accessories are off. OFF 113 - 1997 Ford Explorer | Owner Guide 1st Printing - Page 113
an automatic transmission: • Make sure the parking brake is set. • Make sure the gearshift is in P (Park). P R N D 2 1 If starting a vehicle with a manual transmission: • Make sure the parking brake is set. • Push the clutch pedal to the floor. 1 2 3 4 D R 3. Turn the key to the ON position - 1997 Ford Explorer | Owner Guide 1st Printing - Page 114
CONT 4WD 4WD LOW 0 0 0 0 0 0 160 1 F ABS ! 20 10 0 100 110 120 20 0 BRAKE RPM x 1000 MPH km/h - + E P R N D 2 1 L O/D OFF Make sure the following lights illuminate briefly. If a light fails to illuminate, have the vehicle serviced. • If the driver's safety belt is light does not - 1997 Ford Explorer | Owner Guide 1st Printing - Page 115
down. Release accelerator when engine starts. 4. After idling for a few seconds, apply the brake and release the parking brake. Using the engine block heater (if equipped) An engine block heater warms the engine coolant, which improves starting, warms up the engine faster and allows the heater - 1997 Ford Explorer | Owner Guide 1st Printing - Page 116
Driving BRAKES Your brakes are self-adjusting. Refer to the "Service Guide" for maintenance scheduling. Anti-lock brake system (ABS) (if equipped) The ABS operates by detecting the onset of wheel lock up during brake applications and compensating for this tendency. The front wheels are prevented - 1997 Ford Explorer | Owner Guide 1st Printing - Page 117
Driving Parking brakes To engage the parking brake: To disengage the parking brake: Always set the parking brake fully and make sure that the gearshift is securely latched in P (Park) (automatic transmission) or in 1 (First) (manual transmission). BRAKE 118 - 1997 Ford Explorer | Owner Guide 1st Printing - Page 118
not affect normal driving and should not be noticeable to the driver. To avoid injury, never run the engine with one wheel off the ground, such as when changing a tire. AUTOMATIC RIDE CONTROL SYSTEM (IF EQUIPPED) The Automatic Ride Control System is designed to improve ride, handling and general - 1997 Ford Explorer | Owner Guide 1st Printing - Page 119
to Off. The system stays energized for 40 minutes after the ignition is turned off to compensate for any load changes after the vehicle is parked. The Automatic Ride Control system operation can be monitored through the message center. Refer to Message center in the Instrumentation chapter. 120 - 1997 Ford Explorer | Owner Guide 1st Printing - Page 120
control of the Automatic Ride Control system. The switch does not control or change the performance of the All Wheel Drive system. The switch should be placed in the Normal position for all on road and most dirt, gravel or snow covered roads. For severe off-road conditions where additional body - 1997 Ford Explorer | Owner Guide 1st Printing - Page 121
lever. The O/D OFF light will illuminate. D Drive Not shown on the display. Activate by pressing the transmission control switch. O/D OFF will illuminate in the instrument cluster. Transmission operates in gears one through three. D (Drive) provides more engine braking than D (Overdrive) and - 1997 Ford Explorer | Owner Guide 1st Printing - Page 122
the vehicle decelerates to the proper speed. Driving (5R55E transmission-4.0L engines only) D Overdrive The normal driving position for the best fuel economy. Transmission operates in gears one through five. D can be deactivated by pressing the transmission control switch on the selector lever. The - 1997 Ford Explorer | Owner Guide 1st Printing - Page 123
. D (Drive) provides more engine braking than D (Overdrive) and is useful when towing a trailer or heavy loads through heavy terrain. To return to D (Overdrive) mode, press the transmission control switch. O/D OFF will turn off. When starting your vehicle, the transmission will automatically return - 1997 Ford Explorer | Owner Guide 1st Printing - Page 124
unless the clutch pedal is fully depressed. When starting a vehicle with a manual transmission: 1. Put the gearshift lever in N (Neutral). 2. Hold down the brake pedal. 3. Depress the clutch pedal. 4. Crank the engine and let it idle for a few seconds. • Put the gearshift in 1 (First) or R (Reverse - 1997 Ford Explorer | Owner Guide 1st Printing - Page 125
Driving Upshifts when accelerating (for best fuel economy) 32 km/h (22 11 km/h (9 2-3 mph) mph) 50 km/h (33 19 km/h (13 3 -4 mph) mph) 4 - 5 (Overdrive) 71 km/h (41 27 km/h (17 mph) mph) Upshifts when cruising (recommended for best fuel economy) Transfer case position Shift from: 4AUTO or 4H 4L 16 - 1997 Ford Explorer | Owner Guide 1st Printing - Page 126
move unexpectedly and injure someone. Use 1 (First) gear and set the parking brake fully. Reverse Ensure that the vehicle is at a complete stop before shifting into R (Reverse). Failure to do so may damage the transmission. Put the gearshift into N and wait at least several seconds before shifting - 1997 Ford Explorer | Owner Guide 1st Printing - Page 127
) when you downshift from 5 (Overdrive). USING THE CONTROL TRAC 4WD SYSTEM (IF EQUIPPED) Positions of the Control Trac system 4WD AUTO - Full power delivered to front and rear axles for increased traction. Use this mode for normal on-road operating conditions such as dry road surfaces, wet pavement - 1997 Ford Explorer | Owner Guide 1st Printing - Page 128
or 4WD HIGH To perform this shift, complete the following steps: 1. Bring the vehicle to a stop. 2. Depress and hold the brake. 3. Place the automatic transmission gearshift lever in N (Neutral) or depress the manual transmission clutch. 4. Move the 4WD control to the 4WD AUTO or 4WD HIGH position - 1997 Ford Explorer | Owner Guide 1st Printing - Page 129
conventional vehicles. When using 4WD, maintain steering wheel control at all times, especially in rough terrain. Since sudden changes in terrain can result in abrupt steering motion, always grip the steering wheel from the outside. Do not grip the spokes. Drive cautiously to avoid vehicle damage - 1997 Ford Explorer | Owner Guide 1st Printing - Page 130
. Drying can be improved by moving your vehicle slowly while applying light pressure on the brake pedal. If the transmission and transfer case are submerged in water, their fluids should be checked and changed, if necessary. If the rear axle is submerged in water, the rear axle lubricant should - 1997 Ford Explorer | Owner Guide 1st Printing - Page 131
enter your engine's air intake and severely damage your engine. If driving through deep or standing water is unavoidable, proceed very slowly. Never drive through water that is higher than the bottom of the hubs (truck) / wheel rims (car). Once through the water, always try the brakes. Wet brakes do - 1997 Ford Explorer | Owner Guide 1st Printing - Page 132
D (Drive). Driving on snow and ice Avoid sudden applications of power and quick changes of direction on snow and ice. Apply the accelerator slowly and steadily when starting from a full stop. When braking, apply the brakes as you normally would. In order to allow the anti-lock brake system (ABS) to - 1997 Ford Explorer | Owner Guide 1st Printing - Page 133
following conditions: • 4WD AUTO mode - Neither light will illuminate. • 4WD HIGH mode - Only the 4WD high light illuminates. • 4WD LOW mode - The 4WD LOW light illuminates. ALL WHEEL DRIVE (AWD) SYSTEM (5.0L ENGINES ONLY) Your vehicle is equipped with an all wheel drive (AWD) transfer case. Power - 1997 Ford Explorer | Owner Guide 1st Printing - Page 134
wheel drive vehicles are NOT designed for cornering at speeds as high as passenger cars any more than low-slung sports cars are designed to perform satisfactorily under off-road conditions weight of passengers, cargo and optional equipment. optional equipment and cargo. The GVWR is specific - 1997 Ford Explorer | Owner Guide 1st Printing - Page 135
tires with lower weight capacities than the originals because they might lower the vehicle's GVWR and GAWR. (Replacement tires with a higher weight limit than the originals do not increase the GVWR or the GAWR limitations.) In high altitudes, engines will lose power at a rate of 3% power per - 1997 Ford Explorer | Owner Guide 1st Printing - Page 136
not allow people to ride in any area of your vehicle that is not equipped with seats and safety belts. Be sure everyone in your vehicle is in a seat and using a safety belt properly. Driving with a heavy load The total vehicle weight plus the total weight of passengers and cargo should never exceed - 1997 Ford Explorer | Owner Guide 1st Printing - Page 137
to the severe duty schedule in the "Service Guide". • Do not tow a trailer until your vehicle has been driven at least 800 km (500 miles). • Refer to the instructions included with towing accessories for the proper installation and adjustment specifications. • Speed control may shut off if you are - 1997 Ford Explorer | Owner Guide 1st Printing - Page 138
and automatic transmission system if you are planning on: • towing farther than 80 km (50 miles) • towing in hilly terrain • towing frequently Trailer towing tables TRAILER TOWING TABLE 4X2 MANUAL TRANSMISSION GCWR (Gross Combined Weight Rating)/Trailer Weights Maximum Trailer Weight Maximum Engine - 1997 Ford Explorer | Owner Guide 1st Printing - Page 139
Driving TRAILER TOWING TABLE 4X2 MANUAL TRANSMISSION 3,175 0-1,406 4.0 L 3.73 50 (7,000) (0-3,100) 4-DOOR 0-861 4.0 L 3.27 2,721(6,000) 50 (0-1,900 ) 0-1,315 4.0 L 3.73 3,175(7,000) 50 (0-2,900) TRAILER TOWING TABLE 4X4 MANUAL TRANSMISSION GCWR (Gross Combined Weight Rating)/Trailer Weights 2-DOOR - 1997 Ford Explorer | Owner Guide 1st Printing - Page 140
Driving TRAILER TOWING TABLE 4X2 AUTOMATIC TRANSMISSION GCWR (Gross Combined Weight Rating)/Trailer Weights Maximum Trailer Weight Maximum Engine Rear Axle GCWR Range Kg(Lb) Frontal Area of (EFI) Ratio Kg(Lb) 0-Maximum Trailer Ft2 2-DOOR 3.27 3,175 0-1,360 50 4.0 L (7,000) (0-3,000) 3.55 3,628 0-1, - 1997 Ford Explorer | Owner Guide 1st Printing - Page 141
AWD AUTOMATIC TRANSMISSION GCWR (Gross Combined Weight Rating)/Trailer Weights 4-DOOR 4,990 0-2,902 5.0 L 3.73 50 (11,000) (0-6,400) NOTES: - For high altitude operation, reduce GCW by 2% per 300 meters (1,000 ft) elevation. - For definition of terms and instructions vehicle without cargo. • Subtract - 1997 Ford Explorer | Owner Guide 1st Printing - Page 142
in this chapter. Using trailer brakes Use electric brakes or manual, automatic or surge type hydraulic brakes that meet Federal and local regulations. Install and adjust brakes according to the manufacturer's instructions. Do not connect a trailer's hydraulic brake system directly to your vehicle - 1997 Ford Explorer | Owner Guide 1st Printing - Page 143
in hilly terrain or on hot days. Speed control (if equipped) may not work properly while towing on long, steep grades. If driving with an automatic transmission: • use D or L rather than while towing up or down steep hills • anticipate stops and brake gradually. Towing behind another vehicle Do not - 1997 Ford Explorer | Owner Guide 1st Printing - Page 144
Driving Your vehicle can not be flat towed with all wheels on the ground. Servicing while towing If you tow a trailer for long distances, your vehicle requires more frequent service than a vehicle not used for towing. Refer to the "Service Guide" for more information on maintenance intervals. Using - 1997 Ford Explorer | Owner Guide 1st Printing - Page 145
Driving USING THE LUGGAGE RACK (IF EQUIPPED) Maximum load is 100 lbs, evenly distributed. If it is not possible to distribute the load, position it as far rearward as possible. Adjustable tie down loops must be used to secure the load. To adjust cross-bar position: 1. Loosen the thumbwheel at both - 1997 Ford Explorer | Owner Guide 1st Printing - Page 146
LIGHTS CONTROL Use only in an emergency to warn traffic of vehicle breakdown, approaching danger, etc. Depress to activate all indicators simultaneously. Depress again to switch off. The warning lights COAST SRS FUEL PUMP SHUT-OFF SWITCH If the engine cranks but does not start after a collision, - 1997 Ford Explorer | Owner Guide 1st Printing - Page 147
key to the Off position. 5. Make a further check for leaks in the fuel system. FUSES AND RELAYS If electrical components in the vehicle are not working, a fuse may have blown. Blown fuses are identified by a broken wire. Check the appropriate fuses before replacing any electrical components. Use - 1997 Ford Explorer | Owner Guide 1st Printing - Page 148
identified and corrected. If the fuse continues to blow, have the vehicle's electrical system checked by a qualified service technician. To reset a circuit breaker, press the reset button. Fuses Standard fuse amperage ratings and colors Fuse rating 7.5 amp 10 amp 15 amp 20 amp 30 amp 30 amp fuse - 1997 Ford Explorer | Owner Guide 1st Printing - Page 149
fuse panel Pull the panel out to access the passenger compartment fuse panel. Use the fuse puller tool provided on the fuse panel cover to replace fuses. 1 5 9 13 17 21 25 29 31 2 6 10 14 18 22 26 30 3 7 11 15 19 23 27 4 8 12 16 20 24 28 36 35 - 1997 Ford Explorer | Owner Guide 1st Printing - Page 150
, fog lamp system, DRL, lamp out warning EATC system, seat memory, message center, cellular phone, autolamps EATC system, rear blower, speed control, GEM system, brake interlock, overhead console, automatic ride control, lamp out warning Warning lamps, autolamp Front washer, rear washer & wiper - 1997 Ford Explorer | Owner Guide 1st Printing - Page 151
amp Circuits Protected PCM system, stoplamps, AWD, anti-lock brake, speed control, trailer tow Anti-lock system Air bag system, instrument cluster Wiper run relay Cigar lighter A/C system Ignition coil, PCM system Radio, power antenna, GEM system, anti-theft, cellular phone Turn/hazard flasher Turn - 1997 Ford Explorer | Owner Guide 1st Printing - Page 152
lamps Lux audio system Power distribution box Always replace the cover to the Power Distribution Box before reconnecting the battery or refilling fluid reservoirs. 14 12 10 8 6 4 2 8 4 7 3 6 2 13 11 9 7 5 3 1 5 1 11 10 9 30 40 50 60 High current fuse rating amp amp amp amp Color Light green - 1997 Ford Explorer | Owner Guide 1st Printing - Page 153
trailer stop LP Battery saver relay and headlamp relay Blower motor Power locks, power windows and power seats PCM memory and horn Air ride control relay Instrument panel fuse panel Ignition JBL system Rear wiper system Power point 4WD system Air suspension system Alternator system Air bag system - 1997 Ford Explorer | Owner Guide 1st Printing - Page 154
connected ABS diode PCM diode Relays Relays are located in the power distribution box. Relays receive signals from components or systems and transfer these signals to activate or deactivate other components or systems. Ford recommends that relays be replaced by a qualified service technician - 1997 Ford Explorer | Owner Guide 1st Printing - Page 155
FUEL ONLY 90 180 H L 0 0 0 0 0 0 160 20 10 0 100 110 120 20 RPM x 1000 km/h H - + P R N D 2 1 L RSM ON SET ACC OFF COAST SRS • Before beginning the tire change procedure, ensure that the Automatic Ride Control service switch is turned off. 156 - 1997 Ford Explorer | Owner Guide 1st Printing - Page 156
Roadside emergencies 3. Engage the parking brake. 4. Place the automatic transmission gearshift in P (Park). Place the manual transmission gearshift in 1 (First). 5. Block the diagonally opposite wheel. 6. Remove the jack and lug wrench. 7. Remove the jack handle located under the rear seat. 157 - 1997 Ford Explorer | Owner Guide 1st Printing - Page 157
to the lug wrench. 9. Insert the drive section of the jack handle into the actuator hole and turn counterclockwise until the cable is turn each. 13. Position the jack on the lower suspension arm to raise the front wheel. Position the jack under the rear axle to raise the rear wheel. • Never use the - 1997 Ford Explorer | Owner Guide 1st Printing - Page 158
. 17. Lower the vehicle and tighten the lug nuts as shown. 18. Unblock the wheels and place the flat tire, jack hhandle and lug wrench away. 1 3 4 5 2 Stowing flat tires Stow aluminum wheel and tire with the valve stem down. To stow largest flat tire, place it inside the vehicle and secure with - 1997 Ford Explorer | Owner Guide 1st Printing - Page 159
a trailer. • use tire chains on this tire. • try to repair the temporary spare or remove it from its wheel. • use the wheel for any other type of vehicle. • drive through an automatic car wash. JUMP STARTING YOUR VEHICLE The gases around the battery can explode if exposed to flames, sparks, or lit - 1997 Ford Explorer | Owner Guide 1st Printing - Page 160
could damage the catalytic converter. For further information, see Jumper Cables in the Index. Batteries contain sulfuric acid which burns skin, eyes, and clothing. Connecting the jumper cables 1. Position the vehicles so that they do not touch one another. 2. Switch off the engine. Switch off any - 1997 Ford Explorer | Owner Guide 1st Printing - Page 161
(-) booster battery terminal (2). 2. Remove the cable from the positive (+) terminal of the booster battery (3) and then the discharged battery (4). 3. After the disabled vehicle has been started, allow it to idle for a while so the engine can "relearn" its idle conditions. 1 4 + - - + 2 3 162 - 1997 Ford Explorer | Owner Guide 1st Printing - Page 162
has not developed or approved a T-hook or slingbelt towing procedure. For vehicles equipped with control trac, the ignition must be in the OFF position when towing. When calling for a tow truck, tell the operator what kind of vehicle you have. A towing manual is available for Ford Motor Company 163 - 1997 Ford Explorer | Owner Guide 1st Printing - Page 163
activated the feature may be enabled by following the instruction located on the visor or the headliner. The feature is available on vehicles with Control Trac and automatic transmission only. It is not available on vehicles with All-Wheel Drive. There are no wrecker or recreational vehicle towing - 1997 Ford Explorer | Owner Guide 1st Printing - Page 164
provide you with a "Service Guide" which makes tracking routine service for your vehicle easy. If your vehicle requires professional service, your dealership can provide necessary parts and service. Check your "Warranty Information Booklet" to find out which parts and services are covered. Use only - 1997 Ford Explorer | Owner Guide 1st Printing - Page 165
and all fuel related parts. If you disconnect the battery, the engine must "relearn" its idle conditions before your vehicle will drive properly, as explained in Battery in this chapter. Working with the engine off • Automatic transmission: 1. Set the parking brake fully and ensure the gearshift - 1997 Ford Explorer | Owner Guide 1st Printing - Page 166
Maintenance and care 1. Set the parking brake, depress the clutch and place the gearshift in 1 (First). 1 2 3 4 D R 2. Turn off the engine and remove the key. 3. Block the wheels to prevent the vehicle from moving unexpectedly. 167 - 1997 Ford Explorer | Owner Guide 1st Printing - Page 167
Maintenance and care Working with the engine on • Automatic transmission: 1. Set the parking brake fully and ensure the gearshift is securely latched in P (Park). 2. Block the wheels to prevent the vehicle from moving unexpectedly. Do not start your engine with the air cleaner removed and do not - 1997 Ford Explorer | Owner Guide 1st Printing - Page 168
care • Manual transmission: 1. Set the parking brake fully, and make sure the gearshift is securely latched in Neutral. 2. Block the wheels to prevent the auxiliary latch located in the grille opening. 3. Lift the hood and secure it in the upright position. 4. To close the hood shut it so that the - 1997 Ford Explorer | Owner Guide 1st Printing - Page 169
2 3 4 5 6 7 10 9 8 1. Windshield washer fluid reservoir 2. Engine oil fill cap 3. Transmission fluid dipstick (automatic transmission only) 4. Engine oil dipstick 5. Power steering fluid reservoir 6. Brake fluid reservoir 7. Clutch fluid reservoir (manual transmission only) 8. Battery 170 - 1997 Ford Explorer | Owner Guide 1st Printing - Page 170
reservoir 4.0L SOHC engine 1 2 3 4 5 9 8 7 6 1. Windshield washer fluid reservoir 2. Transmission fluid dipstick 3. Engine oil fill cap 4. Engine oil dipstick 5. Brake fluid reservoir 6. Battery 7. Power steering fluid reservoir 8. Air filter assembly 9. Engine coolant reservoir 171 - 1997 Ford Explorer | Owner Guide 1st Printing - Page 171
coolant reservoir 2. Windshield washer fluid reservoir 3. Engine oil fill cap 4. Transmission fluid dipstick 5. Brake fluid reservoir 6. Power distribution box 7. Battery 8. Radiator cap 9. Power steering fluid reservoir 10. Engine oil dipstick 11. Ignition coil packs 12. Air filter assembly 172 - 1997 Ford Explorer | Owner Guide 1st Printing - Page 172
not covered by your Ford warranty. Synthetic engine oils which are CERTIFIED and of the preferred viscosity may be used in your engine. The engine oil and oil filter must still be changed according to the "Service Guide". Checking the engine oil Check the engine oil each time you fuel your vehicle - 1997 Ford Explorer | Owner Guide 1st Printing - Page 173
the maximum line, engine damage or high oil consumption may occur and some oil must be removed from the engine by a service technician. 7. Put the dipstick back in and ensure it is fully seated. Adding engine oil 1. Check the engine oil. For instructions, refer to Checking the engine oil in this - 1997 Ford Explorer | Owner Guide 1st Printing - Page 174
on the following guidelines. The Vehicle Message Center may be manually reset by depressing the Oil Change Reset switch for five seconds. Continuous contact with used motor oil has caused cancer in laboratory mice. Changing the engine oil and filter Change your engine oil and filter according to the - 1997 Ford Explorer | Owner Guide 1st Printing - Page 175
. Severe duty operation would include extensive idling, trailer towing, driving in severe dust and police, taxi or delivery service. Ford production and aftermarket (Motorcraft) oil filters are designed for added engine protection and long life. If a replacement oil filter is used that does not - 1997 Ford Explorer | Owner Guide 1st Printing - Page 176
Brake fluid should be checked and refilled as needed at least once each year: • Clean the reservoir cap before removal to prevent dirt or water from entering the reservoir. • Visually inspect the fluid level. • If necessary, add brake fluid until the level reaches MAX. Do not fill above this line - 1997 Ford Explorer | Owner Guide 1st Printing - Page 177
only DOT 3 brake fluid designed to meet Ford specifications. Refer to the Capacities and specifications chapter. 1. Clean the reservoir cap before removal to prevent contaminants from entering the reservoir. 2. Remove the cap. 3. Add fluid until the level reaches the FULL line. CHECKING AND ADDING - 1997 Ford Explorer | Owner Guide 1st Printing - Page 178
If a visual inspection shows that washer fluid needs to be added to the reservoir: 1. Lift the windshield reservoir cover. 2. Add enough washer fluid to fill the reservoir. SHER F WA LU ID ONLY Checking and adding washer fluid for the rear window The washer fluid for both the windshield and rear - 1997 Ford Explorer | Owner Guide 1st Printing - Page 179
in the reservoir at least once a month. Be sure to read and understand Precautions when servicing your vehicle in this chapter. RADIAT OR COOLA NT ONLY If the engine coolant has not been checked for a long period of time, the engine coolant reservoir may eventually empty. If this occurs, add - 1997 Ford Explorer | Owner Guide 1st Printing - Page 180
°F]), depending on your local climate conditions. A coolant concentration below 40% will result in a loss of freeze protection. A concentration above 60% may cause the engine to overheat on a warm day. Refer to Lubricant specifications in the Specifications and capacities chapter. Use only a premium - 1997 Ford Explorer | Owner Guide 1st Printing - Page 181
system can hold, refer to Refill capacities in the Capacities and specifications chapter. Have your dealer check the engine cooling system for leaks if you have to add more than a liter (quart) of engine coolant per month. Severe winter climate If you drive in extremely cold climates [less than - 1997 Ford Explorer | Owner Guide 1st Printing - Page 182
the reservoir is between the MAX and MIN lines on the reservoir. Follow the recommended service interval for changing engine coolant as outlined in the "Service Guide". Refer to the Capacities and specifications chapter for more information on engine coolant specifications. RADIAT OR COOLA NT ONLY - 1997 Ford Explorer | Owner Guide 1st Printing - Page 183
Maintenance and care Checking the cooling system hoses Inspect all engine and heater system hoses and hose connections for: • deterioration • leaks • loose hose clamps CHECKING AND ADDING POWER STEERING FLUID Check the power steering fluid at least twice a year by completing the following steps: 1. - 1997 Ford Explorer | Owner Guide 1st Printing - Page 184
Maintenance and care 2. When the engine coolant temperature gauge reaches the normal zone, turn off the engine. H C 3. Open the hood. HOOD 185 - 1997 Ford Explorer | Owner Guide 1st Printing - Page 185
transmission fluid according to the scheduled intervals in the "Service Guide". Before adding any fluid, make sure the correct type will be used. This information is stamped on the dipstick. Check the fluid after your vehicle has reached normal operating temperature, which is reached after driving - 1997 Ford Explorer | Owner Guide 1st Printing - Page 186
to the Capacities and specifications chapter for more information on manual transmission fluid. Driveline universal joint and slip yoke The universal joints standard with your vehicle do not require lubrication. If the original equipment universal joints are replaced with universal joints equipped - 1997 Ford Explorer | Owner Guide 1st Printing - Page 187
joint according to the maintenance intervals specified in the Service Guide. CHECKING AND ADDING DIFFERENTIAL FLUID (IF EQUIPPED) To check and quantities need not be checked or changed unless a leak is suspected or repair is needed. BATTERY MAINTENANCE Important battery information If the original - 1997 Ford Explorer | Owner Guide 1st Printing - Page 188
risk of personal injury. Servicing your battery If replaced with a low-maintenance battery it will have removable vent caps for checking the electrolyte level and adding water. For more information on maintenance intervals for your battery, refer to the "Service Guide". Keep the electrolyte level - 1997 Ford Explorer | Owner Guide 1st Printing - Page 189
function Because your vehicle's engine is electronically controlled, some control conditions are maintained by power from the battery. When the battery is disconnected or a new battery is installed, the computer must "relearn" its idle conditions before your vehicle can drive properly. To begin this - 1997 Ford Explorer | Owner Guide 1st Printing - Page 190
care 1. Put the automatic transmission gearshift in P (Park). Put the manual transmission gearshift in N (Neutral). 2. Turn off all accessories and start the vehicle. 3. Let the engine idle for at least one minute. 4. The relearning process will automatically complete as you drive the vehicle. • If - 1997 Ford Explorer | Owner Guide 1st Printing - Page 191
to prevent your battery from accidental wear down due to doors left ajar. For information on the system and its function, refer to the Controls and features chapter. AIR CLEANER FILTER MAINTENANCE Refer to the "Service Guide" for the appropriate intervals for changing the air cleaner filter. Do - 1997 Ford Explorer | Owner Guide 1st Printing - Page 192
a new element. 4. Close the assembly and secure the locking clamp. The air cleaner filter shown is typical of 4.0 L OHV and 5.0 L engines. The 4.0 L SOHC is comparable. CHECKING AND REPLACING WIPER BLADES Checking wiper blades Check the windshield wiper blades at least twice a year or whenever they - 1997 Ford Explorer | Owner Guide 1st Printing - Page 193
position and turn the wipers on. 4 3 5 2 1 2. Wait for the wipers to reach a vertical position and turn the ignition to LOCK. • Do not move the wipers manually points as necessary. Replacing wiper blades If the wiper blades do not function properly after cleaning, replacement of the blade assembly - 1997 Ford Explorer | Owner Guide 1st Printing - Page 194
as follows: • Windshield wiper blades - 56 cm (16 in) • Liftgate wiper blades - 41 cm (22 in) To replace the wiper blades: 1. Pull the wiper arm away from the windshield and lock into service position. 2. Turn the blade at an angle from the wiper arm. Push the lock pin with a screwdriver to release - 1997 Ford Explorer | Owner Guide 1st Printing - Page 195
space-saver or temporary use spare tires, tires with nominal rim diameters of 10 to 12 inches or limited production tires as defined in Title 49 Code of Federal Regulations Part conditions of their use, however, and may depart significantly from the norm due to variations in driving habits, service - 1997 Ford Explorer | Owner Guide 1st Printing - Page 196
and C, representing the tire's resistance to the generation of heat and its ability to dissipate heat when tested under controlled conditions on a specified indoor laboratory test wheel. Sustained high temperature can cause the material of the tire to degenerate and reduce tire life, and excessive - 1997 Ford Explorer | Owner Guide 1st Printing - Page 197
Certification label. Improperly inflated tires can affect vehicle handling and can fail suddenly, possibly resulting in loss of vehicle control. Rotating tires Rotate your tires at regular intervals for even wear. Rotation intervals are listed in the "Service Guide". • Four tire rotation 198 - 1997 Ford Explorer | Owner Guide 1st Printing - Page 198
visible through the tire treads. When replacing full size tires, never mix radial, bias-belted, or bias-type tires. Use only the tire sizes that are listed on the tire pressure decal. Make sure that all tires are the same size, speed rating, and load-carrying capacity. Use only the tire combinations - 1997 Ford Explorer | Owner Guide 1st Printing - Page 199
to lose control and roll over. Refer to the Safety Compliance Certification label to determine the specific size tire and wheel Ford Motor Company recommends for use on this vehicle. When purchasing replacement tires for your vehicle, consult your dealer or qualified service technician to ensure - 1997 Ford Explorer | Owner Guide 1st Printing - Page 200
qualified service technician for more information on tire chains for your vehicle. Follow these guidelines when using snow tires and chains: • Install chains securely, verifying that the chains do not touch any wiring, brake lines or fuel lines. • Install the chains on the rear tires only. • Drive - 1997 Ford Explorer | Owner Guide 1st Printing - Page 201
dry roads. • The suspension insulation and bumpers will help prevent vehicle control. IMPORTANT FUEL INFORMATION Important safety precautions Do not overfill the fuel tank. The pressure in an overfilled tank may cause leakage and lead to fuel spray and fire. If you do not use the proper fuel cap - 1997 Ford Explorer | Owner Guide 1st Printing - Page 202
is venting vapor or if you hear a hissing sound, wait until it stops before completely removing the cap. Automotive fuels can cause serious injury or death if misused or mishandled. Observe the following guidelines when handling automotive fuel: • Extinguish all smoking materials and - 1997 Ford Explorer | Owner Guide 1st Printing - Page 203
physician immediately. Cleaner air Ford approves the use of gasolines to improve air quality, including reformulated gasolines lightly. However, if it knocks heavily under most driving conditions on the recommended octane fuel, see your dealer or a qualified service technician to prevent any engine - 1997 Ford Explorer | Owner Guide 1st Printing - Page 204
, rough idle or hesitation problems try a different brand of fuel. If the condition persists, see your dealer or a qualified service technician. California emission standards (indicated on the underhood Vehicle Emissions Control Information label) are designed to operate on California reformulated - 1997 Ford Explorer | Owner Guide 1st Printing - Page 205
will perform adequately on other gasolines, the performance of the emission control devices and systems may be adversely affected. Repair of damage caused by using a fuel that your vehicle was not designed for may not be covered by your warranty. Calculating fuel economy To accurately - 1997 Ford Explorer | Owner Guide 1st Printing - Page 206
replacements or for service of components affecting emission control such non-Ford parts should be equivalent to genuine Ford Motor Company parts in performance and durability. Do not park, idle, or drive your vehicle in dry grass or other dry ground cover. The emission system heats up the engine - 1997 Ford Explorer | Owner Guide 1st Printing - Page 207
, the "Service Engine Soon" light or the temperature warning light. These events could indicate that the emission control system is not working properly. If you smell exhaust fumes of any kind inside your vehicle, have the dealer inspect and fix your vehicle immediately. Do not drive if you smell - 1997 Ford Explorer | Owner Guide 1st Printing - Page 208
and Gauges section of your owners guide. Your vehicle may not pass the I/M test with the "check engine/service engine soon" light on. If the vehicle's powertrain system or its battery has just been serviced, the OBD-II system is reset to a "not ready for I/M test" condition. To ready the OBD-II - 1997 Ford Explorer | Owner Guide 1st Printing - Page 209
mount brakelamp • license plate lamp • tail lamps • back-up lamps Do not remove lamp bulbs unless they will be replaced immediately with new ones. If a bulb is removed for an extended period of time, contaminants may enter the lamp-housings and affect lamp performance. Handle a halogen headlamp bulb - 1997 Ford Explorer | Owner Guide 1st Printing - Page 210
on and ensure they work properly. LIFT Foglamps (if equipped) 1. Disconnect the electrical connector from the back of the foglamp by turning it counterclockwise. 2. Remove the bulb by lifting the retaining clip and pulling the bulb from the assembly. 3. Replace the bulb and insert the bulb - 1997 Ford Explorer | Owner Guide 1st Printing - Page 211
service technician. License plate lamps To change either of the license plate lamp bulbs, follow this procedure: 1. Use a screwdriver to detach the lamp from the bumper. 2. Turn and pull the socket from the lamp and remove the bulb. 3. Replace the socket into the lamp and press the lamp back - 1997 Ford Explorer | Owner Guide 1st Printing - Page 212
cargo lamps Map lamps To change the map lamp bulbs: 1. Use a small screwdriver to pry off the lens. 2. To remove the bulbs, rotate each bulb holder counterclockwise. The bulb and bulb holder will drop out. 3. Pull the bulb from the bulb holder and replace it. 4. To replace the bulb, push it back - 1997 Ford Explorer | Owner Guide 1st Printing - Page 213
Function Cargo lamp Interior overhead lamp Front door courtesy lamp Map lamps Ashtray lamp Glove compartment lamp Number of bulbs 1 1 1 2 1 1 Trade number 211-2 912 (906) 168 168 (T10) 161 194 AIMING THE HEADLAMPS The alignment of your headlamps should be checked by a qualified service technician - 1997 Ford Explorer | Owner Guide 1st Printing - Page 214
AND CARING FOR YOUR VEHICLE Refer to the "Customer Assistance Guide" for a list of Ford-approved cleaners, polishes and damage to the vehicle. Remove any exterior accessories, such as antennas, before entering a car wash. • After washing, apply the brakes several times to dry them. Waxing your - 1997 Ford Explorer | Owner Guide 1st Printing - Page 215
the Ford accessory line. Observe the application instructions on the products. Remove particles such as bird droppings, tree sap, insect remains, tar spots, road salt and industrial fallout immediately. Cleaning the wheels Wash the wheels with the same detergent you use to clean the body of your - 1997 Ford Explorer | Owner Guide 1st Printing - Page 216
Maintenance and care high pressure fluid could penetrate the sealed parts and cause damage. • Do not spray with cold water to avoid cracking the engine block. • Cover the highlighted areas to prevent water damage when cleaning the engine. 217 - 1997 Ford Explorer | Owner Guide 1st Printing - Page 217
• Never wash or rinse the engine while it is running; water in the running engine may cause internal damage. Cleaning plastic exterior parts Use a vinyl cleaner for routine cleaning of plastic. Clean with a tar remover if necessary. Do not clean plastic parts with thinners, solvents or petroleum - 1997 Ford Explorer | Owner Guide 1st Printing - Page 218
1000 20 10 0 km/h P R N D 2 1 VOL - PUSH ON AM FM BASS TREB FM 1 ST CLK BAL FADE AUTO SET PUSH OFF ON RSM SEEK EJ DOLBY SYSTEM SET ACC OFF COAST TUNE DISCS SCAN TAPE CD REW 1 FF 2 SIDE 1-2 3 4 COMP 5 SHUFFLE 6 SRS LO OFF *A/C HI *MAX A/C Clean the instrument panel with a damp - 1997 Ford Explorer | Owner Guide 1st Printing - Page 219
for cleaning upholstery or carpets. Do not bleach or dye the belts, because these actions may weaken the belt webbing. All safety belt assemblies, including retractors, buckles, front seat belt buckle support assemblies (slide bar) (if equipped), shoulder belt height adjusters (if equipped - 1997 Ford Explorer | Owner Guide 1st Printing - Page 220
Maintenance and care The child seat liner is removable and may be machine-washed and air dried. 221 - 1997 Ford Explorer | Owner Guide 1st Printing - Page 221
Capacities and specifications MOTORCRAFT PART NUMBERS Component Air filter Fuel filter Battery (standard) Battery (optional) Oil filter PCV valve Spark plug1 1 4.0L EFI engine FA-1616 FG-872 BXT-58 BXT-65-650 FL-1A EV-225 AGSF-22PP2 4.0L SOHC engine FA-1658 FG-872 BXT-58 BXT-65-650 FL-1A EV-225 - 1997 Ford Explorer | Owner Guide 1st Printing - Page 222
manual 4R70W Automatic (4 x 2) 5R55E Automatic with 4.0L SOHC engine (4 x 2) 5R55E Automatic with 4.0L SOHC engine (4 x 4) 4WD AWD 4.0L engine 5.0L engine 4 x 4 vehicles 1.7 (3.5 pints) Fill to line in reservoir 2.6 (5.6 pints) 13.1 (13.9) Capacity-liters (quarts) Power steering fluid Transmission - 1997 Ford Explorer | Owner Guide 1st Printing - Page 223
and 3.73 or 4.10 rear axle ratios or 5.0L engines require synthetic rear axle lubricant. Rear axles containing synthetic lubricant are lubricated for life. These lubricants are not to be checked or changed unless a leak is suspected, service required or the axle assembly has been submerged in water - 1997 Ford Explorer | Owner Guide 1st Printing - Page 224
fluid reservoir Body hinges, latches, door stricker plates and rotors, seat tracks, fuel filler door hinge and spring, hood latch, auxiliary latch Steering column u-joints, parking brake linkage pivots and clevises, transmission control and clutch linkage pivots Ford Part Ford Part Name Number - 1997 Ford Explorer | Owner Guide 1st Printing - Page 225
Door weatherstrips Engine coolant ATX shift linkage Engine oil Ford Part Name High Perfromance DOT 3 Brake Fluid Premium Long Life Grease Silicone Lubricants Ford Premium Cooling System Fluid Premium Long Life Grease Motorcraft Motor Oil 5W-30 Super Premium Motorcraft MERCON Automatic Transmission - 1997 Ford Explorer | Owner Guide 1st Printing - Page 226
Transfer case MERCON XT-2-QDX Four wheel Automatic drive Transmission Fluid Brake and Premium clutch pedal XG-1-C or K Long-life Grease shaft Motorcraft MERCON 5-speed manual Automatic XT-2-QDX transmission transmission fluid Trnafer case Premium XG-1-G or K Front Output Long-Life Grease Slip - 1997 Ford Explorer | Owner Guide 1st Printing - Page 227
Capacities and specifications 3 Add 4-ounces of additive friction modifier C8AZ-19B546-A, Ford specification EST-M2C118-A, for complete Traction-lok rear axles. ENGINE DATA Engine Cubic inches Horsepower Torque Required fuel grade Firing order Spark plug gap 4.0L 2V V-6 SOHC 245 245 160 @ 4200 rpm - 1997 Ford Explorer | Owner Guide 1st Printing - Page 228
Capacities and specifications 4 1 229 - 1997 Ford Explorer | Owner Guide 1st Printing - Page 229
Capacities and specifications 3 5 2 IDENTIFYING YOUR VEHICLE Vehicle identification tag The vehicle identification tag is located on the front panel of the engine compartment. This tag bears technical information on your vehicle and identifies various components. Vehicle identification number The - 1997 Ford Explorer | Owner Guide 1st Printing - Page 230
Capacities and specifications Engine number The engine number is stamped on the engine block. 231 - 1997 Ford Explorer | Owner Guide 1st Printing - Page 231
of vehicles, it may order a recall and remedy campaign. However, NHTSA cannot become involved in individual problems between you, your dealer or Ford Motor Company. To contact NHTSA, you may either call the Auto Safety Hotline toll-free at 1-800-424-9393 (202-366-0123 in the Washington D.C. area) or - 1997 Ford Explorer | Owner Guide 1st Printing - Page 232
description ...89 disposal ...94 indicator light ...93 passenger air bag ...91 Air cleaner filter ...192 replacing ...193 Air conditioning manual heating and air conditioning system ...28,29,30,31,32 Air suspension ...119 All wheel drive (AWD) ...134 Anti-theft system ...65 arming the system ...66 - 1997 Ford Explorer | Owner Guide 1st Printing - Page 233
...57 Lights, warning and indicator air bag ...11 anti-lock brakes (ABS) ...11 anti-theft ...9 brake ...11 charging system ...10 check engine ...9 door ajar ...10 four-wheel drive ...9 fuel reset ...10 high beam ...11 overdrive off ...8 safety belt ...11,87,88 Luggage rack ...146 Manual transmission - 1997 Ford Explorer | Owner Guide 1st Printing - Page 234
...138 safety chains ...143 tips ...139,144 trailer brakes ...143 trailer lamps ...143 Transfer case (see Differential fluid) ...188 Transmission fluid, checking and adding (automatic) ...186 Trip odometer ...14 Turn signal indicator lights ...9 Two step lock ...54 Vehicle dimensions ...228 Vehicle - 1997 Ford Explorer | Owner Guide 1st Printing - Page 235
Voltmeter (see Battery voltage gauge) ...15 Warning chimes headlamps on ...11 key in ignition ...12 safety belt ...12 Washer fluid reservoir ...179 Windows power windows, operating ...56 Windshield washer fluid and wipers ...193 checking and adding fluid ...178 checking and replacing wiper blades - 1997 Ford Explorer | Owner Guide 1st Printing - Page 236
Filling station information FILLING STATION INFORMATION Fuel Fuel tank capacity (2 door) Fuel tank capacity (4 door) Engine oil Unleaded fuel only - Octane 87 66.2 L (17.3 gallons) 79.5 L (20.8 gallons) Use only engine oil displaying the American Petroleum Institute certification mark. SAE 5W-30 is
-
 1
1 -
 2
2 -
 3
3 -
 4
4 -
 5
5 -
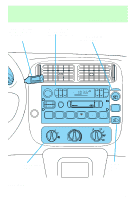 6
6 -
 7
7 -
8
-
9
-
10
-
11
-
12
-
13
-
14
-
15
-
16
-
17
-
18
-
19
-
20
-
21
-
22
-
23
-
24
-
25
-
26
-
27
-
28
-
29
-
30
-
31
-
32
-
33
-
34
-
35
-
36
-
37
-
38
-
39
-
40
-
41
-
42
-
43
-
44
-
45
-
46
-
47
-
48
-
49
-
50
-
51
-
52
-
53
-
54
-
55
-
56
-
57
-
58
-
59
-
60
-
61
-
62
-
63
-
64
-
65
-
66
-
67
-
68
-
69
-
70
-
71
-
72
-
73
-
74
-
75
-
76
-
77
-
78
-
79
-
80
-
81
-
82
-
83
-
84
-
85
-
86
-
87
-
88
-
89
-
90
-
91
-
92
-
93
-
94
-
95
-
96
-
97
-
98
-
99
-
100
-
101
-
102
-
103
-
104
-
105
-
106
-
107
-
108
-
109
-
110
-
111
-
112
-
113
-
114
-
115
-
116
-
117
-
118
-
119
-
120
-
121
-
122
-
123
-
124
-
125
-
126
-
127
-
128
-
129
-
130
-
131
-
132
-
133
-
134
-
135
-
136
-
137
-
138
-
139
-
140
-
141
-
142
-
143
-
144
-
145
-
146
-
147
-
148
-
149
-
150
-
151
-
152
-
153
-
154
-
155
-
156
-
157
-
158
-
159
-
160
-
161
-
162
-
163
-
164
-
165
-
166
-
167
-
168
-
169
-
170
-
171
-
172
-
173
-
174
-
175
-
176
-
177
-
178
-
179
-
180
-
181
-
182
-
183
-
184
-
185
-
186
-
187
-
188
-
189
-
190
-
191
-
192
-
193
-
194
-
195
-
196
-
197
-
198
-
199
-
200
-
201
-
202
-
203
-
204
-
205
-
206
-
207
-
208
-
209
-
210
-
211
-
212
-
213
-
214
-
215
-
216
-
217
-
218
-
219
-
220
-
221
-
222
-
223
-
224
-
225
-
226
-
227
-
228
-
229
-
230
-
231
-
232
-
233
-
234
-
235
-
236
 |
 |

Before driving
Introduction
2
Instrumentation
5
Controls and features
25
Seating and safety restraints
78
Starting and driving
Starting
110
Driving
117
Roadside emergencies
147
Servicing
Maintenance and care
165
Capacities and specifications
222
Reporting safety defects
232
Index
233
Contents
1