| Section |
Page |
| 2005 ESCAPE - SPANISH |
1 |
| Tabla de contenido |
1 |
| Introducción |
4 |
| FELICITACIONES |
4 |
| SEGURIDAD Y PROTECCIÓN DEL MEDIO AMBIENTE |
5 |
| Símbolos de advertencia en este manual |
5 |
| Símbolos de advertencia en su vehículo |
5 |
| Protección del medio ambiente |
5 |
| ASENTAMIENTO DE SU VEHÍCULO |
6 |
| AVISOS ESPECIALES |
6 |
| Garantía de emisión de gases |
6 |
| Instrucciones especiales |
7 |
| Grabación de datos de servicio |
7 |
| Grabación de datos de eventos |
8 |
| Aviso a los propietarios de camionetas pickup y vehículos utilitarios |
8 |
| Uso del vehículo con un barredor de nieve |
9 |
| Uso del vehículo como ambulancia |
9 |
| INFORMACIÓN ESPECÍFICA PARA LOS VEHÍCULOS DEL MEDIO ORIENTE Y NORTE DE ÁFRICA. |
9 |
| Grupo de instrumentos |
12 |
| LUCES Y CAMPANILLAS DE ADVERTENCIA |
12 |
| INDICADORES |
17 |
| Sistemas de audio |
19 |
| RADIO ESTÉREO AM/FM PARA UN CD (SI ESTÁ INSTALADO) |
19 |
| RADIO ESTÉREO AM/FM PREMIUM CON TOCACINTAS Y UN CD (SI ESTÁ INSTALADO) |
22 |
| RADIO CON SISTEMA DE SONIDO DE RECEPCIÓN SATELITAL MACH 300 (SI ESTÁ INSTALADO) |
27 |
| RADIO MODULAR PARA SEIS CD ESTÉREO AM/FM INCORPORADA EN EL TABLERO (SI ESTÁ INSTALADA) |
32 |
| RADIO ESTÉREO AM/FM CON CD/MP3 INCORPORADO EN TABLERO, COMPATIBLE CON RECEPCIÓN SATELITAL: POSTERIOR DISPONIBILIDAD (SI ESTÁ EQUIPADO) |
36 |
| RADIO ESTÉREO AM/FM Y TOCACINTAS CON CD/MP3 PREMIUM, COMPATIBLE CON RECEPCIÓN SATELITAL: POSTERIOR DISPONIBILIDAD (SI ESTÁ INSTALADO) |
41 |
| RETARDO DE ACCESORIOS |
46 |
| FRECUENCIAS DE RADIO |
46 |
| FACTORES DE LA RECEPCIÓN DE RADIO |
46 |
| CUIDADO DE CINTAS Y DEL TOCACINTAS |
46 |
| CUIDADO DE CD Y DEL REPRODUCTOR DE CD |
47 |
| GARANTÍA Y SERVICIO DEL SISTEMA DE AUDIO |
47 |
| Controles de temperatura interior |
48 |
| SISTEMA PARA CALEFACCIÓN SOLAMENTE (SI ESTÁ INSTALADA) |
48 |
| Consejos de funcionamiento |
48 |
| SISTEMA MANUAL DE CALEFACCIÓN Y AIRE ACONDICIONADO (SI ESTÁ INSTALADO) |
49 |
| Consejos de funcionamiento |
49 |
| DESEMPAÑADOR DE LA VENTANA TRASERA |
50 |
| Sistema de luces |
51 |
| CONTROL DE FAROS DELANTEROS |
51 |
| Control de encendido automático de luces (si está instalado) |
51 |
| Sistema de retardo de encendido automático de luces (si está instalado) |
51 |
| Control de los faros de niebla (si están instalados) |
52 |
| Luces diurnas automáticas (DRL) (si están instaladas) |
52 |
| Luces de estacionamiento inteligentes (si están instaladas) |
53 |
| Luces altas |
53 |
| Destello para rebasar |
54 |
| CONTROL DEL ATENUADOR DEL TABLERO |
54 |
| ENFOQUE DE LOS FAROS DELANTEROS |
54 |
| Ajuste de la alineación vertical |
54 |
| CONTROL DE LAS DIRECCIONALES |
56 |
| LUCES INTERIORES |
56 |
| Luces superiores de techo y luces de mapa |
56 |
| Luces de carga y superiores de techo |
57 |
| Economizador de batería de luces interiores |
57 |
| FOCOS |
57 |
| Condensación de los faros delanteros |
57 |
| Reemplazo de los focos exteriores |
58 |
| Uso de los focos correctos |
58 |
| Cambio de los focos interiores |
58 |
| Reemplazo de los focos de los faros delanteros |
59 |
| Reemplazo de los focos de las luces de freno, traseras, direccionales y de reversa |
60 |
| Reemplazo de los focos de la luz de placa |
61 |
| Reemplazo de los focos de luz superior de freno |
62 |
| Reemplazo de los focos de las luces de estacionamiento y de las direccionales |
62 |
| Reemplazo de los focos de los faros de niebla |
62 |
| Controles del conductor |
63 |
| PALANCA MULTIFUNCIÓN |
63 |
| Controles del limpiador y lavador traseros |
64 |
| Cambio de las hojas de los limpiadores |
64 |
| VOLANTE DE LA DIRECCIÓN INCLINABLE |
65 |
| CONSOLA DE TOLDO (SI ESTÁ INSTALADA) |
65 |
| Compartimiento para guardar (si está instalado) |
65 |
| Instalación de un sistema para abrir puertas de garajes (si está equipado) |
65 |
| Espejo de visera iluminado (si está instalado) |
67 |
| TOMACORRIENTE AUXILIAR (12 VDC) |
67 |
| VENTANAS ELÉCTRICAS |
68 |
| Un solo toque |
68 |
| Seguro de la ventana (si está instalado) |
69 |
| Retardo de accesorios |
69 |
| ESPEJOS LATERALES ELÉCTRICOS |
69 |
| Espejos plegables |
70 |
| Espejos exteriores térmicos (si están instalados) |
70 |
| Espejo retrovisor con atenuación automática (si está instalado) |
70 |
| CONTROL DE VELOCIDAD (SI ESTÁ INSTALADO) |
71 |
| Fijación del control de velocidad |
71 |
| Para reasumir una velocidad establecida |
72 |
| Aumento de la velocidad mientras se usa el control de velocidad |
72 |
| Disminución de la velocidad mientras se usa el control de velocidad |
72 |
| Apagado del control de velocidad |
73 |
| CONSOLA CENTRAL |
73 |
| Uso del teléfono celular |
73 |
| TOLDO CORREDIZO (SI ESTÁ INSTALADO) |
74 |
| MESSAGE CENTER (CENTRO DE MENSAJES) (SI ESTÁ INSTALADO) |
75 |
| Características para seleccionar |
75 |
| Set (Establecer) |
75 |
| Menú Info (Información) |
76 |
| Ahorro promedio de combustible (AFE) |
76 |
| Distancia antes de quedar el tanque vacío (DTE) |
77 |
| Ahorro de combustible instantáneo |
77 |
| Unidades (inglesas, métricas) |
77 |
| Comprobación del sistema |
78 |
| Idioma |
78 |
| Desactivación de visualización |
79 |
| Advertencias del sistema |
79 |
| COMPUERTA LEVADIZA |
84 |
| CUBIERTA DE CARGA (SI ESTÁ INSTALADA) |
84 |
| Sistema de administración de carga (si está instalado) |
85 |
| PARRILLA PORTAEQUIPAJE |
86 |
|
86 |
| Para ajustar la posición de la barra transversal (si está instalada): |
86 |
| Para sacar el conjunto de la barra transversal (si está instalada) de los rieles laterales de la parrilla portaequipaje de techo: |
86 |
| Para volver a instalar el conjunto de la barra transversal (si está instalada) en los rieles laterales de la parrilla portaequipaje de techo: |
87 |
| SISTEMA DE PARRILLA PORTAEQUIPAJE SIN LÍMITES (SI ESTÁ INSTALADO) |
88 |
| Para extender la parrilla portaequipaje interior: |
89 |
| Para recoger la parrilla portaequipaje interior: |
91 |
| Para ajustar el conjunto de la barra transversal en la parrilla portaequipaje interior: |
92 |
| Instalación de la carga: |
93 |
| Seguridad y seguros |
95 |
| LLAVES |
95 |
| SEGUROS ELÉCTRICOS DE LAS PUERTAS |
95 |
| Característica de impedimento de bloqueo y desbloqueo eléctrico de puertas |
95 |
| Cierre y apertura de seguros de las puertas con una llave |
96 |
| Desbloqueo de las puertas de dos pasos |
96 |
| Desbloqueo de las puertas de un paso |
96 |
| Bloqueo de las puertas |
96 |
| Característica de apertura inteligente |
97 |
| Seguros de puertas a prueba de niños |
97 |
| SISTEMA DE ENTRADA A CONTROL REMOTO (SI ESTÁ INSTALADO) |
97 |
| Desbloqueo de las puertas de dos pasos |
98 |
| Desbloqueo de las puertas de un paso |
98 |
| Cambio del desbloqueo de las puertas de dos pasos a un paso |
99 |
| Bloqueo de las puertas |
99 |
| Activación de una alarma de emergencia |
99 |
| Cambio de la batería |
99 |
| Reemplazo de transmisores de entrada a control remoto perdidos |
100 |
| Cómo volver a programar sus transmisores de entrada a control remoto |
101 |
| Entrada iluminada |
102 |
| Salida iluminada |
102 |
| SISTEMA PASIVO ANTIRROBO SECURILOCK |
102 |
| Indicador antirrobo |
103 |
| Armado automático |
103 |
| Desarmado automático |
103 |
| Llaves de reemplazo |
104 |
| Programación de duplicados de las llaves |
104 |
| SISTEMA DE ALARMA PERIMÉTRICA (SI ESTÁ INSTALADA) |
105 |
| Armado del sistema |
105 |
| Desarmado del sistema |
106 |
| Activación del sistema antirrobo |
107 |
| Asientos y sistemas de seguridad |
108 |
| ASIENTOS DELANTEROS |
108 |
| Apoyacabezas ajustables |
108 |
| Ajuste del asiento manual delantero |
109 |
| Ajuste del asiento eléctrico delantero (si está instalado) |
109 |
| Asientos térmicos (si están instalados) |
110 |
| Asientos traseros |
110 |
| Apoyacabezas |
110 |
| Plegado de los asientos traseros |
111 |
| Regreso de los asientos traseros a la posición vertical |
113 |
| Para sacar el cojín trasero |
115 |
| Para instalar el cojín trasero |
115 |
| SISTEMAS DE SEGURIDAD |
115 |
| Sistema de seguridad personal |
115 |
| ¿Cómo funciona el Sistema de seguridad personal? |
116 |
| Sistemas de seguridad suplementarios de bolsas de aire de doble etapa para el conductor y el pasajero |
116 |
| Sensor de gravedad de choque frontal |
117 |
| Sensor de posición del asiento del conductor |
117 |
| Sistema de sensores del pasajero delantero |
117 |
| Sensores de uso del cinturón de seguridad delantero |
118 |
| Pretensores del cinturón de seguridad delantero |
118 |
| Retractores de administración de energía del cinturón de seguridad delantero |
118 |
| Para determinar si el sistema de seguridad personal funciona |
119 |
| Precauciones con los sistemas de seguridad |
119 |
| Característica de administración de energía |
121 |
| Combinación de cinturones pélvicos y de hombros |
121 |
| Modo sensible del vehículo |
121 |
| Modo de bloqueo automático |
122 |
| Uso del modo de bloqueo automático |
122 |
| Cómo desactivar el modo de bloqueo automático |
123 |
| Ajuste de la altura de los cinturones de seguridad |
123 |
| Pretensor del cinturón de seguridad |
124 |
| Mecanismo de extensión para cinturón de seguridad |
124 |
| Luz de advertencia y campanilla indicadora del cinturón de seguridad |
125 |
| Condiciones de funcionamiento |
125 |
| BeltMinder (Recordatorio de cinturón de seguridad) |
125 |
| Desactivar una vez |
128 |
| Desactivación/activación de la característica BeltMinder |
128 |
| Mantenimiento de cinturones de seguridad |
130 |
| SISTEMA DE SUJECIÓN SUPLEMENTARIO DE BOLSA DE AIRE (SRS) |
131 |
| Importantes precauciones del SRS |
131 |
| Los niños y las bolsas de aire |
133 |
| ¿Cómo funciona el sistema de seguridad suplementario de bolsas de aire? |
133 |
| Sistema de sensores del pasajero delantero |
135 |
| Para determinar si el sistema funciona |
138 |
| Sistema Safety Canopy (si está instalado) |
139 |
| ¿Cómo funciona el sistema Safety Canopy? |
140 |
| Para determinar si el sistema funciona |
142 |
| Sistema de bolsas de aire laterales (si están instaladas) |
143 |
| ¿Cómo funciona el sistema de bolsas de aire laterales? |
144 |
| Para determinar si el sistema funciona |
145 |
| Eliminación de bolsas de aire y de vehículos con bolsas de aire (incluidos los pretensores) |
146 |
| SISTEMAS DE SEGURIDAD PARA NIÑOS |
146 |
| Precauciones importantes de los sistemas de seguridad para niños |
146 |
| Los niños y los cinturones de seguridad |
147 |
| Asientos auxiliares para niños |
147 |
| Tipos de asientos auxiliares |
148 |
| ASIENTOS DE SEGURIDAD PARA NIÑOS |
150 |
| Asientos de seguridad para niños y bebés o para niños |
150 |
| Instalación de asientos de seguridad para niños con combinación de cinturón pélvico y de hombros |
151 |
| Sujeción de asientos de seguridad para niños con correas de sujeción |
154 |
| Ajustes de asientos de seguridad para niños con conexiones LATCH (anclajes inferiores y correas de sujeción para niños) para anclajes de asientos para niños |
156 |
| Llantas, ruedas y carga |
158 |
| AVISO A LOS PROPIETARIOS DE VEHÍCULOS UTILITARIOS Y CAMIONETAS |
158 |
| CARACTERÍSTICAS DEL VEHÍCULO |
159 |
| Sistemas 4WD y AWD (si están instalados) |
159 |
| Cómo se diferencia su vehículo de los demás |
160 |
| INFORMACIÓN SOBRE GRADO DE UNIFORMIDAD DE LA CALIDAD DE LAS LLANTAS |
161 |
| Desgaste de los surcos |
161 |
| Tracción AA, A, B y C |
161 |
| Temperatura A, B y C |
162 |
| LLANTAS |
162 |
| Glosario de terminología sobre llantas |
162 |
| INSPECCIÓN E INFLADO DE LAS LLANTAS |
163 |
| Inspección de sus llantas |
164 |
| Inflado de las llantas |
164 |
| REQUERIMIENTOS DE REEMPLAZO DE LLANTAS |
166 |
| CAMBIO DE UNA LLANTA DESINFLADA |
167 |
| Información de la llanta de refacción pequeña o Tipo T (si está instalada) |
167 |
| Información de ruedas/llanta de refacción desiguales (si está instalada) |
168 |
| Procedimiento de cambio de llantas |
169 |
| Extracción del gato y las herramientas |
170 |
| Retiro de la llanta o rueda de refacción y correa (si están instaladas) |
172 |
| Cambio de la llanta desinflada |
173 |
| Almacenamiento de la llanta desinflada o de refacción |
177 |
| ESPECIFICACIONES DE TORSIÓN DE LAS TUERCAS DE SEGURIDAD DE LAS RUEDAS |
178 |
| INFORMACIÓN AL COSTADO DE LA LLANTA |
178 |
| Información en llantas tipo “P” |
179 |
| Información adicional contenida en el costado de la llanta para llantas tipo “LT” |
182 |
| Información en llantas tipo “T” |
183 |
| Ubicación de la etiqueta de la llanta |
183 |
| CUIDADO DE LA LLANTA |
183 |
| Desgaste de las llantas |
184 |
| Prácticas de seguridad |
185 |
| Riesgos en las carreteras |
185 |
| Alineación de ruedas y llantas |
186 |
| Rotación de las llantas |
186 |
| USO DE LLANTAS Y DISPOSITIVOS DE TRACCIÓN PARA LA NIEVE |
188 |
| CARGA DEL VEHÍCULO: CON Y SIN REMOLQUE |
189 |
| Instrucciones especiales de carga para propietarios de camionetas pickup y vehículos tipo utilitario |
196 |
| Cálculo de la carga que su vehículo puede transportar o arrastrar |
196 |
| ARRASTRE DE REMOLQUE |
197 |
| Preparación para remolcar |
200 |
| Enganches |
200 |
| Cadenas de seguridad |
200 |
| Frenos del remolque |
200 |
| Luces del remolque |
200 |
| Conducción al remolcar |
201 |
| Servicio después de remolcar |
201 |
| Consejos para arrastrar remolques |
201 |
| Botadura o recuperación de un bote |
202 |
| REMOLQUE VACACIONAL |
202 |
| Manejo |
203 |
| ARRANQUE |
203 |
| Posiciones del encendido |
203 |
| Preparación para arrancar el vehículo |
203 |
| Precauciones de seguridad importantes |
204 |
| Arranque del motor |
206 |
| Uso del calefactor de bloque del motor (si está instalado) |
207 |
| Protección contra los gases de escape |
207 |
| Información importante sobre la ventilación |
207 |
| FRENOS |
207 |
| Sistema de frenos antibloqueo (ABS) en las cuatro ruedas |
208 |
| Uso del ABS |
208 |
| Luz de advertencia ABS |
208 |
| Freno de estacionamiento |
209 |
| DIRECCIÓN |
210 |
| PREPARACIÓN PARA MANEJAR EL VEHÍCULO |
210 |
| FUNCIONAMIENTO DE LA TRANSMISIÓN AUTOMÁTICA (SI ESTÁ INSTALADA) |
211 |
| Interbloqueo del cambio de velocidades y freno |
211 |
| Manejo con un transeje de sobremarcha automático |
213 |
| Conocimiento de las posiciones de la palanca de cambio de velocidades del transeje automático de 4 velocidades |
214 |
| Si su vehículo se atasca en el lodo o la nieve |
217 |
| FUNCIONAMIENTO DEL TRANSEJE MANUAL (SI ESTÁ INSTALADO) |
217 |
| Uso del clutch |
217 |
| Velocidades de cambio recomendadas |
218 |
| Reversa |
219 |
| Estacionamiento del vehículo |
219 |
| SISTEMA DE TRACCIÓN EN LAS CUATRO RUEDAS (4WD) (SI ESTÁ INSTALADO) |
221 |
| Luces indicadoras del sistema de tracción en las cuatro ruedas |
221 |
| Mensajes del sistema 4WD en el Centro de mensajes (si está instalado) |
221 |
| Manejo a campo traviesa con camioneta y vehículos utilitarios |
222 |
| Cómo se diferencia su vehículo de los demás |
222 |
| Principios de funcionamiento básicos |
222 |
| Si su vehículo se sale del pavimento |
223 |
| Si el vehículo queda atascado |
223 |
| Maniobras de emergencia |
224 |
| Arena |
225 |
| Lodo y agua |
225 |
| Manejo en terreno montañoso o con cuestas |
226 |
| Manejo sobre nieve y hielo |
227 |
| Mantenimiento y modificaciones |
228 |
| SISTEMA DE DETECCIÓN DE REVERSA (SI ESTÁ INSTALADO) |
228 |
| CONDUCCIÓN A TRAVÉS DEL AGUA |
231 |
| Emergencias en el camino |
232 |
| OBTENER ASISTENCIA EN EL CAMINO |
232 |
| Uso de la asistencia en el camino |
232 |
| Cobertura en el camino más allá de la garantía básica |
233 |
| CONTROL DE LUCES INTERMITENTES DE EMERGENCIA |
233 |
| INTERRUPTOR DE CORTE DE LA BOMBA DE COMBUSTIBLE |
234 |
| FUSIBLES Y RELEVADORES |
234 |
| Fusibles |
234 |
| Amperaje y color de los fusibles estándar |
235 |
| Tablero de fusibles del compartimiento del pasajero |
236 |
| Caja de distribución de la corriente |
240 |
| ARRANQUE EL VEHÍCULO CON CABLES PASACORRIENTE |
243 |
| Preparación del vehículo |
243 |
| Conexión de los cables pasacorriente |
244 |
| Arranque con cables pasacorriente |
245 |
| Retiro de los cables pasacorriente |
246 |
| REMOLQUE CON GRÚA DE AUXILIO |
248 |
| Asistencia al cliente |
250 |
| CÓMO CONSEGUIR LOS SERVICIOS QUE NECESITA |
250 |
| En el país |
250 |
| Fuera de la ciudad |
250 |
| Asistencia adicional |
252 |
| EN CALIFORNIA (SÓLO EE.UU.) |
252 |
| CONSEJO DE SOLUCIÓN DE DISPUTAS (SÓLO EE.UU.) |
253 |
| ¿Qué tipo de casos revisa el Consejo? |
253 |
| Miembros del Consejo |
254 |
| Las necesidades del Consejo |
254 |
| Presentaciones orales |
255 |
| Tomar una decisión |
255 |
| Para pedir una solicitud/folleto del DSB |
255 |
| UTILIZACIÓN DEL PROGRAMA DE MEDIACIÓN Y ARBITRAJE (SÓLO CANADÁ) |
256 |
| EXTENSIÓN DE SERVICIO FORD |
257 |
| CÓMO CONSEGUIR ASISTENCIA FUERA DE EE.UU. Y CANADÁ |
257 |
| SOLICITUD DE INFORMACIÓN ADICIONAL DEL PROPIETARIO |
258 |
| Cómo obtener un manual del propietario en francés |
259 |
| INFORME DE DEFECTOS DE SEGURIDAD (EE.UU. SOLAMENTE) |
259 |
| Limpieza |
260 |
| LAVADO EXTERIOR |
260 |
| ENCERADO |
260 |
| DESCASCARADOS DE PINTURA |
261 |
| RUEDAS DE ALUMINIO Y TAPONES DE LAS RUEDAS |
261 |
| MOTOR |
261 |
| PARTES EXTERIORES PLÁSTICAS (NO PINTADAS) |
263 |
| VENTANAS Y HOJAS DEL LIMPIADOR |
263 |
| MICAS DEL TABLERO Y DEL GRUPO DE INSTRUMENTOS. |
263 |
| TAPIZADO INTERIOR |
264 |
| INTERIOR |
264 |
| ASIENTOS DE PIEL (SI ESTÁN INSTALADOS) |
265 |
| PARTE INFERIOR DE LA CARROCERÍA |
265 |
| PRODUCTOS PARA EL CUIDADO DE LOS VEHÍCULOS FORD Y LINCOLN MERCURY |
265 |
| Mantenimiento y especificaciones |
267 |
| RECOMENDACIONES DE SERVICIO |
267 |
| MEDIDAS DE PRECAUCIÓN DURANTE EL SERVICIO DE SU VEHÍCULO |
267 |
| Trabajo con el motor apagado |
267 |
| Trabajo con el motor encendido |
268 |
| APERTURA DEL COFRE |
268 |
| IDENTIFICACIÓN DE COMPONENTES EN EL COMPARTIMIENTO DEL MOTOR |
270 |
| Motor I4 de 2.3L |
270 |
| Motor Duratec V6 DOHC 3.0L |
271 |
| LÍQUIDO LAVAPARABRISAS |
272 |
| Revisión y llenado de líquido lavaparabrisas para la compuerta levadiza |
272 |
| ACEITE DEL MOTOR |
273 |
| Revisión del aceite del motor |
273 |
| Cómo agregar aceite de motor |
276 |
| Recomendaciones para el filtro y el aceite del motor |
276 |
| Use aceite del motor SAE 5W-20. |
276 |
| BATERÍA |
277 |
| LÍQUIDO REFRIGERANTE DEL MOTOR |
280 |
| Revisión del líquido refrigerante del motor |
280 |
| Llenado del líquido refrigerante del motor |
281 |
| Líquido refrigerante del motor reciclado |
284 |
| Capacidad de llenado de refrigerante |
284 |
| Climas extremos |
284 |
| Lo que debe saber acerca del sistema de enfriamiento ante fallas (sólo motores 2.3L I4) |
285 |
| Cómo funciona el sistema de enfriamiento ante fallas |
285 |
| Cuando se activa el modo de seguridad ante fallas |
286 |
| LO QUE DEBE SABER ACERCA DE LOS COMBUSTIBLES PARA AUTOMÓVILES |
286 |
| Precauciones de seguridad importantes |
286 |
| Abastecimiento de combustible |
289 |
| Tapón de llenado de combustible |
289 |
| Cómo escoger el combustible correcto |
290 |
| Recomendaciones de octanaje |
291 |
| Calidad del combustible |
291 |
| Aire más limpio |
292 |
| Sin combustible |
292 |
| Filtro de combustible |
292 |
| PUNTOS ESENCIALES PARA UNA BUENA ECONOMÍA DE COMBUSTIBLE |
292 |
| Técnicas de medición |
292 |
| Llenado del tanque |
292 |
| Cálculo para ahorrar combustible |
293 |
| Estilo de manejo: buenos hábitos de manejo y ahorro de combustible |
294 |
| Hábitos |
294 |
| Mantenimiento |
295 |
| Condiciones |
295 |
| Calcomanía EPA para la ventana |
296 |
| SISTEMA DE CONTROL DE EMISIÓN DE GASES |
296 |
| Diagnóstico a bordo (OBD-II) |
297 |
| Disponibilidad para prueba de inspección y mantenimiento (I/M) |
298 |
| REVISIÓN Y LLENADO DEL LÍQUIDO DE LA DIRECCIÓN HIDRÁULICA |
299 |
| DEPÓSITO DE LÍQUIDO DE FRENOS Y DEL CLUTCH |
299 |
| LÍQUIDO DE LA TRANSMISIÓN |
300 |
| Revisión del líquido de la transmisión automática (si está instalada) |
300 |
| Nivel bajo de líquido |
301 |
| Nivel correcto de líquido |
301 |
| Nivel alto de líquido |
301 |
| Ajuste de los niveles de líquido de la transmisión automática |
301 |
| Revisión y llenado de líquido de la transmisión manual (si está instalada) |
302 |
| LÍQUIDO DEL CLUTCH (SI ESTÁ INSTALADO) |
303 |
| CUIDADO DEL FILTRO DE AIRE |
303 |
| Cambio del elemento del filtro de aire |
303 |
| NÚMEROS DE REFACCIONES MOTORCRAFT |
305 |
| CAPACIDADES DE LLENADO |
306 |
| ESPECIFICACIONES DE LUBRICANTES |
309 |
| DATOS DEL MOTOR |
312 |
| DIMENSIONES DEL VEHÍCULO |
312 |
| IDENTIFICACIÓN DEL VEHÍCULO |
314 |
| Etiqueta de certificación |
314 |
| Número de identificación del vehículo (VIN) |
315 |
| Número del motor |
315 |
| Designaciones de códigos de transmisión/transeje |
316 |
| Accesorios |
317 |
| ACCESORIOS LEGÍTIMOS DE FORD PARA SU VEHÍCULO |
317 |
| Estilo exterior |
317 |
| Estilo interior |
318 |
| Estilo de vida |
318 |
| Tranquilidad |
318 |
| Índice |
320 |
| 2005 ESCAPE - ENGLISH |
327 |
| Table of Contents |
327 |
| Introduction |
330 |
| CONGRATULATIONS |
330 |
| SAFETY AND ENVIRONMENT PROTECTION |
331 |
| Warning symbols in this guide |
331 |
| Warning symbols on your vehicle |
331 |
| Protecting the environment |
331 |
| BREAKING-IN YOUR VEHICLE |
331 |
| SPECIAL NOTICES |
332 |
| Emission warranty |
332 |
| Special instructions |
332 |
| Service Data Recording |
332 |
| Event Data Recording |
332 |
| Notice to owners of pickup trucks and utility type vehicles |
333 |
| Using your vehicle with a snowplow |
333 |
| Using your vehicle as an ambulance |
333 |
| MIDDLE EAST/NORTH AFRICA VEHICLE SPECIFIC INFORMATION |
333 |
| Instrument Cluster |
336 |
| WARNING LIGHTS AND CHIMES |
336 |
| GAUGES |
340 |
| Entertainment Systems |
343 |
| AM/FM STEREO / SINGLE CD RADIO (IF EQUIPPED) |
343 |
| PREMIUM AM/FM STEREO/CASSETTE/SINGLE CD (IF EQUIPPED) |
346 |
| MACH 300 SATELLITE READY SOUND SYSTEM RADIO (IF EQUIPPED) |
350 |
| AM/FM STEREO IN-DASH SIX CD MODULAR AUDIO (IF EQUIPPED) |
355 |
| SATELLITE COMPATIBLE AM/FM STEREO IN-DASH SINGLE CD/MP3 RADIO — LATE AVAILABILITY (IF EQUIPPED) |
358 |
| PREMIUM SATELLITE COMPATIBLE AM/FM STEREO/CASSETTE/SINGLE CD/MP3 — LATE AVAILABILITY (IF EQUIPPED) |
363 |
| ACCESSORY DELAY |
367 |
| RADIO FREQUENCIES |
367 |
| RADIO RECEPTION FACTORS |
368 |
| CASSETTE/PLAYER CARE |
368 |
| CD/CD PLAYER CARE |
368 |
| AUDIO SYSTEM WARRANTY AND SERVICE |
369 |
| Climate Controls |
370 |
| HEATER ONLY SYSTEM (IF EQUIPPED) |
370 |
| Operating tips |
370 |
| MANUAL HEATING AND AIR CONDITIONING SYSTEM (IF EQUIPPED) |
371 |
| Operating tips |
371 |
| REAR WINDOW DEFROSTER |
372 |
| Lights |
373 |
| HEADLAMP CONTROL |
373 |
| Autolamp control (if equipped) |
373 |
| Autolamp delay system (if equipped) |
374 |
| Foglamp control (if equipped) |
374 |
| Daytime running lamps (DRL) (if equipped) |
374 |
| Smart park lamps (if equipped) |
375 |
| High beams |
375 |
| Flash to pass |
375 |
| PANEL DIMMER CONTROL |
376 |
| AIMING THE HEADLAMPS |
376 |
| Vertical aim adjustment |
376 |
| TURN SIGNAL CONTROL |
377 |
| INTERIOR LAMPS |
377 |
| Dome lamps and map lamps |
377 |
| Cargo and dome lamp |
378 |
| Interior lighting battery saver |
378 |
| BULBS |
379 |
| Headlamp Condensation |
379 |
| Replacing exterior bulbs |
379 |
| Using the right bulbs |
379 |
| Replacing the interior bulbs |
380 |
| Replacing headlamp bulbs |
380 |
| Replacing brake/tail/turn/backup lamp bulbs |
381 |
| Replacing license plate lamp bulbs |
382 |
| Replacing high-mount brake lamp bulbs |
383 |
| Replacing front parking lamp/turn signal bulbs |
383 |
| Replacing foglamp bulbs |
383 |
| Driver Controls |
384 |
| MULTI-FUNCTION LEVER |
384 |
| Rear window wiper/washer controls |
385 |
| Changing the wiper blades |
385 |
| TILT STEERING WHEEL |
386 |
| OVERHEAD CONSOLE (IF EQUIPPED) |
386 |
| Storage compartment (if equipped) |
386 |
| Installing a garage door opener (if equipped) |
387 |
| Illuminated visor mirror (if equipped) |
388 |
| AUXILIARY POWER POINT (12VDC) |
388 |
| POWER WINDOWS |
389 |
| One touch down |
389 |
| Window lock (if equipped) |
390 |
| Accessory delay |
390 |
| POWER SIDE VIEW MIRRORS |
390 |
| Fold-away mirrors |
390 |
| Heated outside mirrors (if equipped) |
391 |
| Automatic dimming rear view mirror (if equipped) |
391 |
| SPEED CONTROL (IF EQUIPPED) |
391 |
| Setting speed control |
392 |
| Resuming a set speed |
392 |
| Increasing speed while using speed control |
393 |
| Reducing speed while using speed control |
393 |
| Turning off speed control |
393 |
| CENTER CONSOLE |
394 |
| Cell phone use |
394 |
| MOON ROOF (IF EQUIPPED) |
395 |
| MESSAGE CENTER (IF EQUIPPED) |
395 |
| Selectable features |
396 |
| Set |
396 |
| Info menu |
396 |
| Average fuel economy (AFE) |
396 |
| Distance to empty (DTE) |
397 |
| Instantaneous fuel economy |
397 |
| Units (English/Metric) |
397 |
| System check |
398 |
| Language |
398 |
| Display Off |
399 |
| System warnings |
399 |
| LIFTGATE |
403 |
| CARGO SHADE (IF EQUIPPED) |
403 |
| Cargo management system (if equipped) |
404 |
| LUGGAGE RACK |
404 |
| ************ |
404 |
| To adjust the cross-bar (if equipped) position: |
405 |
| To remove the cross-bar assembly (if equipped) from the roof rack side rails: |
405 |
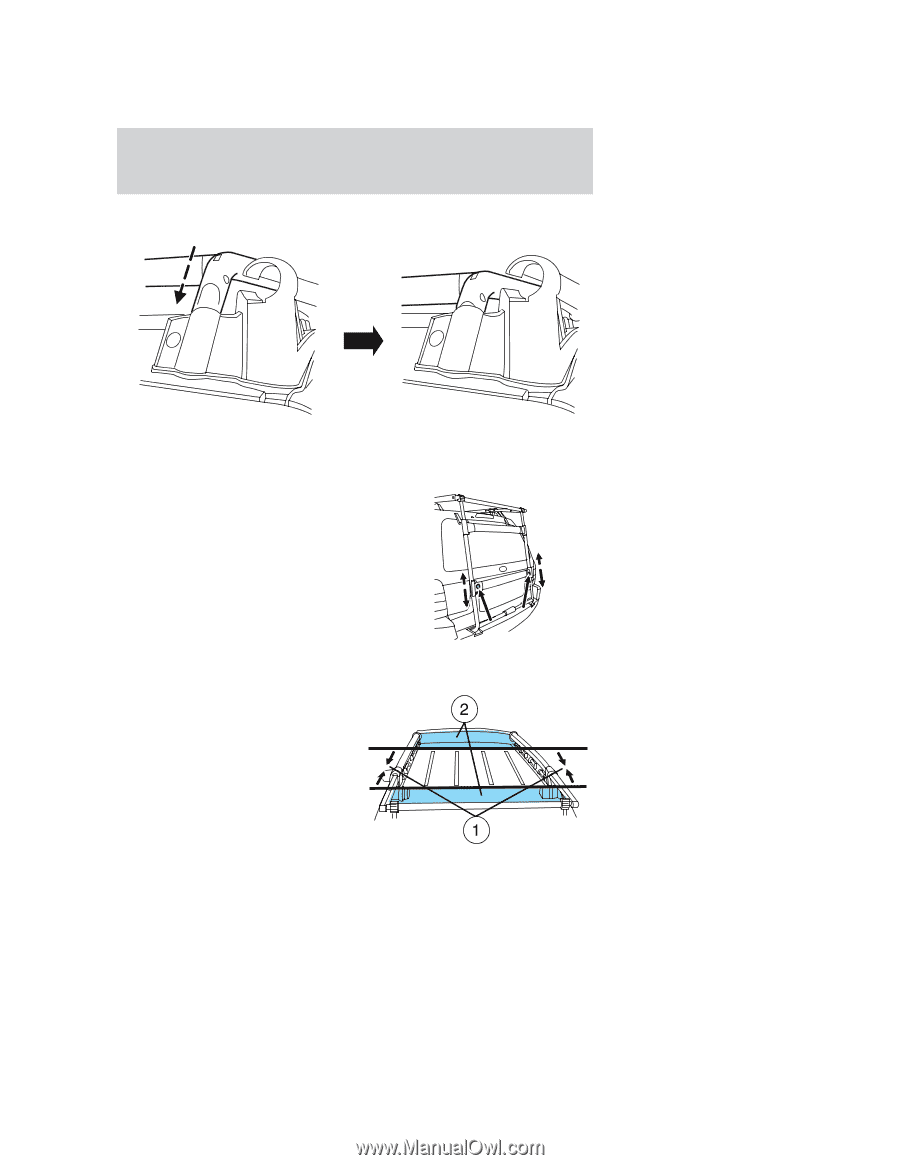
| To reinstall the cross-bar assembly (if equipped) to the roof rack side rails: |
406 |
| NO BOUNDARIES RACK SYSTEM (IF EQUIPPED) |
407 |
| To extend the inner rack: |
407 |
| To stow the inner rack: |
410 |
| To adjust the cross-bar assembly on the inner rack: |
411 |
| Loading cargo: |
411 |
| Locks and Security |
413 |
| KEYS |
413 |
| POWER DOOR LOCKS |
413 |
| Power door lock/unlock inhibit feature |
413 |
| Door key unlocking/locking |
414 |
| Two step door unlocking |
414 |
| One step door unlocking |
414 |
| Locking the doors |
414 |
| Smart unlocking feature |
414 |
| Childproof door locks |
415 |
| REMOTE ENTRY SYSTEM (IF EQUIPPED) |
415 |
| Two step door unlocking |
416 |
| One step door unlocking |
416 |
| Switching from two step to one step door unlocking |
416 |
| Locking the doors |
417 |
| Sounding a panic alarm |
417 |
| Replacing the battery |
417 |
| Replacing lost remote entry transmitters |
418 |
| How to reprogram your remote entry transmitters |
418 |
| Illuminated entry |
419 |
| Illuminated exit |
420 |
| SECURILOCK PASSIVE ANTI-THEFT SYSTEM |
420 |
| Theft indicator |
420 |
| Automatic arming |
421 |
| Automatic disarming |
421 |
| Replacement keys |
421 |
| Programming spare keys |
422 |
| PERIMETER ALARM SYSTEM (IF EQUIPPED) |
423 |
| Arming the system |
423 |
| Disarming the system |
424 |
| Triggering the anti-theft system |
424 |
| Seating and Safety Restraints |
425 |
| FRONT SEATS |
425 |
| Adjustable head restraints |
425 |
| Adjusting the front manual seat |
426 |
| Adjusting the front power seat (if equipped) |
426 |
| Heated seats (if equipped) |
427 |
| Rear seats |
427 |
| Head restraints |
427 |
| Folding down rear seats |
428 |
| Returning the rear seats to upright position |
430 |
| To remove the rear cushion |
432 |
| To install the rear cushion |
432 |
| SAFETY RESTRAINTS |
432 |
| Personal Safety System |
432 |
| How does the Personal Safety System work? |
433 |
| Driver and passenger dual-stage air bag supplemental restraints |
433 |
| Front crash severity sensor |
433 |
| Driver’s seat position sensor |
433 |
| Front passenger sensing system |
434 |
| Front safety belt usage sensors |
434 |
| Front safety belt pretensioners |
435 |
| Front safety belt energy management retractors |
435 |
| Determining if the Personal Safety System is operational |
435 |
| Safety restraints precautions |
436 |
| Energy Management Feature |
437 |
| Combination lap and shoulder belts |
437 |
| Vehicle sensitive mode |
437 |
| Automatic locking mode |
438 |
| How to use the automatic locking mode |
438 |
| How to disengage the automatic locking mode |
439 |
| Safety belt height adjustment |
439 |
| Safety belt pretensioner |
440 |
| Safety belt extension assembly |
440 |
| Safety belt warning light and indicator chime |
440 |
| Conditions of operation |
441 |
| BeltMinder |
441 |
| One time disable |
444 |
| Deactivating/activating the BeltMinder feature |
444 |
| Safety belt maintenance |
446 |
| AIRBAG SUPPLEMENTAL RESTRAINT SYSTEM (SRS) |
446 |
| Important SRS precautions |
447 |
| Children and airbags |
448 |
| How does the air bag supplemental restraint system work? |
449 |
| Front passenger sensing system |
450 |
| Determining if the system is operational |
453 |
| Safety Canopy system (if equipped) |
453 |
| How does the Safety Canopy system work? |
455 |
| Determining if the system is operational |
456 |
| Side air bag system (if equipped) |
457 |
| How does the side air bag system work? |
458 |
| Determining if the system is operational |
459 |
| Disposal of air bags and air bag equipped vehicles (including pretensioners) |
459 |
| SAFETY RESTRAINTS FOR CHILDREN |
460 |
| Important child restraint precautions |
460 |
| Children and safety belts |
460 |
| Child booster seats |
461 |
| Types of booster seats |
462 |
| SAFETY SEATS FOR CHILDREN |
463 |
| Child and infant or child safety seats |
463 |
| Installing child safety seats with combination lap and shoulder belts |
464 |
| Attaching child safety seats with tether straps |
467 |
| Attaching safety seats with LATCH (Lower Anchors and Tethers for Children) attachments for child seat anchors |
469 |
| Tires, Wheels and Loading |
471 |
| NOTICE TO UTILITY VEHICLE AND TRUCK OWNERS |
471 |
| VEHICLE CHARACTERISTICS |
471 |
| How your vehicle differs from other vehicles |
472 |
| INFORMATION ABOUT UNIFORM TIRE QUALITY GRADING |
473 |
| Treadwear |
473 |
| Traction AA A B C |
474 |
| Temperature A B C |
474 |
| TIRES |
474 |
| Glossary of tire terminology |
474 |
| INSPECTING AND INFLATING YOUR TIRES |
475 |
| Inspecting your tires |
476 |
| Inflating your tires |
476 |
| TIRE REPLACEMENT REQUIREMENTS |
478 |
| CHANGING A FLAT TIRE |
478 |
| T-Type/Mini-Spare Tire Information (if equipped) |
479 |
| Dissimilar spare tire/wheel information (if equipped) |
479 |
| Tire change procedure |
480 |
| Removing the jack and tools |
481 |
| Removing the spare tire or spare tire and tether (if equipped) |
483 |
| Changing the flat tire |
484 |
| Stowing the flat/spare tire |
487 |
| WHEEL LUG NUT TORQUE SPECIFICATIONS |
488 |
| INFORMATION CONTAINED ON THE TIRE SIDEWALL |
489 |
| Information on “P” type tires |
489 |
| Additional information contained on the tire sidewall for “LT” type tires |
492 |
| Information on “T” type tires |
493 |
| Location of the tire label |
493 |
| TIRE CARE |
494 |
| Tire wear |
494 |
| Safety practices |
495 |
| Highway hazards |
495 |
| Tire and wheel alignment |
495 |
| Tire rotation |
496 |
| USING SNOW TIRES AND TRACTION DEVICES |
497 |
| VEHICLE LOADING – WITH AND WITHOUT A TRAILER |
498 |
| Special loading instructions for owners of pickup trucks and utility-type vehicles |
505 |
| Calculating the load your vehicle can carry/tow |
505 |
| TRAILER TOWING |
505 |
| Preparing to tow |
508 |
| Hitches |
508 |
| Safety chains |
508 |
| Trailer brakes |
508 |
| Trailer lamps |
508 |
| Driving while you tow |
508 |
| Servicing after towing |
509 |
| Trailer towing tips |
509 |
| Launching or retrieving a boat |
509 |
| RECREATIONAL TOWING |
510 |
| Driving |
511 |
| STARTING |
511 |
| Positions of the ignition |
511 |
| Preparing to start your vehicle |
511 |
| Important safety precautions |
512 |
| Starting the engine |
514 |
| Using the engine block heater (if equipped) |
514 |
| Guarding against exhaust fumes |
514 |
| Important ventilating information |
515 |
| BRAKES |
515 |
| Four-wheel anti-lock brake system (ABS) |
515 |
| Using ABS |
515 |
| ABS warning lamp |
516 |
| Parking brake |
516 |
| STEERING |
517 |
| PREPARING TO DRIVE YOUR VEHICLE |
517 |
| AUTOMATIC TRANSMISSION OPERATION (IF EQUIPPED) |
518 |
| Brake-shift interlock |
518 |
| Driving with an automatic overdrive transaxle |
520 |
| Understanding the gearshift positions of the 4–speed automatic transaxle |
521 |
| If your vehicle gets stuck in mud or snow |
523 |
| MANUAL TRANSAXLE OPERATION (IF EQUIPPED) |
524 |
| Using the clutch |
524 |
| Recommended shift speeds |
525 |
| Reverse |
525 |
| Parking your vehicle |
526 |
| FOUR WHEEL DRIVE (4WD) SYSTEM (IF EQUIPPED) |
527 |
| Driving off-road with truck and utility vehicles |
528 |
| How your vehicle differs from other vehicles |
528 |
| Basic operating principles |
528 |
| If your vehicle goes off the edge of the pavement |
528 |
| If your vehicle gets stuck |
529 |
| Emergency maneuvers |
530 |
| Sand |
530 |
| Mud and water |
531 |
| Driving on hilly or sloping terrain |
531 |
| Driving on snow and ice |
532 |
| Maintenance and Modifications |
533 |
| REVERSE SENSING SYSTEM (IF EQUIPPED) |
534 |
| DRIVING THROUGH WATER |
536 |
| Roadside Emergencies |
537 |
| GETTING ROADSIDE ASSISTANCE |
537 |
| Using roadside assistance |
537 |
| Roadside coverage beyond basic warranty |
538 |
| HAZARD FLASHER CONTROL |
538 |
| FUEL PUMP SHUT-OFF SWITCH |
538 |
| FUSES AND RELAYS |
539 |
| Fuses |
539 |
| Standard fuse amperage rating and color |
540 |
| Passenger compartment fuse panel |
541 |
| Power distribution box |
544 |
| JUMP STARTING YOUR VEHICLE |
546 |
| Preparing your vehicle |
547 |
| Connecting the jumper cables |
547 |
| Jump starting |
549 |
| Removing the jumper cables |
550 |
| WRECKER TOWING |
552 |
| Customer Assistance |
554 |
| GETTING THE SERVICES YOU NEED |
554 |
| At home |
554 |
| Away from home |
554 |
| Additional Assistance |
555 |
| IN CALIFORNIA (U.S. ONLY) |
556 |
| THE DISPUTE SETTLEMENT BOARD (U.S. ONLY) |
557 |
| What kinds of cases does the Board review? |
557 |
| Board membership |
558 |
| What the Board needs |
558 |
| Oral presentations |
559 |
| Making a decision |
559 |
| To request a DSB Brochure/Application |
559 |
| UTILIZING THE MEDIATION/ARBITRATION PROGRAM (CANADA ONLY) |
560 |
| FORD EXTENDED SERVICE PLAN |
560 |
| GETTING ASSISTANCE OUTSIDE THE U.S. AND CANADA |
561 |
| ORDERING ADDITIONAL OWNER’S LITERATURE |
562 |
| Obtaining a French owner’s guide |
562 |
| REPORTING SAFETY DEFECTS (U.S. ONLY) |
562 |
| Cleaning |
563 |
| WASHING THE EXTERIOR |
563 |
| WAXING |
563 |
| PAINT CHIPS |
563 |
| ALUMINUM WHEELS AND WHEEL COVERS |
564 |
| ENGINE |
564 |
| PLASTIC (NON-PAINTED) EXTERIOR PARTS |
565 |
| WINDOWS AND WIPER BLADES |
566 |
| INSTRUMENT PANEL AND CLUSTER LENS |
566 |
| INTERIOR TRIM |
566 |
| INTERIOR |
567 |
| LEATHER SEATS (IF EQUIPPED) |
567 |
| UNDERBODY |
567 |
| FORD AND LINCOLN MERCURY CAR CARE PRODUCTS |
568 |
| Maintenance and Specifications |
569 |
| SERVICE RECOMMENDATIONS |
569 |
| PRECAUTIONS WHEN SERVICING YOUR VEHICLE |
569 |
| Working with the engine off |
569 |
| Working with the engine on |
569 |
| OPENING THE HOOD |
570 |
| IDENTIFYING COMPONENTS IN THE ENGINE COMPARTMENT |
571 |
| WINDSHIELD WASHER FLUID |
573 |
| Checking and adding washer fluid for the liftgate |
573 |
| ENGINE OIL |
573 |
| Checking the engine oil |
573 |
| Adding engine oil |
576 |
| Engine oil and filter recommendations |
577 |
| Use SAE 5W-20 engine oil. |
577 |
| BATTERY |
578 |
| ENGINE COOLANT |
580 |
| Checking engine coolant |
580 |
| Adding engine coolant |
581 |
| Recycled engine coolant |
583 |
| Coolant refill capacity |
583 |
| Severe climates |
584 |
| What you should know about fail-safe cooling (2.3L I4 engine only) |
584 |
| How fail-safe cooling works |
585 |
| When fail-safe mode is activated |
585 |
| WHAT YOU SHOULD KNOW ABOUT AUTOMOTIVE FUELS |
586 |
| Important safety precautions |
586 |
| Refueling |
587 |
| Fuel Filler Cap |
588 |
| Choosing the right fuel |
589 |
| Octane recommendations |
589 |
| Fuel quality |
589 |
| Cleaner air |
590 |
| Running out of fuel |
590 |
| Fuel Filter |
590 |
| ESSENTIALS OF GOOD FUEL ECONOMY |
590 |
| Measuring techniques |
590 |
| Filling the tank |
591 |
| Calculating fuel economy |
591 |
| Driving style — good driving and fuel economy habits |
592 |
| Habits |
592 |
| Maintenance |
593 |
| Conditions |
593 |
| EPA window sticker |
593 |
| EMISSION CONTROL SYSTEM |
594 |
| On board diagnostics (OBD-II) |
595 |
| Readiness for Inspection/Maintenance (I/M) testing |
595 |
| CHECKING AND ADDING POWER STEERING FLUID |
596 |
| BRAKE/CLUTCH FLUID RESERVOIR |
597 |
| TRANSMISSION FLUID |
597 |
| Checking automatic transmission fluid (if equipped) |
597 |
| Low fluid level |
598 |
| Correct fluid level |
598 |
| High fluid level |
598 |
| Adjusting automatic transmission fluid levels |
598 |
| Checking and adding manual transmission fluid (if equipped) |
599 |
| CLUTCH FLUID (IF EQUIPPED) |
600 |
| AIR FILTER MAINTENANCE |
600 |
| Changing the air filter element |
600 |
| MOTORCRAFT PART NUMBERS |
602 |
| REFILL CAPACITIES |
603 |
| LUBRICANT SPECIFICATIONS |
605 |
| ENGINE DATA |
607 |
| VEHICLE DIMENSIONS |
608 |
| IDENTIFYING YOUR VEHICLE |
609 |
| Certification label |
609 |
| Vehicle identification number (VIN) |
610 |
| Engine number |
610 |
| Transmission/Transaxle code designations |
611 |
| Accessories |
612 |
| GENUINE FORD ACCESSORIES FOR YOUR VEHICLE |
612 |
| Exterior style |
612 |
| Interior style |
613 |
| Lifestyle |
613 |
| Peace of mind |
613 |
 1
1 406
406 407
407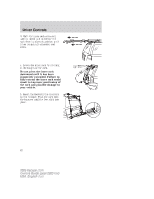 408
408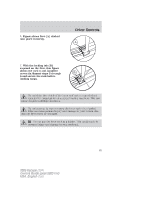 409
409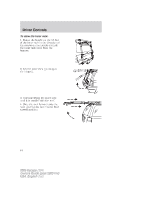 410
410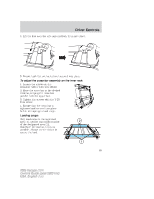 411
411 412
412 413
413 414
414 415
415 416
416