2014 Ford F250 Super Duty Super Cab Diesel Supplement Printing 1 - Page 21
2014 Ford F250 Super Duty Super Cab Manual

Page 21 highlights
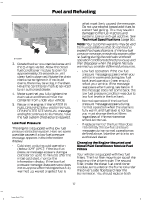
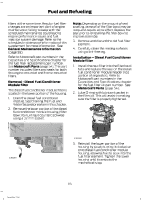
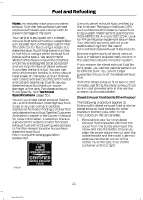
Fuel and Refueling filters at the same time. Regular fuel filter changes are an important part of engine maintenance; failing to keep with the scheduled maintenance could lead to engine performance issues and fuel injection system damage. Refer to the scheduled maintenance information of this supplement for more information. See General Maintenance Information (page 58). Refer to Motorcraft part numbers in the Capacities and Specifications chapter for the fuel filter replacement part number. See Motorcraft Parts (page 54). This part number includes filters and seals for both the engine-mounted and frame-mounted filters. Removal - Diesel Fuel Conditioner Module filter The diesel fuel conditioner module filter is located in the lower portion of the housing. 1. Drain the diesel fuel conditioner module. See Draining the Fuel and Water Separator earlier in this chapter. 2. Remove the lower portion of the diesel fuel conditioner module housing (filter bowl) by turning it counterclockwise using a 32 mm socket. Note: Depending on the amount of seal swelling, removal of the filter bowl may be noisy and require some effort. Replace the seal prior to reinstalling the filter bowl to improve assembly. 3. Remove and discard the old fuel filter element. 4. Carefully clean the mating surfaces using a lint-free rag. Installation - Diesel Fuel Conditioner Module filter Install the new filter into the filter bowl tabs and replace the seal on the diesel fuel conditioner module header (top portion of separator). Refer to Motorcraft part numbers in the Capacities and Specifications chapter for the fuel filter kit part number. See Motorcraft Parts (page 54). 2. Lube O-ring with lubricant packet in the filter kit. This will assist in making sure the filter is properly tightened. 1. E163362 E163361 3. Reinstall the lower portion of the housing by slowly turning it clockwise onto diesel fuel conditioner module housing, allowing fuel to soak into the fuel filter element. Tighten the lower housing until it contacts the mechanical stop. 18 Super Duty (TFA)
-
 1
1 -
2
-
3
-
4
-
5
-
6
-
7
-
8
-
9
-
10
-
11
-
12
-
13
-
14
-
15
-
 16
16 -
 17
17 -
 18
18 -
 19
19 -
 20
20 -
 21
21 -
 22
22 -
 23
23 -
 24
24 -
 25
25 -
 26
26 -
27
-
28
-
29
-
30
-
31
-
32
-
33
-
34
-
35
-
36
-
37
-
38
-
39
-
40
-
41
-
42
-
43
-
44
-
45
-
46
-
47
-
48
-
49
-
50
-
51
-
52
-
53
-
54
-
55
-
56
-
57
-
58
-
59
-
60
-
61
-
62
-
63
-
64
-
65
-
66
-
67
-
68
-
69
-
70
-
71
-
72
-
73
-
74
-
75
-
76
-
77
-
78
-
79
-
80
-
81
-
82
 |
 |
