2014 Ford F250 Super Duty Super Cab Diesel Supplement Printing 1 - Page 42
2014 Ford F250 Super Duty Super Cab Manual

Page 42 highlights
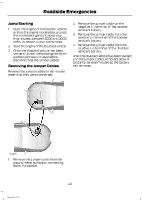
Roadside Emergencies Note: Use only a 12-volt supply to start your vehicle. Note: Do not disconnect the battery of the disabled vehicle as this could damage the vehicle's electrical system. Park the booster vehicle close to the hood of the disabled vehicle, making sure the two vehicles do not touch. Turn all accessories off. 1 Connecting the Jumper Cables WARNING Do not attach the cables to fuel lines, engine rocker covers, the intake manifold or electrical components as grounding points. Stay clear of moving parts. To avoid reverse polarity connections, make sure that you correctly identify the positive (+) and negative (-) terminals on both the disabled and booster vehicles before connecting the cables. Note: In the illustration, the bottom vehicle represents the booster vehicle. E142664 3 4 2 1. Connect the positive (+) jumper cable to the positive (+) terminal of the discharged battery. 2. Connect the other end of the positive (+) cable to the positive (+) terminal of the assisting battery. 3. Connect the negative (-) cable to the negative (-) terminal of the assisting battery. 4. Make the final connection of the negative (-) cable to an exposed metal part of the stalled vehicle's engine, or connect the negative (-) cable to a ground connection point if available. WARNING Do not connect the end of the second cable to the negative (-) terminal of the battery to be jumped. A spark may cause an explosion of the gases that surround the battery. 39 Super Duty (TFA)
-
 1
1 -
2
-
3
-
4
-
5
-
6
-
7
-
8
-
9
-
10
-
11
-
12
-
13
-
14
-
15
-
16
-
17
-
18
-
19
-
20
-
21
-
22
-
23
-
24
-
25
-
26
-
27
-
28
-
29
-
30
-
31
-
32
-
33
-
34
-
35
-
36
-
 37
37 -
 38
38 -
 39
39 -
 40
40 -
 41
41 -
 42
42 -
 43
43 -
 44
44 -
 45
45 -
 46
46 -
 47
47 -
48
-
49
-
50
-
51
-
52
-
53
-
54
-
55
-
56
-
57
-
58
-
59
-
60
-
61
-
62
-
63
-
64
-
65
-
66
-
67
-
68
-
69
-
70
-
71
-
72
-
73
-
74
-
75
-
76
-
77
-
78
-
79
-
80
-
81
-
82
 |
 |
