1995 Honda Accord Owner's Manual - Page 188
1995 Honda Accord Manual
Page 188 highlights
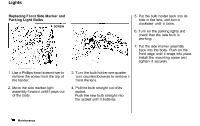
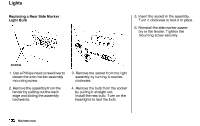
Lights Replacing a Rear Side Marker Light Bulb 5. Insert the socket in the assembly. Turn it clockwise to lock it in place. 6. Reinstall the side marker assembly in the fender. Tighten the mounting screw securely. SCREW 1. Use a Phillips-head screwdriver to loosen the side marker assembly mounting screw. 2. Remove the assembly from the fender by pulling out the back edge and sliding the assembly backwards. 3. Remove the socket from the light assembly by turning it counterclockwise. 4. Remove the bulb from the socket by pulling it straight out. Install the new bulb. Turn on the headlights to test the bulb. Maintenance
-
 1
1 -
2
-
3
-
4
-
5
-
6
-
7
-
8
-
9
-
10
-
11
-
12
-
13
-
14
-
15
-
16
-
17
-
18
-
19
-
20
-
21
-
22
-
23
-
24
-
25
-
26
-
27
-
28
-
29
-
30
-
31
-
32
-
33
-
34
-
35
-
36
-
37
-
38
-
39
-
40
-
41
-
42
-
43
-
44
-
45
-
46
-
47
-
48
-
49
-
50
-
51
-
52
-
53
-
54
-
55
-
56
-
57
-
58
-
59
-
60
-
61
-
62
-
63
-
64
-
65
-
66
-
67
-
68
-
69
-
70
-
71
-
72
-
73
-
74
-
75
-
76
-
77
-
78
-
79
-
80
-
81
-
82
-
83
-
84
-
85
-
86
-
87
-
88
-
89
-
90
-
91
-
92
-
93
-
94
-
95
-
96
-
97
-
98
-
99
-
100
-
101
-
102
-
103
-
104
-
105
-
106
-
107
-
108
-
109
-
110
-
111
-
112
-
113
-
114
-
115
-
116
-
117
-
118
-
119
-
120
-
121
-
122
-
123
-
124
-
125
-
126
-
127
-
128
-
129
-
130
-
131
-
132
-
133
-
134
-
135
-
136
-
137
-
138
-
139
-
140
-
141
-
142
-
143
-
144
-
145
-
146
-
147
-
148
-
149
-
150
-
151
-
152
-
153
-
154
-
155
-
156
-
157
-
158
-
159
-
160
-
161
-
162
-
163
-
164
-
165
-
166
-
167
-
168
-
169
-
170
-
171
-
172
-
173
-
174
-
175
-
176
-
177
-
178
-
179
-
180
-
181
-
182
-
 183
183 -
 184
184 -
 185
185 -
 186
186 -
 187
187 -
 188
188 -
 189
189 -
 190
190 -
 191
191 -
 192
192 -
 193
193 -
194
-
195
-
196
-
197
-
198
-
199
-
200
-
201
-
202
-
203
-
204
-
205
-
206
-
207
-
208
-
209
-
210
-
211
-
212
-
213
-
214
-
215
-
216
-
217
-
218
-
219
-
220
-
221
-
222
-
223
-
224
-
225
-
226
-
227
-
228
-
229
-
230
-
231
-
232
-
233
-
234
-
235
-
236
-
237
-
238
-
239
-
240
-
241
-
242
-
243
-
244
-
245
-
246
-
247
-
248
-
249
-
250
-
251
-
252
-
253
 |
 |
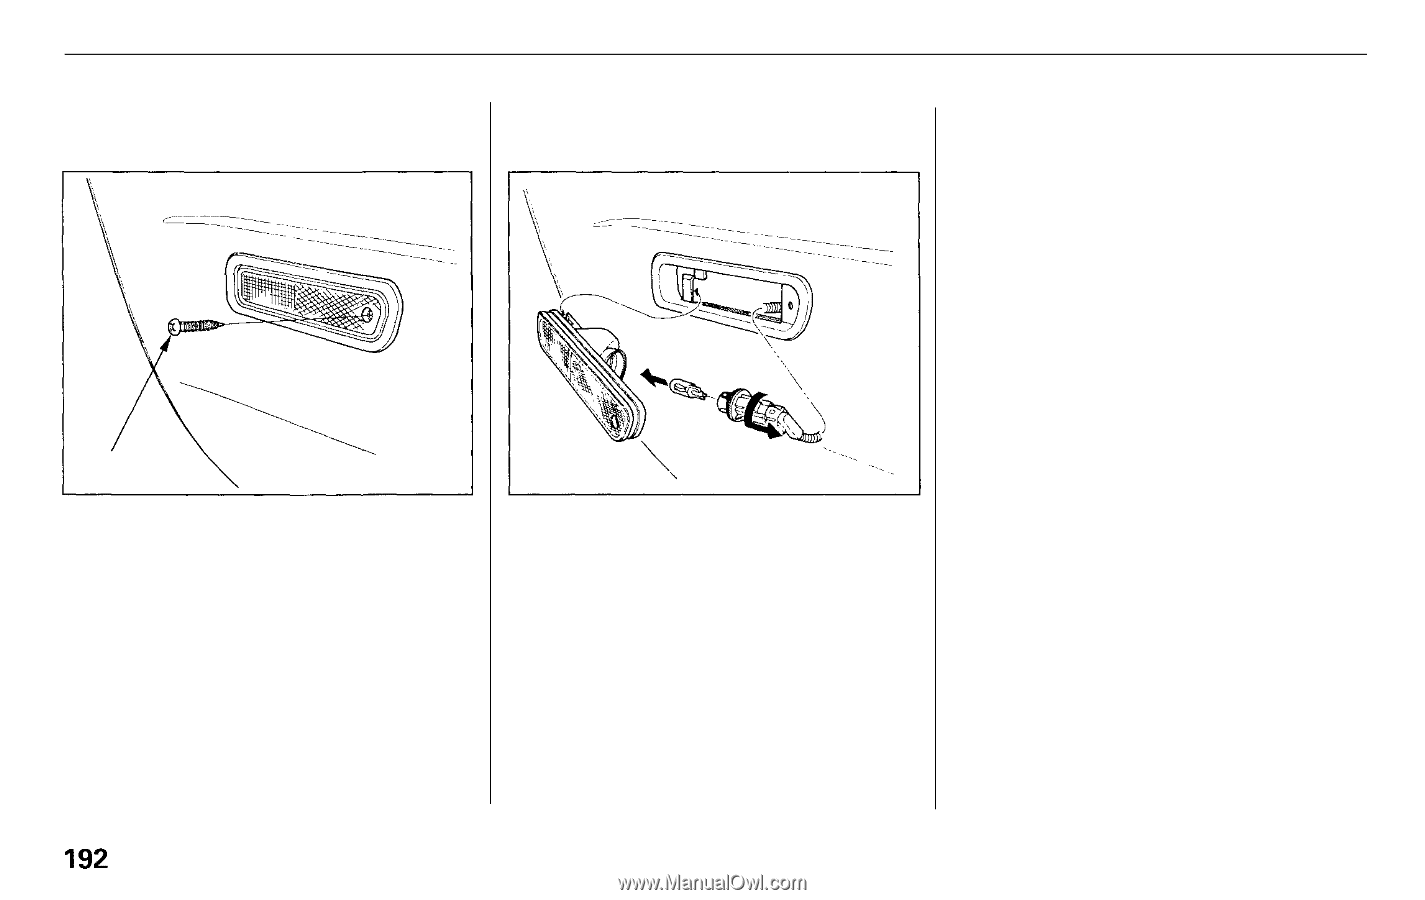
Lights
Replacing a Rear Side Marker
Light Bulb
1. Use a Phillips-head screwdriver to
loosen the side marker assembly
mounting screw.
2. Remove the assembly from the
fender by pulling out the back
edge and sliding the assembly
backwards.
3. Remove the socket from the light
assembly by turning it counter-
clockwise.
4. Remove the bulb from the socket
by pulling it straight out.
Install the new bulb. Turn on the
headlights to test the bulb.
5. Insert the socket in the assembly.
Turn it clockwise to lock it in place.
6. Reinstall the side marker assem-
bly in the fender. Tighten the
mounting screw securely.
Maintenance
SCREW