1995 Honda Accord Owner's Manual - Page 81
1995 Honda Accord Manual

Page 81 highlights
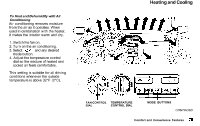
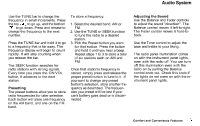
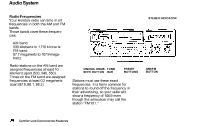
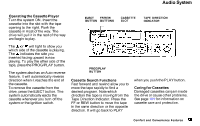
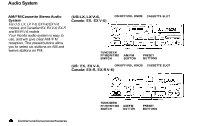
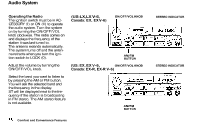
Audio System Use the TUNE bar to change the frequency in small increments. Press the top to go up, and the bottom to go down. Press and release to change the frequency to the next number. Press the TUNE bar and hold it to go to a frequency that is far away. The frequency display will begin to count rapidly. It will stop counting when you release the bar. The SEEK function searches for radio stations with strong signals. Every time you press the ON/VOL button, it advances to the next station. Presetting The preset buttons allow you to store radio frequencies for later selection. Each button will store one frequency on the AM band, and one on the FM band. To store a frequency: 1. Select the desired band, AM or FM. 2. Use the TUNE or SEEK function to tune the radio to a desired station. 3. Pick the Preset button you want for that station. Press the button and hold it until you hear a beep. Repeat steps 1 to 3 to store a total of six stations each on AM and FM. Once that station's frequency is stored, simply press and release the proper preset button to tune to it. If you want to change any preset button's selection, store another frequency as described. The frequencies you preset will be lost if your car's battery goes dead or is disconnected. Adjusting the Sound Use the Balance and Fader controls to adjust the sound "direction". The Balance control moves it left-to-right. The Fader control moves it front-toback. Use the Tone control to adjust the bass and treble to your liking. The radio panel illumination comes on with the instrument panel lights, even with the radio off. You can turn off this illumination even with the radio on by pulling the Balance control knob out. Check this knob if the lights do not come on with the instrument panel lights. Comfort and Convenience Features
-
 1
1 -
2
-
3
-
4
-
5
-
6
-
7
-
8
-
9
-
10
-
11
-
12
-
13
-
14
-
15
-
16
-
17
-
18
-
19
-
20
-
21
-
22
-
23
-
24
-
25
-
26
-
27
-
28
-
29
-
30
-
31
-
32
-
33
-
34
-
35
-
36
-
37
-
38
-
39
-
40
-
41
-
42
-
43
-
44
-
45
-
46
-
47
-
48
-
49
-
50
-
51
-
52
-
53
-
54
-
55
-
56
-
57
-
58
-
59
-
60
-
61
-
62
-
63
-
64
-
65
-
66
-
67
-
68
-
69
-
70
-
71
-
72
-
73
-
74
-
75
-
 76
76 -
 77
77 -
 78
78 -
 79
79 -
 80
80 -
 81
81 -
 82
82 -
 83
83 -
 84
84 -
 85
85 -
 86
86 -
87
-
88
-
89
-
90
-
91
-
92
-
93
-
94
-
95
-
96
-
97
-
98
-
99
-
100
-
101
-
102
-
103
-
104
-
105
-
106
-
107
-
108
-
109
-
110
-
111
-
112
-
113
-
114
-
115
-
116
-
117
-
118
-
119
-
120
-
121
-
122
-
123
-
124
-
125
-
126
-
127
-
128
-
129
-
130
-
131
-
132
-
133
-
134
-
135
-
136
-
137
-
138
-
139
-
140
-
141
-
142
-
143
-
144
-
145
-
146
-
147
-
148
-
149
-
150
-
151
-
152
-
153
-
154
-
155
-
156
-
157
-
158
-
159
-
160
-
161
-
162
-
163
-
164
-
165
-
166
-
167
-
168
-
169
-
170
-
171
-
172
-
173
-
174
-
175
-
176
-
177
-
178
-
179
-
180
-
181
-
182
-
183
-
184
-
185
-
186
-
187
-
188
-
189
-
190
-
191
-
192
-
193
-
194
-
195
-
196
-
197
-
198
-
199
-
200
-
201
-
202
-
203
-
204
-
205
-
206
-
207
-
208
-
209
-
210
-
211
-
212
-
213
-
214
-
215
-
216
-
217
-
218
-
219
-
220
-
221
-
222
-
223
-
224
-
225
-
226
-
227
-
228
-
229
-
230
-
231
-
232
-
233
-
234
-
235
-
236
-
237
-
238
-
239
-
240
-
241
-
242
-
243
-
244
-
245
-
246
-
247
-
248
-
249
-
250
-
251
-
252
-
253
 |
 |