2001 Pontiac Aztek Owner's Manual - Page 227
2001 Pontiac Aztek Manual

Page 227 highlights
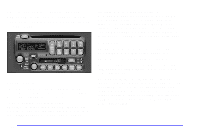
PUSHBUTTONS: The six numbered pushbuttons let you return to your favorite stations. You can set up to 18 stations (six AM, six FM1 and six FM2). Just: 1. Turn the radio on. 2. Press AM-FM to select the band. 3. Tune in the desired station. 4. Press EQ to select the equalization. 5. Press and hold one of the six numbered buttons until you hear a beep. Whenever you press that numbered button, the station you set will return and the equalization that you selected will also be automatically selected for that button. 6. Repeat the steps for each pushbutton. PRESET SCAN: Press and hold one of the SEEK arrows for more than four seconds until PSCAN and the preset number appear on the display. You will hear a double beep. Use PRESET SCAN to listen to each of your preset stations for a few seconds. The radio will go to the first preset station stored on your pushbuttons, stop for a few seconds, then go on to the next preset station. Press one of the SEEK arrows again to stop scanning presets. PRESET SCAN will skip over presets where no station is being received at that time to prevent hearing static. Setting the Tone TONE: Press and release this button until the desired tone control (BASS, MID or TREB) is found. The SELECT LED indicator will light to show that the tone control can be adjusted. When using BASS or MID, turn the SELECT knob clockwise to increase bass. Turn it counterclockwise to decrease bass. When using TREB, turn the SELECT knob clockwise to increase treble. Turn it counterclockwise to decrease treble. If a station is weak or noisy, you may want to decrease the treble. To set all of the tone controls to the middle position, press and hold TONE until FLAT appears on the display. EQ: This feature allows you to choose preset bass, mid and treble equalization settings designed for different individual listening tastes. Press EQ to select the desired preset equalization setting. Each time you press EQ, another setting will appear on the display. You can preset up to six equalization settings. Just: 1. Turn the radio on. 2. Use the TONE button and the SELECT knob to select the desired equalization. 3. Press and hold EQ for two seconds. SELECT EQ # will appear on the display. The EQ icon will flash. 3-27
-
 1
1 -
2
-
3
-
4
-
5
-
6
-
7
-
8
-
9
-
10
-
11
-
12
-
13
-
14
-
15
-
16
-
17
-
18
-
19
-
20
-
21
-
22
-
23
-
24
-
25
-
26
-
27
-
28
-
29
-
30
-
31
-
32
-
33
-
34
-
35
-
36
-
37
-
38
-
39
-
40
-
41
-
42
-
43
-
44
-
45
-
46
-
47
-
48
-
49
-
50
-
51
-
52
-
53
-
54
-
55
-
56
-
57
-
58
-
59
-
60
-
61
-
62
-
63
-
64
-
65
-
66
-
67
-
68
-
69
-
70
-
71
-
72
-
73
-
74
-
75
-
76
-
77
-
78
-
79
-
80
-
81
-
82
-
83
-
84
-
85
-
86
-
87
-
88
-
89
-
90
-
91
-
92
-
93
-
94
-
95
-
96
-
97
-
98
-
99
-
100
-
101
-
102
-
103
-
104
-
105
-
106
-
107
-
108
-
109
-
110
-
111
-
112
-
113
-
114
-
115
-
116
-
117
-
118
-
119
-
120
-
121
-
122
-
123
-
124
-
125
-
126
-
127
-
128
-
129
-
130
-
131
-
132
-
133
-
134
-
135
-
136
-
137
-
138
-
139
-
140
-
141
-
142
-
143
-
144
-
145
-
146
-
147
-
148
-
149
-
150
-
151
-
152
-
153
-
154
-
155
-
156
-
157
-
158
-
159
-
160
-
161
-
162
-
163
-
164
-
165
-
166
-
167
-
168
-
169
-
170
-
171
-
172
-
173
-
174
-
175
-
176
-
177
-
178
-
179
-
180
-
181
-
182
-
183
-
184
-
185
-
186
-
187
-
188
-
189
-
190
-
191
-
192
-
193
-
194
-
195
-
196
-
197
-
198
-
199
-
200
-
201
-
202
-
203
-
204
-
205
-
206
-
207
-
208
-
209
-
210
-
211
-
212
-
213
-
214
-
215
-
216
-
217
-
218
-
219
-
220
-
221
-
 222
222 -
 223
223 -
 224
224 -
 225
225 -
 226
226 -
 227
227 -
 228
228 -
 229
229 -
 230
230 -
 231
231 -
 232
232 -
233
-
234
-
235
-
236
-
237
-
238
-
239
-
240
-
241
-
242
-
243
-
244
-
245
-
246
-
247
-
248
-
249
-
250
-
251
-
252
-
253
-
254
-
255
-
256
-
257
-
258
-
259
-
260
-
261
-
262
-
263
-
264
-
265
-
266
-
267
-
268
-
269
-
270
-
271
-
272
-
273
-
274
-
275
-
276
-
277
-
278
-
279
-
280
-
281
-
282
-
283
-
284
-
285
-
286
-
287
-
288
-
289
-
290
-
291
-
292
-
293
-
294
-
295
-
296
-
297
-
298
-
299
-
300
-
301
-
302
-
303
-
304
-
305
-
306
-
307
-
308
-
309
-
310
-
311
-
312
-
313
-
314
-
315
-
316
-
317
-
318
-
319
-
320
-
321
-
322
-
323
-
324
-
325
-
326
-
327
-
328
-
329
-
330
-
331
-
332
-
333
-
334
-
335
-
336
-
337
-
338
-
339
-
340
-
341
-
342
-
343
-
344
-
345
-
346
-
347
-
348
-
349
-
350
-
351
-
352
-
353
-
354
-
355
-
356
-
357
-
358
-
359
-
360
-
361
-
362
-
363
-
364
-
365
-
366
-
367
-
368
-
369
-
370
-
371
-
372
-
373
-
374
-
375
-
376
-
377
-
378
-
379
-
380
-
381
-
382
-
383
-
384
-
385
-
386
-
387
-
388
-
389
-
390
-
391
-
392
-
393
-
394
-
395
-
396
-
397
-
398
-
399
-
400
-
401
-
402
-
403
-
404
-
405
-
406
-
407
-
408
-
409
-
410
-
411
-
412
-
413
-
414
-
415
-
416
-
417
-
418
-
419
-
420
-
421
-
422
-
423
-
424
-
425
-
426
-
427
-
428
-
429
-
430
-
431
-
432
-
433
 |
 |