| Section |
Page |
| 2003_forester_toc.pdf |
1 |
| FORESTER 2003 OWNERS MANUAL |
1 |
| Table of contents |
15 |
| Illustrated index |
16 |
| Interior |
18 |
| Instrument panel |
20 |
| Light control and wiper control levers/switches |
21 |
| Combination meter |
22 |
| Tire changing tools |
24 |
| Cargo area cover |
25 |
| 2003_forester_Sec_01 |
26 |
| Section 1: Seat, seatbelt and SRS airbags |
26 |
| Front seats |
27 |
| Fore and aft adjustment |
28 |
| Reclining the seatback |
29 |
| Seat height adjustment (driver’s seat) |
30 |
| Lumbar support |
30 |
| Head restraint adjustment |
31 |
| Active head restraint |
32 |
| Seat heater (if equipped) |
33 |
| Rear seats |
34 |
| Headrest adjustment |
35 |
| Folding down the rear seatback |
36 |
| Seatbelts |
37 |
| Seatbelt safetytips |
37 |
| EmergencyLock ing Retractor (ELR) |
39 |
| Automatic/EmergencyLockin g Retractor (A/ELR) |
39 |
| Seatbelt warning light and chime |
40 |
| Fastening the seatbelt |
40 |
| Seatbelt maintenance |
51 |
| Front seatbelt pretensioners |
52 |
| System monitors |
53 |
| Child restraint systems |
55 |
| Installing child restraint systems with seatbelt |
58 |
| Installation of child restraint systems byuse of lower and tether anchorages |
60 |
| Top tether anchorages |
63 |
| *SRS airbag (Supplemental Restraint System airbag) |
64 |
| SRS frontal airbag |
69 |
| SRS side airbag (if equipped) |
76 |
| SRS airbag system monitors |
85 |
| RETURN TO TABLE OF CONTENTS file://2003_forester_toc.pdf#page=15
2003_forester_Sec_02 |
90 |
| Section 2: Keys and Doors |
90 |
| Keys |
91 |
| Key Number |
91 |
| Door Locks |
92 |
| Locking and Unlocking from the Outside |
92 |
| Locking and Unlocking from the inside |
93 |
| Power door locking switches |
94 |
| Remote keyless entry system (if equipped) |
95 |
| Locking the doors |
96 |
| Unlocking the Doors |
96 |
| Illuminated entry |
97 |
| Vehicle finder function |
97 |
| Sounding a panic alarm |
97 |
| Selecting audible signal operation |
97 |
| Replacing the battery |
98 |
| Replacing lost transmitters |
99 |
| Security system |
103 |
| System operation |
103 |
| Arming the system |
103 |
| Disarming the system |
105 |
| Valet mode |
106 |
| Passive arming |
106 |
| Child safety locks |
109 |
| Windows |
110 |
| Power Windows |
110 |
| Rear Gate |
113 |
| Moonroof (if equipped) |
115 |
| To open the moonroof |
115 |
| To close the moonroof |
115 |
| Anti-entrapment function |
115 |
| RETURN TO THE TABLE OF CONTENTS file://2003_forester_toc.pdf#page=15
2003_forester_Sec_03 |
118 |
| Section 3: Instruments and Controls |
118 |
| Ignition switch |
119 |
| Lock |
119 |
| ACC |
120 |
| ON |
120 |
| START |
120 |
| Keyreminder chime |
120 |
| Keyin terlock release (AT vehicles only) |
121 |
| Hazard warning flasher |
122 |
| Meters and gauges |
122 |
| Speedometer |
122 |
| Odometer/Trip meter |
122 |
| Tachometer |
123 |
| Fuel gauge |
124 |
| Temperature gauge |
125 |
| Ambient temperature gauge |
126 |
| Warning and indicator lights |
126 |
| Seatbelt warning light and chime |
126 |
| SRS airbag system warning light |
127 |
| The seatbelt warning light remains on for about six seconds and turns off automatically after six seconds. CHECK ENGINE warning light/ Malfunction indicator lamp |
127 |
| Charge warning light |
128 |
| Oil pressure warning light |
128 |
| AT OIL TEMPerature warning light (for AT vehicles) |
129 |
| ABS warning light |
129 |
| Brake system warning light |
130 |
| Door open warning lights |
131 |
| Low fuel warning light |
131 |
| Front-wheel drive warning light (for AT vehicles) |
132 |
| Shift position indicator (AT vehicles) |
132 |
| Turn signal indicator lights |
132 |
| High beam indicator light |
132 |
| Cruise control indicator light |
132 |
| Clock |
133 |
| Light control switch |
134 |
| Headlights |
134 |
| High/low beam change (dimmer) |
135 |
| Headlight flasher |
135 |
| Daytime running light system |
136 |
| Turn signal lever |
136 |
| Illumination brightness control |
137 |
| Parking light switch |
138 |
| Fog light switch (if equipped) |
138 |
| Wiper and washer |
139 |
| Windshield wiper and washer switches |
140 |
| Rear window wiper and washer switch |
142 |
| Windshield wiper deicer (if equipped) |
143 |
| Rear window defogger switch |
144 |
| Mirrors |
146 |
| Inside mirror |
146 |
| Outside mirrors |
148 |
| Tilt steering wheel |
150 |
| Horn |
151 |
| RETURN TO THE TABLE OF CONTENTS file://2003_forester_toc.pdf#page=15
2003_forester_Sec_04 |
152 |
| Section 4: Climate Control |
152 |
| Climate control Ventilator |
153 |
| Air flow selection |
153 |
| Center and side ventilators |
154 |
| Manual climate control system |
155 |
| Control panel |
155 |
| Heater operation |
157 |
| Air conditioner operation (if equipped) |
160 |
| Automatic climate control system (if equipped) |
161 |
| Temperature sensors |
166 |
| Operating tips for heater and air conditioner |
167 |
| Cleaning ventilation grille |
167 |
| Efficient cooling after parking in direct sunlight |
168 |
| Lubrication oil circulation in the refrigerant circuit |
168 |
| Checking air conditioning system before summer season |
168 |
| Cooling and dehumidifying in high humidityand low temperature weatiher conditions |
168 |
| Air conditioner compressor shut-off when engine is heavily loaded |
168 |
| Refrigerant for your climate control system |
168 |
| Air filtration system (if equipped) |
169 |
| Replacing an air filter |
169 |
| RETURN TO THE TABLE OF CONTENTS file://2003_forester_toc.pdf#page=15
2003_forester_Sec_05 |
174 |
| Sectioin 5: Audio |
174 |
| Antenna system |
175 |
| FM reception |
175 |
| Installation of accessories |
176 |
| Audio set |
176 |
| Type A audio set |
176 |
| Type B audio set |
177 |
| In-dash 6 CD auto changer (Optional audio unit – if equipped) |
177 |
| Type A audio set (if equipped) |
178 |
| Radio operation |
178 |
| Compact disc player operation |
183 |
| CD changer control (If optional in-dash CD changer is connected) |
186 |
| Type B audio set (if equipped) |
189 |
| Radio operation |
189 |
| Cassette player operation |
195 |
| Built in CD changer operation |
199 |
| In-dash 6 CD auto changer (if equipped) |
204 |
| Loading and unloading compact discs |
204 |
| Precautions to observe when handling a compact disc (CD) |
207 |
| RETURN TO THE TABLE OF CONTENTS file://2003_forester_toc.pdf#page=15
2003_forester_Sec_06 |
210 |
| Section 6: Interior Equipment |
210 |
| Interior lights |
211 |
| Dome light |
211 |
| Cargo area light |
211 |
| Map lights |
212 |
| Sun visors |
212 |
| Vanity mirror |
213 |
| Storage compartments |
213 |
| Glove box |
214 |
| Center console |
214 |
| Overhead console |
215 |
| Dashboard storage compartment |
215 |
| Convenience net |
216 |
| Coin tray |
216 |
| Cup holders |
217 |
| Front passenger’s cup holder |
217 |
| Rear passenger’s cup holder |
217 |
| Accessory power outlets |
218 |
| Cigarette lighter socket |
220 |
| Use with a cigarette lighter |
221 |
| Using as an accessorypower outlet |
222 |
| Ashtray |
223 |
| Front ashtray |
223 |
| Rear ashtray(i f equipped) |
223 |
| Floor mat |
224 |
| Coat hook |
225 |
| Cargo area cover (if equipped) |
225 |
| Using the cover |
225 |
| To remove the cover |
226 |
| To install the cover housing |
226 |
| Shopping bag hook |
227 |
| Cargo tie-down hooks |
227 |
| Under-floor storage compartment |
228 |
| RETURN TO THE TABLE OF CONTENTS file://2003_forester_toc.pdf#page=15
2003_forester_Sec_07 |
232 |
| Section 7: Starting and Operating |
232 |
| Starting and operating Fuel |
233 |
| Fuel requirements |
233 |
| Fuel filler lid and cap |
235 |
| State emission testing (U.S. only) |
237 |
| Preparing to drive |
239 |
| Starting the engine |
240 |
| Manual transmission vehicle |
240 |
| Automatic transmission vehicle |
240 |
| Starting the engine during cold weather below –4°F (–20° C) |
241 |
| Starting a flooded engine |
241 |
| Stopping the engine |
242 |
| Manual transmission |
242 |
| Shifting speeds |
243 |
| Driving tips |
244 |
| Automatic transmission |
245 |
| Selector lever for automatic transmission |
246 |
| Shift lock release |
249 |
| Rear viscous limited slip differential (LSD) (if equipped) |
251 |
| Power steering |
251 |
| Braking |
252 |
| Braking tips |
252 |
| Brake system |
252 |
| Disc brake pad wear warning indicators |
253 |
| ABS (Anti-lock Brake System) |
253 |
| ABS system self-check |
254 |
| ABS warning light |
254 |
| Electronic Brake Force Distribution (EBD) system (if equipped) |
256 |
| Steps to take if EBD system fails |
256 |
| Parking your vehicle |
258 |
| Parking brake |
258 |
| Parking tips |
258 |
| Hill holder (for manual transmission (if equipped) |
260 |
| Cruise control (if equipped) |
262 |
| To set cruise control |
262 |
| To temporarilyca ncel the cruise control |
263 |
| To turn off the cruise control |
263 |
| To change the cruising speed |
263 |
| Self-leveling rear suspension (if equipped) |
265 |
| RETURN TO THE TABLE OF CONTENTS file://2003_forester_toc.pdf#page=15
2003_forester_Sec_08 |
268 |
| Section 8: Driving Tips |
268 |
| New vehicle break-in driving – the first 1,000 miles (1,600 km) |
269 |
| Fuel economy hints |
269 |
| Engine exhaust gas (Carbon monoxide) |
270 |
| Catalytic converter |
271 |
| Periodic inspections |
272 |
| Driving in foreign countries |
272 |
| Driving tips for AWD vehicles |
273 |
| Off road driving |
274 |
| Winter driving |
276 |
| Operation during cold weather |
276 |
| Driving on snowy and icy roads |
278 |
| Corrosion protection |
279 |
| Snow tires |
279 |
| Tire chains |
280 |
| Rocking the vehicle |
280 |
| Loading your vehicle |
281 |
| Vehicle capacity weight |
282 |
| GVWR and GAWR (Gross Vehicle Weight Rating and Gross Axle Weight Rating) |
283 |
| Roof rail and crossbar (if equipped) |
284 |
| Trailer hitch (if equipped) |
289 |
| Connecting a trailer |
289 |
| When you do not tow a trailer |
291 |
| Trailer towing |
292 |
| Warranties and maintenance |
292 |
| Maximum load limits |
292 |
| Trailer hitches |
297 |
| Connecting a trailer |
298 |
| Trailer towing tips |
299 |
| RETURN TO THE TABLE OF CONTENTS file://2003_forester_toc.pdf#page=15
2003_forester_Sec_09 |
304 |
| Section 9: In case of emergency |
304 |
| If you park your vehicle in case of an emergency |
305 |
| Flat tires |
306 |
| Changing a flat tire |
306 |
| Jump starting |
312 |
| How to jump start |
313 |
| Engine overheating |
315 |
| If steam is coming from the engine compartment |
315 |
| If no steam is coming from the engine compartment |
315 |
| Towing |
316 |
| Towing and tie-down hooks |
316 |
| Using a flat-bed truck |
318 |
| Towing with all wheels on the ground |
318 |
| Rear gate—if the rear gate cannot be unlocked |
320 |
| Moonroof – if the moonroof cannot be closed |
321 |
| Maintenance tools |
322 |
| Jack and jack handle |
322 |
| RETURN TO THE TABLE OF CONTENTS file://2003_forester_toc.pdf#page=15
2003_forester_Sec_10 |
324 |
| Section 10: Appearance care |
324 |
| Exterior care |
325 |
| Washing |
325 |
| Waxing and polishing |
326 |
| Cleaning aluminum wheels |
326 |
| Corrosion protection |
327 |
| Most common causes of corrosion |
327 |
| To help prevent corrosion |
327 |
| Cleaning the interior |
328 |
| Seat fabric |
328 |
| Leather seat materials |
328 |
| Synthetic leather upholstery |
329 |
| RETURN TO THE TABLE OF CONTENTS file://2003_forester_toc.pdf#page=15
2003_forester_Sec_11 |
330 |
| Section 11: Maintenance and service |
330 |
| Maintenance schedule |
332 |
| Maintenance precautions |
332 |
| Before checking or servicing in the engine campartment |
333 |
| When you do checking or servicing in the engine compartment while the engine is running |
334 |
| Engine hood |
334 |
| Engine compartment overview |
337 |
| Engine oil |
338 |
| Checking the oil level |
338 |
| Changing the oil and oil filter |
339 |
| Recommended grade and viscosity |
341 |
| Recommended grade and viscosity under severe drivinb conditions |
343 |
| Synthetic oil |
343 |
| Cooling system |
343 |
| Cooling fan, hose and connections |
344 |
| Engine coolant |
344 |
| Air cleaner element |
348 |
| Replacing the air cleaner element |
348 |
| Spark plugs |
349 |
| Recommended spark plugs |
350 |
| Drive belts |
350 |
| Manual transmission oil |
351 |
| Checking the oil level |
351 |
| Recommended grade and viscosity |
352 |
| Automatic transmission fluid |
353 |
| Checking the fluid level |
353 |
| Recommended fluid |
354 |
| Front differential gear oil (AT vehicles) |
355 |
| Checking the oil level |
355 |
| Recommended grade and viscosity |
355 |
| Rear differential gear oil |
356 |
| Checking the gear oil level |
356 |
| Recommended grade and viscosity |
357 |
| Power steering fluid |
358 |
| Checking the fluid level |
358 |
| Recommended fluid |
359 |
| Brake fluid |
359 |
| Checking the fluid level |
359 |
| Recommended brake fluid |
360 |
| Clutch fluid (MT vehicles) |
360 |
| Checking the fluid level |
360 |
| Recommended clutch fluid |
361 |
| Brake booster |
361 |
| Brake pedal |
362 |
| Checking the brake pedal free play |
362 |
| Checking the brake pedal reserve distance |
362 |
| Clutch pedal (MT vehicles) |
363 |
| Checking the clutch function |
363 |
| Checking the clutch pedal free play |
363 |
| Hill holder (MT vehicles — if equipped |
364 |
| Replacement of brake pad and lining |
364 |
| Breaking-in of new brake pads and linings |
365 |
| Parking brake stroke |
366 |
| Tires and wheels |
366 |
| Types of tires |
366 |
| Tire inspection |
367 |
| Tire pressures and wear |
367 |
| Wheel balance |
370 |
| Wear indicators |
370 |
| Tire rotation |
371 |
| Tire replacement |
372 |
| Wheel replacement |
372 |
| Aluminum wheels (If equipped) |
373 |
| Windshield washer fluid |
374 |
| Replacement of windshield wiper blades |
375 |
| Battery |
378 |
| Fuses |
379 |
| Main fuse |
382 |
| Installation of accessories |
382 |
| Replacing bulbs |
383 |
| Headlight |
384 |
| Front turn signal, side marker light and parking lights |
386 |
| Front fog light |
390 |
| Rear combination lights |
390 |
| License plate light |
391 |
| Dome light, map light and cargo area light |
392 |
| High mount stop light |
393 |
| RETURN TO THE TABLE OF CONTENTS file://2003_forester_toc.pdf#page=15
2003_forester_Sec_12 |
394 |
| Section 12: Specifications |
394 |
| Specifications |
395 |
| Dimensions |
395 |
| Engine |
396 |
| Electrical system |
396 |
| Capacities |
397 |
| Tires |
397 |
| Wheel alignment |
398 |
| Fuses and circuits |
399 |
| Fuse panel located behind the coin tray |
399 |
| Fuse panel located in the engine compartment |
401 |
| Bulb chart |
402 |
| Vehicle identification |
403 |
| RETURN TO THE TABLE OF CONTENTS file://2003_forester_toc.pdf#page=15
2003_forester_Sec_13 |
404 |
| Section 13: Consumer information and Reportingsafety defects |
404 |
| Uniform tire qualitygrading standards |
405 |
| Treadwear |
405 |
| Traction AA, A, B, C |
405 |
| Temperature A, B, C |
406 |
| Reporting safetydefects (USA) |
407 |
| RETURN TO THE TABLE OF CONTENTS file://2003_forester_toc.pdf#page=15
2003_forester_Sec_14 |
408 |
| Forester 2003 Index |
408 |
| A-C |
409 |
| C-E |
410 |
| F-I |
411 |
| J-O |
412 |
| P-S |
413 |
| S-W |
414 |
| W |
415 |
| US Compass Calibration Zones |
416 |
| Gas Station Reference |
417 |
 1
1 2
2 3
3 4
4 5
5 6
6 7
7 8
8 9
9 10
10 11
11 12
12 13
13 14
14 15
15 16
16 17
17 18
18 19
19 20
20 21
21 22
22 23
23 24
24 25
25 26
26 27
27 28
28 29
29 30
30 31
31 32
32 33
33 34
34 35
35 36
36 37
37 38
38 39
39 40
40 41
41 42
42 43
43 44
44 45
45 46
46 47
47 48
48 49
49 50
50 51
51 52
52 53
53 54
54 55
55 56
56 57
57 58
58 59
59 60
60 61
61 62
62 63
63 64
64 65
65 66
66 67
67 68
68 69
69 70
70 71
71 72
72 73
73 74
74 75
75 76
76 77
77 78
78 79
79 80
80 81
81 82
82 83
83 84
84 85
85 86
86 87
87 88
88 89
89 90
90 91
91 92
92 93
93 94
94 95
95 96
96 97
97 98
98 99
99 100
100 101
101 102
102 103
103 104
104 105
105 106
106 107
107 108
108 109
109 110
110 111
111 112
112 113
113 114
114 115
115 116
116 117
117 118
118 119
119 120
120 121
121 122
122 123
123 124
124 125
125 126
126 127
127 128
128 129
129 130
130 131
131 132
132 133
133 134
134 135
135 136
136 137
137 138
138 139
139 140
140 141
141 142
142 143
143 144
144 145
145 146
146 147
147 148
148 149
149 150
150 151
151 152
152 153
153 154
154 155
155 156
156 157
157 158
158 159
159 160
160 161
161 162
162 163
163 164
164 165
165 166
166 167
167 168
168 169
169 170
170 171
171 172
172 173
173 174
174 175
175 176
176 177
177 178
178 179
179 180
180 181
181 182
182 183
183 184
184 185
185 186
186 187
187 188
188 189
189 190
190 191
191 192
192 193
193 194
194 195
195 196
196 197
197 198
198 199
199 200
200 201
201 202
202 203
203 204
204 205
205 206
206 207
207 208
208 209
209 210
210 211
211 212
212 213
213 214
214 215
215 216
216 217
217 218
218 219
219 220
220 221
221 222
222 223
223 224
224 225
225 226
226 227
227 228
228 229
229 230
230 231
231 232
232 233
233 234
234 235
235 236
236 237
237 238
238 239
239 240
240 241
241 242
242 243
243 244
244 245
245 246
246 247
247 248
248 249
249 250
250 251
251 252
252 253
253 254
254 255
255 256
256 257
257 258
258 259
259 260
260 261
261 262
262 263
263 264
264 265
265 266
266 267
267 268
268 269
269 270
270 271
271 272
272 273
273 274
274 275
275 276
276 277
277 278
278 279
279 280
280 281
281 282
282 283
283 284
284 285
285 286
286 287
287 288
288 289
289 290
290 291
291 292
292 293
293 294
294 295
295 296
296 297
297 298
298 299
299 300
300 301
301 302
302 303
303 304
304 305
305 306
306 307
307 308
308 309
309 310
310 311
311 312
312 313
313 314
314 315
315 316
316 317
317 318
318 319
319 320
320 321
321 322
322 323
323 324
324 325
325 326
326 327
327 328
328 329
329 330
330 331
331 332
332 333
333 334
334 335
335 336
336 337
337 338
338 339
339 340
340 341
341 342
342 343
343 344
344 345
345 346
346 347
347 348
348 349
349 350
350 351
351 352
352 353
353 354
354 355
355 356
356 357
357 358
358 359
359 360
360 361
361 362
362 363
363 364
364 365
365 366
366 367
367 368
368 369
369 370
370 371
371 372
372 373
373 374
374 375
375 376
376 377
377 378
378 379
379 380
380 381
381 382
382 383
383 384
384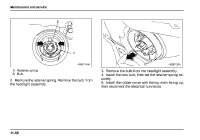 385
385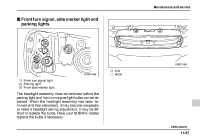 386
386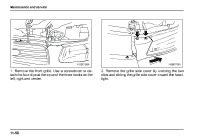 387
387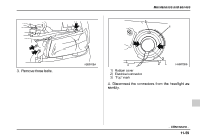 388
388 389
389 390
390 391
391 392
392 393
393 394
394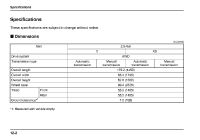 395
395 396
396 397
397 398
398 399
399 400
400 401
401 402
402 403
403 404
404 405
405 406
406 407
407 408
408 409
409 410
410 411
411 412
412 413
413 414
414 415
415 416
416 417
417


