ASRock 939S56-M RAID Installation Guide - Page 10
the data any more, you should select <N> to save
 |
View all ASRock 939S56-M manuals
Add to My Manuals
Save this manual to your list of manuals |
Page 10 highlights
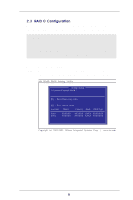
STEP 9: Press to escape the current setup menu. Then you will see the following message: "Split the SOURCE (Disk 1) data to RAID disks? N" If you press and , it will Create Stripe only. If you press and , it will split the data on source disk to RAID disks. SiS RAID BIOS Setting Utility RAID Setup * Current Created Raid * RAID 0 Split the SOURCE (Disk 1) data to RAID disks ? N [Q] : Exit current menu Location Disk 1 Disk 2 Model XXXXXX XXXXXX Capacity Mode RAID Type XXXXXX XXXX XXXXXXX XXXXXX XXXX XXXXXXX Copyright (c) 2003-2005. Silicon Integrated Systems Corp | www.sis.com NOTE If both SATA disks are empty, or you don't need the data any more, you should select to save your time. If you want to keep the data of the source disk, you should select . This split action may take several hours depending on the size of your HDD. 10
-
 1
1 -
2
-
3
-
4
-
 5
5 -
 6
6 -
 7
7 -
 8
8 -
 9
9 -
 10
10 -
 11
11 -
 12
12 -
 13
13 -
 14
14 -
 15
15 -
16
-
17
-
18
-
19
-
20
-
21
-
22
-
23
-
24
-
25
 |
 |
