ASRock 939S56-M RAID Installation Guide - Page 2
Guide to SATA Hard Disks Installation
 |
View all ASRock 939S56-M manuals
Add to My Manuals
Save this manual to your list of manuals |
Page 2 highlights
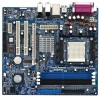
1 . Guide to SATA Hard Disks Installation 1.1 Serial ATA (SATA) Hard Disks Installation This motherboard adopts SiS 965L south bridge chipset that supports Serial ATA (SATA) hard disks. You may install SATA hard disks in this motherboard for internal storage devices. This section will guide you to install the SATA hard disks. STEP 1: Install the SATA hard disks into the drive bays of your chassis. STEP 2: Connect one end of the SATA data cable to the motherboard's primary SATA connector (SATA1). STEP 3: Connect the other end of the SATA data cable to the primary SATA hard disk. STEP 4: Connect the SATA power cable to the SATA hard disk. If you just want to install only one SATA HDD, the installation process is complete at this step. If you want to install two SATA HDDs or you want to use RAID function, please continue to do the following steps. STEP 5: Connect one end of the second SATA data cable to the motherboard's secondary SATA connector (SATA2). STEP 6: Connect the other end of the SATA data cable to the secondary SATA hard disk. STEP 7: Connect the SATA power cable to the SATA hard disk. 2
-
 1
1 -
 2
2 -
 3
3 -
 4
4 -
 5
5 -
 6
6 -
 7
7 -
 8
8 -
9
-
10
-
11
-
12
-
13
-
14
-
15
-
16
-
17
-
18
-
19
-
20
-
21
-
22
-
23
-
24
-
25
 |
 |
