Airlink AR660W3G Quick Installation Guide - Page 9
Connecting to the Router with, Easy Setup Button - airlink101 manual
 |
UPC - 658729081659
View all Airlink AR660W3G manuals
Add to My Manuals
Save this manual to your list of manuals |
Page 9 highlights
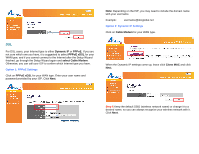
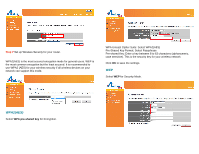
Section 4 (Optional) Connecting to the Router with Easy Setup Button The AR660W3G Airlink101 Wireless N 3G/3.5G Mobile Router has a Easy Setup Button built-in which allows you to connect your wireless computer with the router easily and safely. Your wireless adapter must support this feature (WiFi Protected Setup™) as well. If not, you will need to set up the wireless security manually and you can skip this section. In the instructions below, we are going to use the Airlink101 WLAN Monitor utility comes with the AWLL6077, Airlink101 Wireless N adapter as an example. Step 1 Go to the computer with Airlink101 Wireless N adapter, AWLL6077 connected. Step 2 Push and hold the Easy Setup Button on the Adapter until you see the following window pops up on the computer monitor. You will see this window pops up on the monitor: Step 3 Within the following 2 minutes, push the Easy Setup Button on the Router. The WLAN LED on the Router will stay solid green instead of blinking. Step 4 The Router will now start to synchronize the security settings with the wireless adapter. When you see a similar window as below, the connection has been established.
-
 1
1 -
2
-
3
-
 4
4 -
 5
5 -
 6
6 -
 7
7 -
 8
8 -
 9
9 -
 10
10
 |
 |
