Asus K8V SE DELUXE K8V SE Deluxe User's Manual - Page 129
Other FastBuild Utility Commands
 |
View all Asus K8V SE DELUXE manuals
Add to My Manuals
Save this manual to your list of manuals |
Page 129 highlights
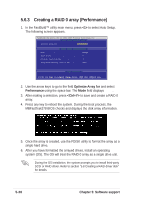
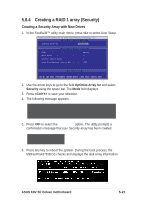
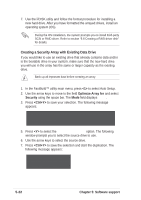
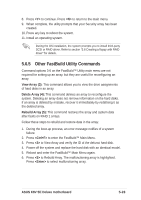
8. Press to continue. Press to return to the main menu. 9. When complete, the utility prompts that your Security array has been created. 10. Press any key to reboot the system. 11. Install an operating system. During the OS installation, the system prompts you to install third-party SCSI or RAID driver. Refer to section "5.8 Creating a floppy with RAID driver" for details. 5.6.5 Other FastBuild Utility Commands Command options 3-6 on the FastBuild™ Utility main menu are not required for setting up an array, but they are useful for reconfiguring an array. View Array (3): This command allows you to view the drive assignments of hard disks in an array. Delete Array (4): This command deletes an array to reconfigure the system. Deleting an array does not remove information on the hard disks. If an array is deleted by mistake, recover it immediately by redefining it as the deleted array. Rebuild Array (5): This command restores the array and system data after faults on RAID 1 arrays. Follow these steps to rebuild and restore data in the array: 1. During the boot-up process, an error message notifies of a system failure. 2. Press to enter the FastBuild™ Main Menu. 3. Press to View Array and verify the ID of the defunct hard disk. 4. Power off the system and replace the hard disk with an identical model. 5. Reboot and enter the FastBuild™ Main Menu again. 6. Press to Rebuild Array. The malfunctioning array is highlighted. Press to select malfunctioning array. ASUS K8V SE Deluxe motherboard 5-23
-
 1
1 -
2
-
3
-
4
-
5
-
6
-
7
-
8
-
9
-
10
-
11
-
12
-
13
-
14
-
15
-
16
-
17
-
18
-
19
-
20
-
21
-
22
-
23
-
24
-
25
-
26
-
27
-
28
-
29
-
30
-
31
-
32
-
33
-
34
-
35
-
36
-
37
-
38
-
39
-
40
-
41
-
42
-
43
-
44
-
45
-
46
-
47
-
48
-
49
-
50
-
51
-
52
-
53
-
54
-
55
-
56
-
57
-
58
-
59
-
60
-
61
-
62
-
63
-
64
-
65
-
66
-
67
-
68
-
69
-
70
-
71
-
72
-
73
-
74
-
75
-
76
-
77
-
78
-
79
-
80
-
81
-
82
-
83
-
84
-
85
-
86
-
87
-
88
-
89
-
90
-
91
-
92
-
93
-
94
-
95
-
96
-
97
-
98
-
99
-
100
-
101
-
102
-
103
-
104
-
105
-
106
-
107
-
108
-
109
-
110
-
111
-
112
-
113
-
114
-
115
-
116
-
117
-
118
-
119
-
120
-
121
-
122
-
123
-
 124
124 -
 125
125 -
 126
126 -
 127
127 -
 128
128 -
 129
129 -
 130
130 -
 131
131 -
 132
132 -
 133
133 -
 134
134 -
135
-
136
-
137
-
138
-
139
-
140
 |
 |