Asus K8V SE DELUXE K8V SE Deluxe User's Manual - Page 136
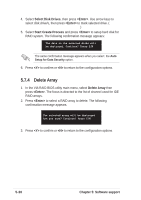
Delete Array
 |
View all Asus K8V SE DELUXE manuals
Add to My Manuals
Save this manual to your list of manuals |
Page 136 highlights
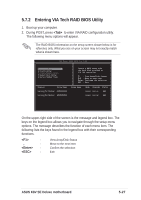
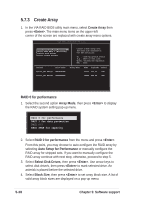
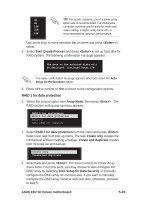
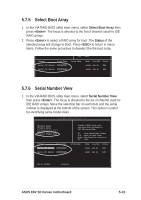
4. Select Select Disk Drives, then press . Use arrow keys to select disk drive/s, then press to mark selected drive. (An asterisk is placed before a selected drive.) 5. Select Start Create Process and press to setup hard disk for RAID system. The following confirmation message appears: The data on the selected disks will be destroyed. Continue? Press Y/N The same confirmation message appears when you select the Auto Setup for Data Security option. 6. Press to confirm or to return to the configuration options. 5.7.4 Delete Array 1. In the VIA RAID BIOS utility main menu, select Delete Array then press . The focus is directed to the list of channel used for IDE RAID arrays. 2. Press to select a RAID array to delete. The following confirmation message appears. The selected array will be destroyed. Are you sure? Continue? Press Y/N 3. Press to confirm or to return to the configuration options. 5-30 Chapter 5: Software support
-
 1
1 -
2
-
3
-
4
-
5
-
6
-
7
-
8
-
9
-
10
-
11
-
12
-
13
-
14
-
15
-
16
-
17
-
18
-
19
-
20
-
21
-
22
-
23
-
24
-
25
-
26
-
27
-
28
-
29
-
30
-
31
-
32
-
33
-
34
-
35
-
36
-
37
-
38
-
39
-
40
-
41
-
42
-
43
-
44
-
45
-
46
-
47
-
48
-
49
-
50
-
51
-
52
-
53
-
54
-
55
-
56
-
57
-
58
-
59
-
60
-
61
-
62
-
63
-
64
-
65
-
66
-
67
-
68
-
69
-
70
-
71
-
72
-
73
-
74
-
75
-
76
-
77
-
78
-
79
-
80
-
81
-
82
-
83
-
84
-
85
-
86
-
87
-
88
-
89
-
90
-
91
-
92
-
93
-
94
-
95
-
96
-
97
-
98
-
99
-
100
-
101
-
102
-
103
-
104
-
105
-
106
-
107
-
108
-
109
-
110
-
111
-
112
-
113
-
114
-
115
-
116
-
117
-
118
-
119
-
120
-
121
-
122
-
123
-
124
-
125
-
126
-
127
-
128
-
129
-
130
-
 131
131 -
 132
132 -
 133
133 -
 134
134 -
 135
135 -
 136
136 -
 137
137 -
 138
138 -
 139
139 -
 140
140
 |
 |