Asus P5Q User Manual - Page 47
CPU / Northbridge overvoltage setting 3-pin OV_CPU, 3-pin OV_NB
 |
UPC - 610839163014
View all Asus P5Q manuals
Add to My Manuals
Save this manual to your list of manuals |
Page 47 highlights
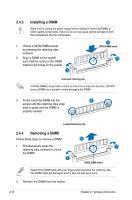
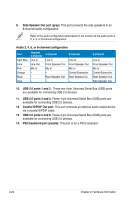
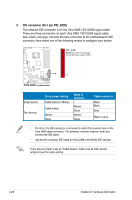
2. CPU / Northbridge overvoltage setting (3-pin OV_CPU, 3-pin OV_NB) These jumpers allow you to enable or disable the advanced CPU and Northbridge overvoltage settings in BIOS. Read the following information before you change the jumper settings. Set to pins 1-2 to activate the advanced CPU / Northbridge overvoltage feature. Pins 2-3 (Default) Pins 1-2 (OV Enabled) OV_CPU up to 1.70V up to 2.10V OV_NB up to 1.76V up to 2.20V • Before you change the jumper settings for extra-high overvoltage ability, use the BIOS items introduced in 3.4 Ai Tweaker menu first to adjust the desired CPU and Northbridge performance. Make sure your system function well under the highest BIOS voltage settings before you change the setting of these two jumpers. • Refer to 3.4 Ai Tweaker menu for more information about CPU and Northbridge overvoltage settings. • DO NOT set the OV_CPU jumper to pins 1-2 when you install a new CPU and have not booted for the first time. Doing so may cause the system to halt. For system failure due to the wrong setting of the OV_CPU jumper, shut down the computer and move the cap back to pins 2-3. • The system may need a better cooling system (for example, a water-cooling system) to work stably under high voltage settings. ASUS P5Q 2-21
-
 1
1 -
2
-
3
-
4
-
5
-
6
-
7
-
8
-
9
-
10
-
11
-
12
-
13
-
14
-
15
-
16
-
17
-
18
-
19
-
20
-
21
-
22
-
23
-
24
-
25
-
26
-
27
-
28
-
29
-
30
-
31
-
32
-
33
-
34
-
35
-
36
-
37
-
38
-
39
-
40
-
41
-
 42
42 -
 43
43 -
 44
44 -
 45
45 -
 46
46 -
 47
47 -
 48
48 -
 49
49 -
 50
50 -
 51
51 -
 52
52 -
53
-
54
-
55
-
56
-
57
-
58
-
59
-
60
-
61
-
62
-
63
-
64
-
65
-
66
-
67
-
68
-
69
-
70
-
71
-
72
-
73
-
74
-
75
-
76
-
77
-
78
-
79
-
80
-
81
-
82
-
83
-
84
-
85
-
86
-
87
-
88
-
89
-
90
-
91
-
92
-
93
-
94
-
95
-
96
-
97
-
98
-
99
-
100
-
101
-
102
-
103
-
104
-
105
-
106
-
107
-
108
-
109
-
110
-
111
-
112
-
113
-
114
-
115
-
116
-
117
-
118
-
119
-
120
-
121
-
122
-
123
-
124
-
125
-
126
-
127
-
128
-
129
-
130
-
131
-
132
-
133
-
134
-
135
-
136
-
137
-
138
-
139
-
140
-
141
-
142
-
143
-
144
-
145
-
146
-
147
-
148
-
149
-
150
-
151
-
152
-
153
-
154
-
155
-
156
-
157
-
158
-
159
-
160
-
161
-
162
-
163
-
164
-
165
-
166
-
167
-
168
-
169
-
170
-
171
-
172
-
173
-
174
-
175
-
176
-
177
-
178
-
179
-
180
-
181
-
182
-
183
-
184
 |
 |
