Asus P7P55D Deluxe User Manual - Page 113
Using ASUS TurboV Auto Tuning Mode - evo bios
 |
UPC - 610839172450
View all Asus P7P55D Deluxe manuals
Add to My Manuals
Save this manual to your list of manuals |
Page 113 highlights
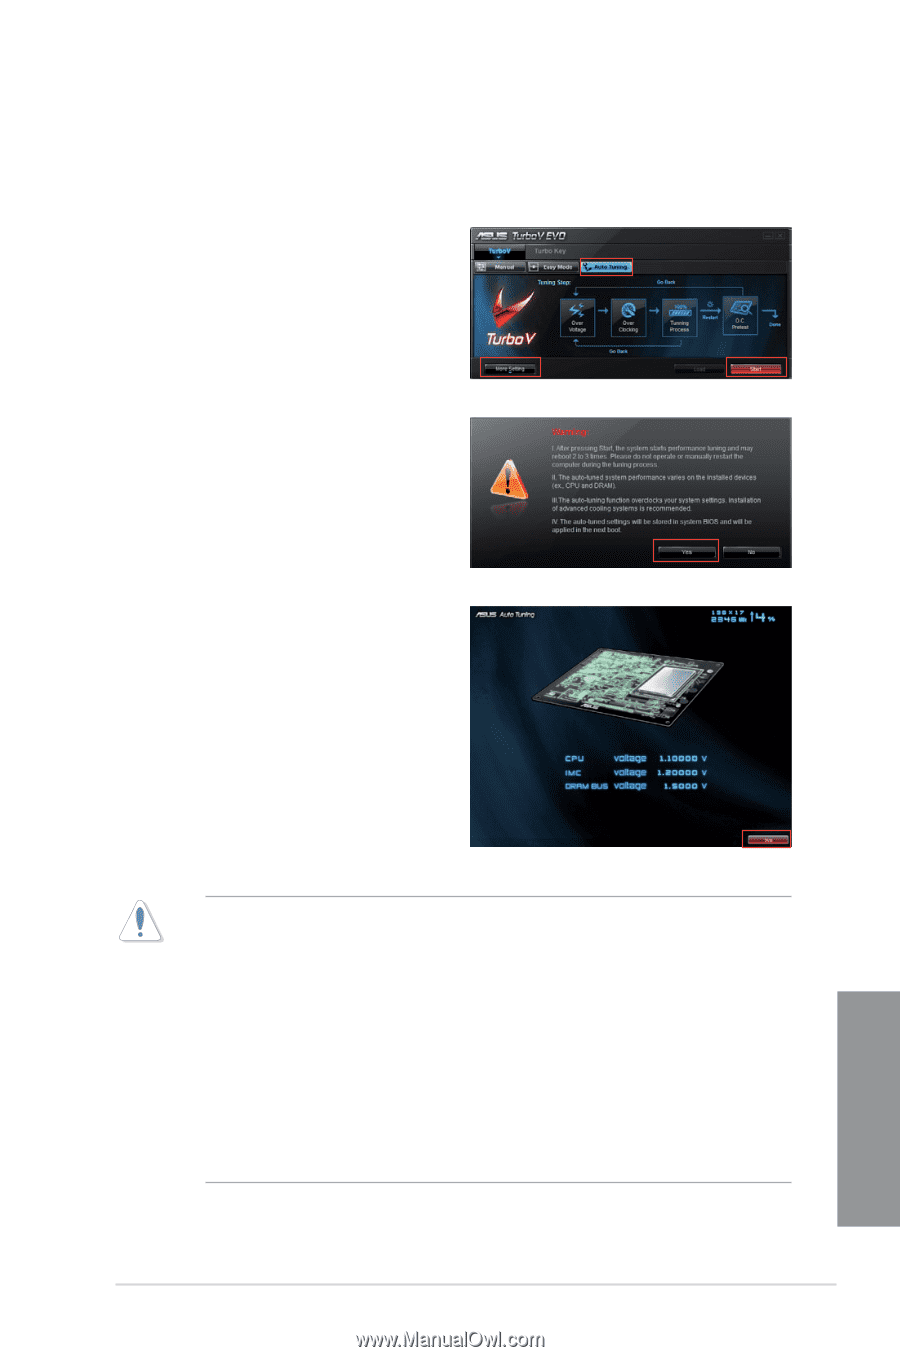
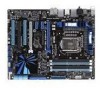
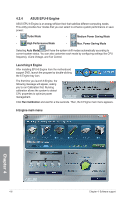
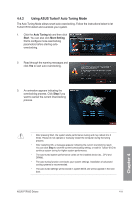
4.4.2 Using ASUS TurboV Auto Tuning Mode The Auto Tuning Mode allows smart auto-overclocking. Follow the instructions below to let TurboV EVO detect and overclock your system. 1. Click the Auto Tuning tab and then click Start. You can also click More Setting first to configure more overclocking parameters before starting autooverclocking. 2. Read through the warning messages and click Yes to start auto-overclocking. 3. An animation appears indicating the overclocking process. Click Stop if you want to cancel the current Overclocking process. Chapter 4 • After pressing Start, the system starts performance tuning and may reboot 2 to 3 times. Please do not operate or manually restart the computer during the tuning process. • After restarting OS, a message appears indicating the current overclocking result. You can click Stop to save the current overclocking setting, or wait for TurboV EVO to continue system tuning for higher system performance. • The auto-tuned system performance varies on the installed device (ex., CPU and DRAM). • The auto-tuning function overclocks your system settings. Installation of advanced cooling systems is recommended. • The auto-tuned settings will be stored in system BIOS and will be applied in the next boot. ASUS P7P55D Deluxe 4-11
-
 1
1 -
2
-
3
-
4
-
5
-
6
-
7
-
8
-
9
-
10
-
11
-
12
-
13
-
14
-
15
-
16
-
17
-
18
-
19
-
20
-
21
-
22
-
23
-
24
-
25
-
26
-
27
-
28
-
29
-
30
-
31
-
32
-
33
-
34
-
35
-
36
-
37
-
38
-
39
-
40
-
41
-
42
-
43
-
44
-
45
-
46
-
47
-
48
-
49
-
50
-
51
-
52
-
53
-
54
-
55
-
56
-
57
-
58
-
59
-
60
-
61
-
62
-
63
-
64
-
65
-
66
-
67
-
68
-
69
-
70
-
71
-
72
-
73
-
74
-
75
-
76
-
77
-
78
-
79
-
80
-
81
-
82
-
83
-
84
-
85
-
86
-
87
-
88
-
89
-
90
-
91
-
92
-
93
-
94
-
95
-
96
-
97
-
98
-
99
-
100
-
101
-
102
-
103
-
104
-
105
-
106
-
107
-
 108
108 -
 109
109 -
 110
110 -
 111
111 -
 112
112 -
 113
113 -
 114
114 -
 115
115 -
 116
116 -
 117
117 -
 118
118 -
119
-
120
-
121
-
122
-
123
-
124
-
125
-
126
-
127
-
128
-
129
-
130
-
131
-
132
-
133
-
134
 |
 |