Bosch SHP78CM2N Installation Instructions
Bosch SHP78CM2N Manual
 |
View all Bosch SHP78CM2N manuals
Add to My Manuals
Save this manual to your list of manuals |
Bosch SHP78CM2N manual content summary:
- Bosch SHP78CM2N | Installation Instructions - Page 1
apRpleiagniscteearnydojuorin the Bosch boscfahmm-hiyolybmooefs.pccheormks/:us/ Dishwasher [en-us] Installation Instructions Dishwasher 2 [fr-ca] Instructions d'installation Lave-vaisselle 17 [es-mx] Instrucciones de instalación Lavadora de platos 33 - Bosch SHP78CM2N | Installation Instructions - Page 2
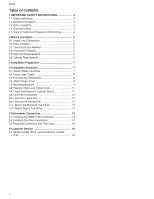
en-us Table of contents 1 IMPORTANT SAFETY INSTRUCTIONS 3 1.1 Safety definitions 3 1.2 General information 3 1.3 Safe Installation 3 1.4 Electrical safety 3 1.5 State of 5.3 Electrical Connection and Test Cycle 16 6 Customer Service 16 6.1 Model number (E-Nr.) and production number (FD 16 2 - Bosch SHP78CM2N | Installation Instructions - Page 3
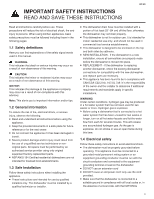
signal words used in this manual. WARNING This indicates that death service provider using only original equipment factory replacement parts. ¡ NSF/ANSI 184 Certified residential dishwashers are not intended for licensed food establishments. 1.3 Safe Installation Follow these safety instructions - Bosch SHP78CM2N | Installation Instructions - Page 4
block/junction box model, SMZPCJB1UC, designed for permanent wire connection, is not included but can be ordered through Customer Service by calling 1-800-944-2904. Follow the instructions included with the kit. WARNING Avoid Electrical Shock ▶ Do not work on an energized circuit. Doing so could - Bosch SHP78CM2N | Installation Instructions - Page 5
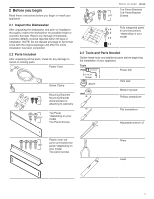
or missing parts. Power Cord Before you begin en-us Toe Panel Brackets Toe Panel Bracket Screws x 4 Fully integrated panel kit and instructions x 2 *depending on your x 6 model x 2 2.3 Tools and Parts Needed Gather these tools and additional parts before beginning the installation of your - Bosch SHP78CM2N | Installation Instructions - Page 6
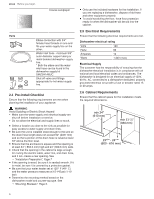
of your appliance. WARNING Avoid Scalding or Electric Shock Hazard ▶ Make sure the water supply and electrical supply are shut off before installation or service. ▶ Do not allow the electrical and supply lines to touch. ¡ Select a location as close to the sink as possible for easy access to water - Bosch SHP78CM2N | Installation Instructions - Page 7
metal, use the Edge Protector with Power Cord clips Kit SMZEPCC1UC. Installation Procedure 4 Installation Procedure Installation Procedure Follow these instructions to install the dishwasher. 4.1 Attach Water Inlet Hose NOTICE: Avoid cross-threading ▶ Cross-threading will cause leaks. Teflon tape - Bosch SHP78CM2N | Installation Instructions - Page 8
en-us Installation Procedure 1. Attach elbow joint to the water inlet valve with the open end facing towards the direction of the sink, either to the left or the right. . Turn by hand and do not over tighten . 2. Attach hot water line to elbow. 4.2 Visual Leak Check 1. Temporarily hook up water - Bosch SHP78CM2N | Installation Instructions - Page 9
When opening the door on an uninstalled dishwasher, carefully open the door while supporting the rear of the unit. Failure to follow this warning can result power cord. If cord is missing order kit SMZPC002UC through Customer Service. ¡ If you require a permanent wiring connection, order kit - Bosch SHP78CM2N | Installation Instructions - Page 10
en-us Installation Procedure 2. Slip bracket flange through side slots in frame. 3. Using pliers, bend side flanges. Do not attach to cabinet yet. Side Mount Side Mount is used for counter tops made of marble, granite, or other solid surface material that cannot be easily drilled. CAUTION Avoid - Bosch SHP78CM2N | Installation Instructions - Page 11
4.6 Prepare Hoses and Power Cord The dishwasher drain hose is configured for a sink on the left side of the installation location. If your sink is on the right side, you will need to reposition the drain hose behind the dishwasher before installing. 1. If needed, unhook the strap and reposition the - Bosch SHP78CM2N | Installation Instructions - Page 12
. 2. Level front to back by turning center screw clockwise to raise or counter-clockwise to lower the back. 4.9 Outer Door Assembly ▶ Follow the instructions for outer door assembly on the fully integrated template. Note: The door panel should weigh between 9 and 18 lbs, be at least 3/4" thick - Bosch SHP78CM2N | Installation Instructions - Page 13
Installation Procedure en-us 3. For Side Mount, lift the flap on the deco strip and insert the 1/2" (12.7mm) wood screws underneath. 4.10 Secure the Dishwasher 1. Center the dishwasher in the opening. x= x 2. If using the Top Mount, and screw the 1/2" (12.7mm) wood screws through the holes in the - Bosch SHP78CM2N | Installation Instructions - Page 14
the toe panel. 4.12 Attach Plastic Toe Panel If your dishwasher came with a plastic toe panel and slotted toe panel, follow these instructions. 1. Align the plastic toe panel on the base of the dishwasher so the holes lines up. Dishwasher Connection 5 Dishwasher Connection Dishwasher Connection - Bosch SHP78CM2N | Installation Instructions - Page 15
¡ If using copper tubing or other material not depicted in this manual for water supply, defer to a licensed plumber for proper installation. If local ordinance require an air gap, install it according to the manufacturer's instructions. ¡ The drain hose length can be extended if necessary. Use kit - Bosch SHP78CM2N | Installation Instructions - Page 16
CA: 1-800-944-2904 www.bosch-home.ca/en/service/get-support www.bosch-home.ca/en/service/cleaners-and-accessories For assistance with connecting to Home Connect®, you can also view instructions here: www.home-connect.com/us/en/help-support/set-up 6.1 Model number (E-Nr.) and production number (FD - Bosch SHP78CM2N | Installation Instructions - Page 17
plinthe en plastique 29 5 Raccordement du lave-vaisselle 30 5.1 Installation de l'arrivée d'eau 30 5.2 Installation du raccord d'évacuation 30 5.3 Connexion électrique et cycle d'essai 31 6 Service à la clientèle 32 6.1 Numéro de modèle (E-Nr.) et numéro de fabrication (FD 32 17 - Bosch SHP78CM2N | Installation Instructions - Page 18
certifiés NSF/ANSI 184 ne sont pas destinés aux établissements de services alimentaires agréés. 1.3 Installation sûre Suivez les consignes de sécurité suivantes lors de l'installation de l'appareil. ¡ Ces instructions d'installation sont destinées à des installateurs qualifiés uniquement. Le lave - Bosch SHP78CM2N | Installation Instructions - Page 19
/boîte de jonction, SMZPCJB1UC, conçu pour un branchement permanent des fils, peut être commandé auprès du service à la clientèle au 1-800-944-2904. Suivez les instructions fournies avec la trousse. AVERTISSEMENT Éviter les chocs électriques ▶ Ne travaillez pas sur un circuit sous tension. Cela - Bosch SHP78CM2N | Installation Instructions - Page 20
durant le transport. Cordon d'alimentation Équerres de plinthe Vis d'équerres de plinthe x 4 Trousse de panneaux entièrement intégrée x 2 et instructions *selon x 6 votre modèle x 2 2.3 Outils et pièces nécessaires Rassemblez les outils et pièces supplémentaires suivants avant de commencer - Bosch SHP78CM2N | Installation Instructions - Page 21
Papier abrasif Pièces Le raccord coudé avec filetage femelle 3/4 po pour tuyau à une extrémité s'adapte à votre ligne d'alimentation en eau à l'autre extrémité. Tuyau d'arrivée d'eau - tube en cuivre de 3/8 po de diamètre extérieur minimum ou conduite d'alimentation du lave-vaisselle à tresse mé - Bosch SHP78CM2N | Installation Instructions - Page 22
des bords avec clips pour cordon d'alimentation SMZEPCC1UC. Procédure d'installation 4 Procédure d'installation Procédure d'installation Suivez les instructions suivantes pour installer le lavevaisselle. 4.1 Fixer le flexible d'arrivée d'eau AVIS : Évitez de déformer les filetages ▶ La déformation - Bosch SHP78CM2N | Installation Instructions - Page 23
Ruban de téflon ▶ N'utilisez pas de ruban de téflon; cela pourrait créer des fuites et endommager le plancher ou les armoires. 1. Fixez le raccord coudé au robinet d'arrivée d'eau, l'extrémité ouverte étant orientée vers la direction de l'évier, soit vers la gauche, soit vers la droite. . Serrez - Bosch SHP78CM2N | Installation Instructions - Page 24
en bois ou autres matériaux qui peuvent être facilement percés. 1. Orientez les supports de montage et insérez-les dans le bon emplacement. La prise pour le fourni. Si le cordon est manquant, commandez la trousse SMZPC002UC auprès du service à la clientèle. ¡ Si vous avez besoin d'une connexion de - Bosch SHP78CM2N | Installation Instructions - Page 25
Procédure d'installation fr-ca 1. Saisissez l'équerre de fixation avec une pince et repliez le support sur lui-même au niveau de la perforation. 2. Glissez la bride de l'équerre dans les fentes latérales du cadre. 3. À l'aide d'une pince, pliez les - Bosch SHP78CM2N | Installation Instructions - Page 26
fr-ca Procédure d'installation 4.6 Préparer les tuyaux et le cordon d'alimentation Le tuyau d'évacuation du lave-vaisselle est configuré pour un évier situé sur le côté gauche de l'emplacement d'installation. Si votre évier se trouve sur le côté droit, vous devrez repositionner le tuyau d'é - Bosch SHP78CM2N | Installation Instructions - Page 27
5. Passez la main dans le meuble adjacente et sortez complètement les tuyaux et l'excédent de cordon d'alimentation afin qu'ils ne soient pas pliés. Procédure d'installation fr-ca 2. Mettez l'avant et l'arrière à niveau en tournant la vis centrale dans le sens des aiguilles d'une montre pour - Bosch SHP78CM2N | Installation Instructions - Page 28
fixation à travers les trous dans ces dernières. Choisissez le trou le mieux adapté à votre installation. 4.9 Assemblage de la porte extérieure ▶ Suivez les instructions pour l'assemblage de la porte extérieure sur le modèle entièrement intégré. Remarque : Le panneau de porte doit peser entre 9 et - Bosch SHP78CM2N | Installation Instructions - Page 29
ère la plinthe. 4.12 Fixer la plinthe en plastique Si votre lave-vaisselle a été livré avec une plinthe en plastique et une plinthe à fentes, suivez ces instructions. 1. Alignez la plinthe en plastique avec les trous à la base du lave-vaisselle. 2. Fixez-les à l'aide de deux des vis de 3/4 po (19 mm - Bosch SHP78CM2N | Installation Instructions - Page 30
fr-ca Raccordement du lave-vaisselle Raccordement du lave-vaisselle 5 Raccordement du lave-vaisselle Raccordement du lave-vaisselle Suivez les instructions suivantes pour raccorder le lavevaisselle. 5.1 Installation de l'arrivée d'eau Le chauffe-eau doit être réglé pour fournir de l'eau à environ 49 - Bosch SHP78CM2N | Installation Instructions - Page 31
Remarques importantes pour les raccords d'évacuation : ¡ Si la réglementation locale exige une fente d'aération, installez-la conformément aux instructions du fabricant. ¡ La longueur du tuyau d'évacuation peut être allongée si nécessaire. Utilisez la trousse #SGZ1010UC. La longueur maximale - Bosch SHP78CM2N | Installation Instructions - Page 32
de l'appareil. USA: 1-800-944-2904 www.bosch-home.com/us/owner-support/get-support www.bosch-home.com/us/shop CA: 1-800-944-2904 www.bosch-home.ca/en/service/get-support www.bosch-home.ca/en/service/cleaners-and-accessories Vous trouverez également de l'aide pour contacter Home Connect® à l'adresse - Bosch SHP78CM2N | Installation Instructions - Page 33
Tabla de contenidos 1 INSTRUCCIONES DE SEGURIDAD IMPORTANTES 34 1.1 Definiciones de seguridad 34 1.2 Información general 34 1.3 Instalación segura 34 1.4 Seguridad eléctrica 35 1.5 Advertencias en virtud de la Proposición 65 del estado de California 35 2 Antes de empezar 36 2.1 Revisar el - Bosch SHP78CM2N | Installation Instructions - Page 34
en las páginas siguientes. 1.1 Definiciones de seguridad Aquí puede encontrar explicaciones de las palabras de señal de seguridad utilizadas en este manual. ADVERTENCIA Esto indica que pueden producirse la muerte o heridas graves si no se cumple con esta advertencia. PRECAUCIÓN Esto indica que - Bosch SHP78CM2N | Installation Instructions - Page 35
es-mx INSTRUCCIONES DE SEGURIDAD IMPORTANTES LEA Y CONSERVE ESTAS INSTRUCCIONES 1.4 Seguridad eléctrica Seguir estas instrucciones de seguridad para evitar descargas eléctricas. ¡ El lavavajillas debe estar puesto a tierra correctamente antes de la operación. Este aparato debe estar conectado a un - Bosch SHP78CM2N | Installation Instructions - Page 36
es-mx Antes de empezar Antes de empezar 2 Antes de empezar Antes de empezar Leer estas instrucciones antes de comenzar la instalación del aparato. 2.1 Revisar el lavavajillas Después de desembalar el lavavajillas y antes de la instalación, revisarlo para descartar posibles daños cosméticos o - Bosch SHP78CM2N | Installation Instructions - Page 37
Papel de lija grueso Componentes Conexión acodada con roscas hembra de manguera de 3/4" en un extremo y conexión a la línea de suministro de agua en el otro. Manguera de entrada de agua tubería de cobre con diámetro exterior de mínimo 3/8" o línea de suministro del lavavajillas de trenzado metá - Bosch SHP78CM2N | Installation Instructions - Page 38
es-mx Preparación para la instalación Si el lavavajillas debe instalarse en una esquina, asegurarse de que exista el espacio suficiente para abrir la puerta como se muestra. 2. Extraer la manguera de desagüe de la base del embalaje como se muestra en la imagen. Preparación para la instalación 3 - Bosch SHP78CM2N | Installation Instructions - Page 39
Cinta de teflón ▶ No utilizar cinta de teflón; podría causar fugas y dañar los suelos o gabinetes. 1. Acoplar una junta acodada en la válvula de entrada de agua con el extremo abierto hacia el fregadero, ya sea hacia la izquierda o hacia la derecha. . Girar con la mano y no apretar demasiado . 2. - Bosch SHP78CM2N | Installation Instructions - Page 40
es-mx Procedimiento de instalación 3. Utilizar un nivel sobre la parte frontal para comprobar que los dos pies estén nivelados. (El pie trasero se ajusta una vez que se encuentra dentro del gabinete). 4.4 Acoplar el cable de alimentación ▶ Conectar el extremo del cable de alimentación en la parte - Bosch SHP78CM2N | Installation Instructions - Page 41
Procedimiento de instalación es-mx 2. Deslizar la pestaña del soporte a través de las ranuras laterales en el bastidor. 3. Utilizando unas pinzas, doblar las pestañas laterales. No acoplar todavía al gabinete. Montaje en el lateral El montaje en el lateral se utiliza para encimeras de mármol, - Bosch SHP78CM2N | Installation Instructions - Page 42
es-mx Procedimiento de instalación 4.6 Preparar las mangueras y el cable de alimentación La manguera de desagüe del lavavajillas está diseñada para un fregadero en el lado izquierdo del lugar de instalación. Si su fregadero se encuentra en el lado derecho, tendrá que reposicionar la manguera de - Bosch SHP78CM2N | Installation Instructions - Page 43
5. Dentro del gabinete adyacente, tirar de las mangueras y del cable de alimentación sobrante completamente de forma que no se tuerzan. Procedimiento de instalación es-mx 2. Nivelarlo de delante atrás girando el tornillo central en sentido horario para levantar o en sentido antihorario para bajar - Bosch SHP78CM2N | Installation Instructions - Page 44
es-mx Procedimiento de instalación 2. Si se utiliza el montaje en la parte superior, atornillar los tornillos del soporte de montaje en los agujeros de los soportes de montaje. Elija el agujero más adecuado para su instalación. 4.9 Montaje de la puerta exterior ▶ Seguir las instrucciones para el - Bosch SHP78CM2N | Installation Instructions - Page 45
2. Utilizar los tornillos de 3/4" (19mm) los soportes de la placa protectora del zócalo para montar los soportes de metal en la base Procedimiento de instalación es-mx 5. Utilizar los tornillos de 9/16" (14mm) para montar la placa protectora del zócalo a través del agujero de forma que coincida con - Bosch SHP78CM2N | Installation Instructions - Page 46
aprobada, con los racores adecuados para esta conexión. ¡ Si se utiliza una tubería de cobre u otro material no representado en este manual para el suministro de agua, recurrir a un fontanero autorizado para que realice una instalación adecuada. ¡ Utilizar siempre juntas adecuadas al realizar - Bosch SHP78CM2N | Installation Instructions - Page 47
Nota Notas importantes acerca de la conexión para el desagüe: ¡ Si los reglamentos locales exigen una separación para ventilación, instalarla de acuerdo con las instrucciones del fabricante. ¡ La largura de la manguera de desagüe puede ampliarse en caso necesario. Utilizar el kit #SGZ1010UC. La - Bosch SHP78CM2N | Installation Instructions - Page 48
ón (FD) se su aparato. USA: 1-800-944-2904 www.bosch-home.com/us/owner-support/get-support www.bosch-home.com/us/shop CA: 1-800-944-2904 www.bosch-home.ca/en/service/get-support www.bosch-home.ca/en/service/cleaners-and-accessories Aquí podrá encontrar ayuda para la conexión con Home Connect®: www - Bosch SHP78CM2N | Installation Instructions - Page 49
- Bosch SHP78CM2N | Installation Instructions - Page 50
- Bosch SHP78CM2N | Installation Instructions - Page 51
- Bosch SHP78CM2N | Installation Instructions - Page 52
We're here to assist with usage instructions, cleaning tips, accessories & parts, troubleshooting, and repairs. Find online resources such as FAQs, how-to-videos, manuals, warranties and authorized Bosch servicers at: www.bosch-home.com/us/owner-support/get-support Contact us: Please have your Model
-
 1
1 -
 2
2 -
 3
3 -
 4
4 -
 5
5 -
 6
6 -
 7
7 -
8
-
9
-
10
-
11
-
12
-
13
-
14
-
15
-
16
-
17
-
18
-
19
-
20
-
21
-
22
-
23
-
24
-
25
-
26
-
27
-
28
-
29
-
30
-
31
-
32
-
33
-
34
-
35
-
36
-
37
-
38
-
39
-
40
-
41
-
42
-
43
-
44
-
45
-
46
-
47
-
48
-
49
-
50
-
51
-
52
 |
 |

Register
your
appliance and join
the Bosch
family of perks:
bosch-home.com/us/
mybosch
Dishwasher
[en-us]
Installation Instructions
Dishwasher
2
[fr-ca]
Instructions d’installation
Lave–vaisselle
17
[es-mx]
Instrucciones de instalación Lavadora de platos
33