Bosch SHP78CM2N Installation Instructions - Page 5
Before you begin
 |
View all Bosch SHP78CM2N manuals
Add to My Manuals
Save this manual to your list of manuals |
Page 5 highlights
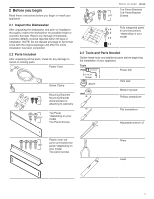
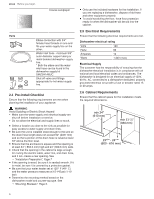
Before you begin 2 Before you begin Before you begin Read these instructions before you begin to install your appliance. 2.1 Inspect the Dishwasher After unpacking the dishwasher and prior to installation, thoroughly inspect the dishwasher for possible freight or cosmetic damage. Report any damage immediately. Cosmetic defects must be reported within 30 days of installation. NOTE: Do not discard any bags or items that come with the original package until after the entire installation has been completed. 2.2 Parts Included After unpacking all the parts, check for any damage in transit or missing parts. Power Cord Before you begin en-us Toe Panel Brackets Toe Panel Bracket Screws x 4 Fully integrated panel kit and instructions x 2 *depending on your x 6 model x 2 2.3 Tools and Parts Needed Gather these tools and additional parts before beginning the installation of your appliance. Tools Power drill Screw Clamp Mounting Brackets Mounting Bracket wood screws for attaching to cabinetry Toe Panel *depending on your model Toe Panel Screws Hole saw Measuring tape Phillips screwdriver Flat screwdriver Adjustable wrench x2 Plastic inner toe panel and slotted toe 3/4" panel *depending on your model Toe panel screws Pliers Level 5
-
 1
1 -
 2
2 -
 3
3 -
 4
4 -
 5
5 -
 6
6 -
 7
7 -
 8
8 -
 9
9 -
 10
10 -
 11
11 -
12
-
13
-
14
-
15
-
16
-
17
-
18
-
19
-
20
-
21
-
22
-
23
-
24
-
25
-
26
-
27
-
28
-
29
-
30
-
31
-
32
-
33
-
34
-
35
-
36
-
37
-
38
-
39
-
40
-
41
-
42
-
43
-
44
-
45
-
46
-
47
-
48
-
49
-
50
-
51
-
52
 |
 |
