Bowflex Xtreme Assembly and Owners Manual - Page 13
Install Upper Lat Tower Assembly - home gym
 |
View all Bowflex Xtreme manuals
Add to My Manuals
Save this manual to your list of manuals |
Page 13 highlights
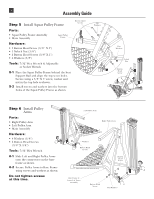
11 Assembly Guide Step 15 Install Upper Lat Tower Assembly Parts: • Upper Lat Tower Assembly • Main Assembly Hardware (1:1): • 6 Button Head Screws (3/8" X 3/4") • 6 Washers (3/8") Tool: 7/32" Hex Wrench 15-1 Position the Upper Lat Tower Assembly over the Lower Lat Tower Assembly. 15-2 Slide the Upper Lat Tower onto the Lower Lat Tower and secure with screws and washers as shown. Upper Lat Tower Flat Washers Button Head Screws Rods not shown for clarity Flat Washers Button Head Screws Lower Lat Tower TIGHTEN HARDWARE Carefully go over the entire Bowflex Xtreme™ home gym and tighten all hardware before using.
-
 1
1 -
2
-
3
-
4
-
5
-
6
-
7
-
 8
8 -
 9
9 -
 10
10 -
 11
11 -
 12
12 -
 13
13 -
 14
14 -
 15
15 -
 16
16 -
 17
17 -
 18
18 -
19
-
20
-
21
-
22
-
23
-
24
-
25
-
26
-
27
-
28
-
29
-
30
-
31
-
32
-
33
-
34
-
35
-
36
-
37
-
38
-
39
-
40
-
41
-
42
-
43
-
44
-
45
-
46
-
47
-
48
-
49
-
50
-
51
-
52
-
53
-
54
-
55
-
56
-
57
-
58
-
59
-
60
-
61
-
62
-
63
-
64
-
65
-
66
-
67
-
68
-
69
-
70
-
71
-
72
-
73
-
74
-
75
-
76
-
77
-
78
-
79
-
80
-
81
-
82
-
83
-
84
-
85
-
86
-
87
-
88
-
89
-
90
 |
 |

11
Assembly Guide
Step 15
Install Upper Lat Tower Assembly
Parts:
• Upper Lat Tower Assembly
• Main Assembly
Hardware
(1:1):
•
6 Button Head Screws (3/8" X 3/4")
•
6 Washers (3/8")
Tool:
7/32" Hex Wrench
15-1
Position the Upper Lat Tower Assembly
over the Lower Lat Tower Assembly.
15-2
Slide the Upper Lat Tower onto the
Lower Lat Tower and secure with screws
and washers as shown.
Rods not shown
for clarity
Upper Lat Tower
Button Head
Screws
Flat
Washers
Flat
Washers
Button Head
Screws
Lower Lat Tower
TIGHTEN HARDWARE
Carefully go over the entire Bowflex
Xtreme
™
home gym and tighten all
hardware before using.