Brother International CP-2000 Owners Manual - English - Page 13
then use the same screws and hole to attach the enclosed wall-mount
 |
View all Brother International CP-2000 manuals
Add to My Manuals
Save this manual to your list of manuals |
Page 13 highlights
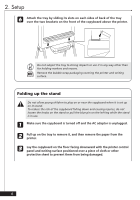
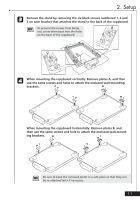
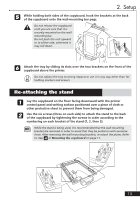
2. Setup 3 Remove the stand by removing the six black screws numbered 1, 2 and 3 on each bracket that attaches the stand to the back of the copyboard. + To prevent the screws from being lost, screw them back into the holes on the back of the copyboard. 4 When mounting the copyboard vertically: Remove plates A, and then use the same screws and holes to attach the enclosed wall-mounting brackets. A A When mounting the copyboard horizontally: Remove plates B, and then use the same screws and hole to attach the enclosed wall-mounting brackets. B B + Be sure to keep the removed plates in a safe place so that they can be re-attached later if necessary. 11
-
 1
1 -
2
-
3
-
4
-
5
-
6
-
7
-
 8
8 -
 9
9 -
 10
10 -
 11
11 -
 12
12 -
 13
13 -
 14
14 -
 15
15 -
 16
16 -
 17
17 -
 18
18 -
19
-
20
-
21
-
22
-
23
-
24
-
25
-
26
-
27
-
28
-
29
-
30
-
31
-
32
-
33
 |
 |

11
3
Remove the stand by removing the six black screws numbered 1, 2 and
3 on each bracket that attaches the stand to the back of the copyboard.
+
To prevent the screws from being
lost, screw them back into the holes
on the back of the copyboard.
4
When mounting the copyboard vertically: Remove plates A, and then
use the same screws and holes to attach the enclosed wall-mounting
brackets.
When mounting the copyboard horizontally: Remove plates B, and
then use the same screws and hole to attach the enclosed wall-mount-
ing brackets.
+
Be sure to keep the removed plates in a safe place so that they can
be re-attached later if necessary.
2. Setup
A
A
B
B